COMMODORE 64 USER’S GUIDE
TABLE OF CONTENTS
INTRODUCTION
1. SETUP
1.1. Unpacking and Connecting the Commodore 64
1.2. Installation
1.3. Optional Connections
1.4. Operation
1.5. Color Adjustment
2. GETTING STARTED
2.1. Keyboard
2.2. Back to Normal
2.3. Loading and Saving Programs
2.4. PRINT and Calculations
2.5. Precedence
2.6. Combining Things
3. BEGINNING BASIC PROGRAMMING
3.1. The Next Step GOTO
3.2. Editing Tips
3.3. Variables
3.4. IF … THEN
3.5. FOR … NEXT Loops
4. ADVANCED BASIC
4.1. Introduction
4.2. Simple Animation Nested Loops
4.3. INPUT
4.4. GET
4.5. Random Numbers and Other Functions
4.6. Guessing Game
4.7. Your Roll
4.8. Random Graphics CHR$ and ASC Functions
5. ADVANCED COLOR AND GRAPHIC COMMANDS
5.1. Color and Graphics
5.2. PRINTing Colors
5.3. Color CHR$ Codes
5.4. PEEKs and POKEs
5.5. Screen Graphics
5.6. Screen Memory Map
5.7. Color Memory Map
5.8. More Bouncing Balls
6. SPRITE GRAPHICS
6.1. Introduction to Sprites
6.2. Sprite Creation
6.3. Additional Notes on Sprites
6.4. Binary Arithmetic
7. CREATING SOUND
7.1. Using Sound if You’re Not a Computer Programmer
7.2. Structure of a Sound Program
7.3. Sample Sound Program
7.4. Making Music on Your Commodore 64
7.5. Important Sound Settings
7.6. Playing a Song on the Commodore 64
7.7. Creating Sound Effects
7.8. Sample Sound Effects To Try
8. ADVANCED DATA HANDLING
8.1. READ and DATA
8.2. Averages
8.3. Subscripted Variables One-Dimensional Arrays Averages Revisited
8.4. DIMENSION
8.5. Simulated Dice Roll With Arrays
8.6. Two-Dimensional Arrays
APPENDICES
Introduction
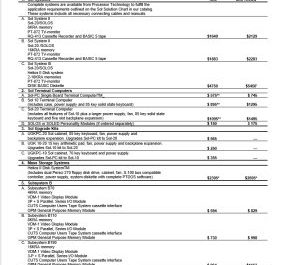
A: COMMODORE 64 ACCESSORIES AND SOFTWARE
B: ADVANCED CASSETTE OPERATION
C: COMMODORE 64 BASIC
D: ABBREVIATIONS FOR BASIC KEYWORDS
E: SCREEN DISPLAY CODES
F: ASCII AND CHR$ CODES
G: SCREEN AND COLOR MEMORY MAP
H: DERIVING MATHEMATICAL FUNCTIONS
I: PINOUTS FOR INPUT/OUTPUT DEVICES
J: PROGRAMS TO TRY
K: CONVERTING STANDARD BASIC PROGRAMS TO COMMODORE 64 BASIC
L: ERROR MESSAGES
M: MUSIC NOTE VALUES
N: BIBLIOGRAPHY
O: SPRITE REGISTER MAP
P: COMMODORE 64 SOUND CONTROL SETTINGS
INDEX
INTRODUCTION
Congratulations, on your purchase of one of the best computers in the world. You are now the proud owner of the COMMODORE 64. Commodore is known as The Friendly Computer company, and part of being friendly is giving you easy to read, easy to use and easy to understand instruction manuals. The COMMODORE 64 USER’S GUIDE is designed to give you all the information you need to properly set up your equipment, get acquainted with operating the COMMODORE 64, and give you a simple, fun start at learning to make your own program.
For those of you who don’t want to bother learning how to program, we’ve put all the information you need to use Commodore programs or other prepackaged programs and/or game cartridges (third party software) right up front. This means you don’t have to hunt through the entire book to get started.
Now let’s look at some of the exciting features that are just waiting for you inside your COMMODORE 64. First, when it comes to graphics you’ve got the most advanced picture maker in the microcomputer industry. We call it SPRITE GRAPHICS, and it allows you to design your own pictures in 4 different colors, just like the ones you see on arcade type video games. Not only that, the SPRITE EDITOR let’s you animate as many as 8 different picture levels at one time. The SPRITE EDITOR will soon be available as software program that you can load directly into your COMMODORE 64. You can move your creations anywhere on the screen, even pass one image in front of or behind another. Your COMMODORE 64 even provides automatic collision detection which instructs the computer to take the action you want when the sprites hit each other.
Next, the COMMODORE 64 has built-in music and sound effects that rival many well known music synthesizers. This part of your computer gives you 3 independent voices, each with a full 9 octave “piano-type” range. In addition you get 4 different waveforms (sawtooth, triangle, variable pulse, and noise), a programmable ADSR (attack, decay, sustain, release) envelope generator and a programmable high, low, and bandpass filter for the voices, and variable resonance and volume controls. If you want your music to play back with professional sound reproduction, the COMMODORE 64 allows you to connect your audio output to almost any high-quality amplification system.
While we’re on the subject of connecting the COMMODORE 64 to other pieces of equipment … your system can be expanded by adding accessories, known as peripherals, as your computing needs grow. Some of your options include items like a DATASSETTE recorder or as many as 5, VIC 1541 disk drive units for the programs you make and/or play. If you already have a VIC 1540 disk drive your dealer can update it for use with the COMMODORE 64. You can add a VIC dot matrix printer to give you printed copies of your programs, letters, invoices, etc… If you want to connect up with larger computers and their massive data bases then just plug in a VICMODEM cartridge, and get the services of hundreds of specialists and a variety of information networks through your home or business telephone. Finally if you’re one of those people interested in the wide variety of applications software available in CP/M, the COMMODORE 64 can be fitted with a plug-in Z-80 microprocessor.
Just as important as all the available hardware is the fact that this USER’S GUIDE will help you develop your understanding of computers. It won’t tell you everything there is to know about computers, but it will refer you to a wide variety of publications for more detailed information about the topics presented. Commodore wants you to really enjoy your new COMMODORE 64. And to have fun, remember: programming is not the kind of thing you can learn in a day. Be patient with yourself as you go through the USER’S GUIDE. But before you start, take a few minutes to fill out and mail in the owner/registration card that come with your computer. It will ensure that your COMMODORE 64 is properly registered with Commodore Headquarters and that you receive the most up-to-date information regarding future enhancements for your machine. Welcome to a whole new world of fun!
NOTE: Many programs are under development while this manual is being produced. Please check with your local Commodore dealer and with Commodore User’s Magazines and Clubs, which will keep you up to date on the wealth of applications programs being written for the Commodore 64, worldwide.
1. SETUP
1.1. Unpacking and Connecting the Commodore 64
The following step-by-step instructions show you how to connect the Commodore 64 to your television set, sound system, or monitor and make sure everything is working properly.
Before attaching anything to the computer, check the contents of the Commodore 64 container. Besides this manual, you should find the following items:
1. Commodore 64
2. Power supply (black box with an AC plug and supply cord)
3. Video cable
4. TV Switchbox (small silver box with short antenna leads).
If any items are missing check back with your dealer immediately for a replacement.
First, let’s take a look at the arrangement of the various connections on the computer and how each functions.
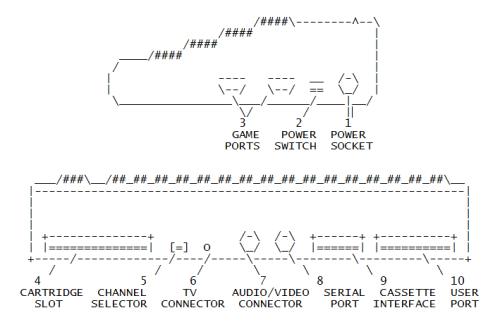
SIDE PANEL CONNECTIONS
1. POWER SOCKET. The free end of the cable from the power supply is
attached here to supply power to the Commodore 64.
2. POWER SWITCH. Turns on power to the Commodore 64.
3. GAME PORTS. Each game connector can accept a joystick or game
controller paddle, while the lightpen can only be plugged into the
game port closest to the front of your computer.
REAR CONNECTIONS
4. CARTRIDGE SLOT. The rectangular slot to the left accepts program or
game cartridges.
5. CHANNEL SELECTOR. Use this switch to select which TV channel the
computer’s picture will be displayed on.
6. TV CONNECTOR. This connector supplies both the picture and sound to
your television set.
7. AUDIO & VIDEO OUTPUT. This connector supplies direct audio, which
can be connected to a high quality sound system, and a “composite”
video signal, which can be fed into a television “monitor”.
8. SERIAL PORT. You can attach a printer or single disk drive directly
to the Commodore 64 through this connector.
9. CASSETTE INTERFACE. A DATASSETTE recorder can be attached to the
computer so you can save information entered for use at a later
time.
10. USER PORT. Various interface cartridges can be attached to the user
port, such as the VICMODEM, or RS 232 communication cartridge.
1.2. Installation
CONNECTIONS TO YOUR TV
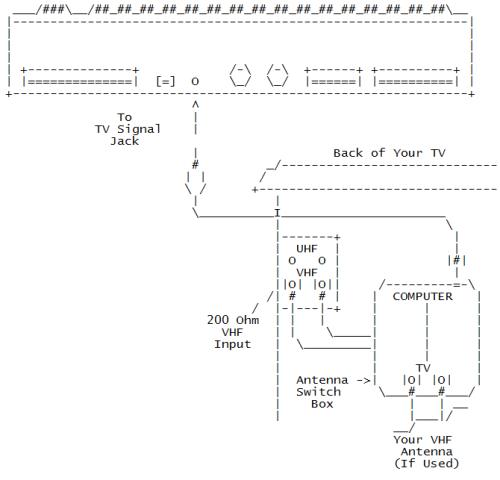
Connect the computer to your TV as shown below.
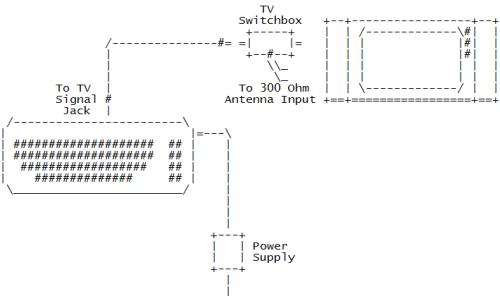
1. Attach one end of the TV cable to the phono type TV signal jack at the rear of the Commodore 64. Just push it in. Either end of the cable can be used.
2. Connect the other end of the cable to the antenna switchbox. Just push it in.
3. If you have a VHF antenna, disconnect it from your TV set.
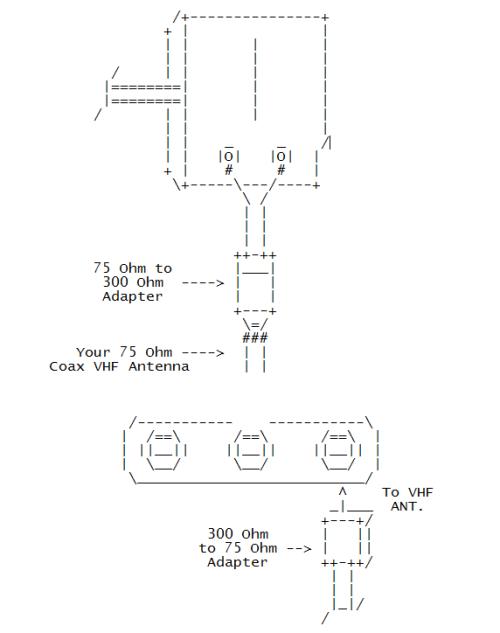
4. Connect your VHF antenna cable to the screw terminals labeled “antenna input” on the switchbox. If your antenna cable is the round 75-ohm coax type, use a 75-ohm to 300-ohm adapter (not supplied) to attach your antenna cable to the switchbox.
5. Connect the twin lead output cable of the antenna switchbox to the VHF antenna terminals of your TV set. If your set is one of the newer types with a round 75-ohm VHF connector, you will need a 300-ohm to 75-ohm converter (not supplied) to connect the switchbox to the 75-ohm VHF antenna input on the set.
6. Set the TV’s VHF tuner to the channel number indicated on the computer’s channel selector switch (channel 3 move the switch to the left, channel 4 move the switch to the right). If a strong local TV signal is present on one of these channels, select the other channel to avoid possible interference.
7. Plug the power supply cable into the power socket on the side of the Commodore 64. Just push it in. It is “keyed” to allow insertion in only one direction, so you can’t connect the power cord the wrong way. The power supply converts household current into the form the computer uses.
The Commodore 64 is now correctly connected. No additional connections are required to use the computer with your TV. The antenna switchbox will connect the computer to the TV when the slide switch is in the “computer” position. When the switch is in the “TV” position your set will operate normally.
1.3. Optional Connections
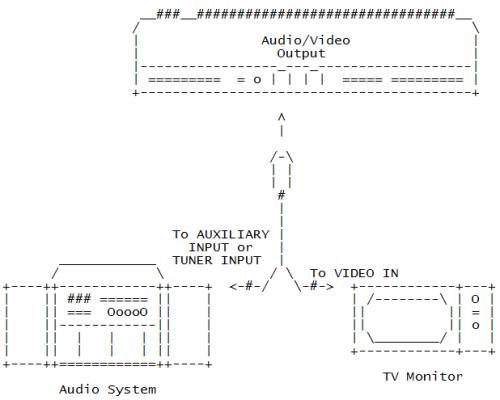
Since the Commodore 64 furnishes a channel of high fidelity sound, you may wish to play it through a quality amplifier to realize the best sound possible. In addition, the Commodore 64 also provides a standard “composite” video signal, which can be fed into a television monitor.
These options are made possible by the audio/video output jack on the rear panel of the Commodore 64. The easiest way to gain access to these signals is by using a standard 5-Pin DIN audio cable (not supplied). This cable connects directly to the audio/video connector on the computer. Two of the four pins on the opposite end of the cable contain the audio and video signals. Optionally, you can construct your own cable, using the pinouts shown in Appendix I as a guide.
Normally, the BLACK connector of the DIN cable supplies the AUDIO signal. This plug may be connected to the AUXILIARY input of an amplifier, or the AUDIO IN connector of a monitor or other video system, such as a video cassette recorder (VCR).
The WHITE or RED connector usually supplies the direct VIDEO signal. This plug is connected to the VIDEO IN connector of the monitor or video input section of some other video system, such as a VCR.
Depending on the manufacturer of your DIN cable, the color coding of the plugs may be different. Use the pinouts shown in Appendix I to match up the proper plugs if you don’t get an audio or video signal using the suggested connections.
If you purchased peripheral equipment, such as a VIC 1541 disk drive or a VIC 1525E printer, you may wish to connect it at this time. Refer to the user’s manuals supplied with any additional equipment for the procedure for connecting it to the computer.
A completed system might look like this.
[ Picture omitted ]
1.4. Operation
USING THE COMMODORE 64
1. Turn on the computer using the rocker switch on the right-side panel when you’re looking at the computer from the front.
2. After a few moments the following will be displayed on the TV screen:
**** COMMODORE 64 BASIC V2 ****
64K RAM SYSTEM 38911 BASIC BYTES FREE
READY.
_ <———– Cursor signals Commodore 64 is waiting for your input
3. If your TV has a manual fine tuning knob, adjust the TV until you get a clear picture.
4. You may also want to adjust the color and tint controls on the TV for the best display. You can use the color adjustment procedure described later to get everything setup properly.
When you first get a picture, the screen should appear mostly dark blue, with a light blue border and letters.
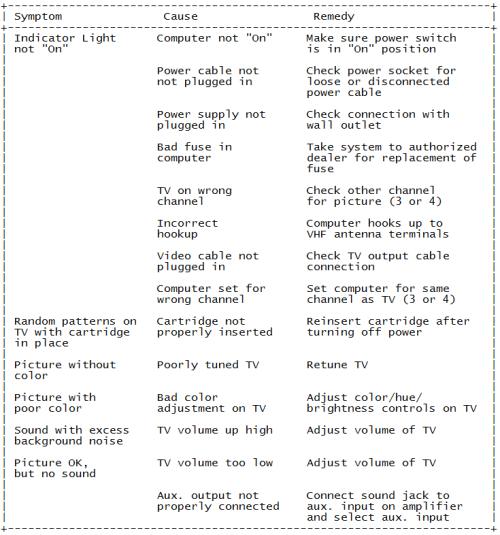
If you don’t get the expected results, recheck the cables and connections. The accompanying chart will help you isolate any problem.
TROUBLESHOOTING CHART
TIP: The COMMODORE 64 was designed to be used by everyone. But we at Commodore recognize that computer users may, occasionally, run into difficulties. To help answer your questions and give you some fun programming ideas, Commodore has created several publications to help you. You might also find that it’s a good idea to join a Commodore Users Club to help you meet some other COMMODORE 64 owners who can help you gain knowledge and experience.
CURSOR
The flashing square under READY is called the cursor and indicates where what you type on the keyboard will be displayed on the screen. As you type, the cursor will move ahead one space, as the original cursor position is replaced with the character you typed. Try typing on the keyboard and watch as characters you type are displayed on the TV screen.
1.5. Color Adjustment
There is a simple way to get a pattern of colors on the TV so you can easily adjust the set. Even though you may not be familiar with the operation of the computer right now, just follow along, and you’ll see how easy it is to use the Commodore 64.
First, look on the left side of the keyboard and locate the key marked <CTRL>. This stands for ConTRoL and is used, in conjunction with other keys, to instruct the computer to do a specific task.
[ Picture omitted ]
To use a control function, you hold down the <CTRL> key while depressing a second key.
Try this: hold the <CTRL> key while also depressing the <9> key. Then release both keys. Nothing obvious should have happened, but if you touch any key now, the screen will show the character displayed in reverse type, rather than normal type — like the opening message or anything you typed earlier.
Hold down the <SPACE BAR>. What happens? If you did the above procedure correctly, you should see a light blue bar move across the screen and then move down to the next line as long as the <SPACE BAR> is depressed.
**** COMMODORE 64 BASIC V2 ****
64K RAM SYSTEM 38911 BASIC BYTES FREE
READY.
____________________________
__________
Now, hold <CTRL> while depressing any of the other number keys. Each of them has a color marked on the front. Anything displayed from this point will be in that color. For example, hold <CTRL> and the <8> key and release both. Now hold the <SPACE BAR>.
Watch the display. The bar is now in yellow! In a like manner you can change the bar to any of the colors indicated on the number keys by holding <CTRL> and the appropriate key.
Change the bar to a few more different colors and then adjust the color and tint controls on your TV so the display matches the colors you selected.
The display should appear something like this:
**** COMMODORE 64 BASIC V2 ****
64K RAM SYSTEM 38911 BASIC BYTES FREE
READY.
_________________________ <—— <3> Red bar
_______ ____________ ____ <—— <3>,<6>,<7> Red, Green, Blue bars
__________ ______________ <—— <7>,<8> Blue, Yellow bars
____________ <—— <8> Yellow bar
At this point everything is properly adjusted and working correctly. The following chapters will introduce you to the BASIC language. However, you can immediately start using some of the many prewritten applications and games available for the Commodore 64 without knowing anything about computer programming.
Each of these packages contains detailed information about how to use the program. It is suggested, though, that you read through the first few chapters of this manual to become more familiar with the basic operation of your new system.
2. GETTING STARTED
2.1. Keyboard
Now that you’ve got everything set up and adjusted, please take a few moments to familiarize yourself with the keyboard which is your most important means of communication with the Commodore 64. You will find the keyboard similar to a standard typewriter keyboard found in most areas. There are, however, a number of new keys which control specialized functions. What follows is a brief description of the various keys and how they function. The detailed operation of each key will be covered in later sections.
[ Picture omitted ]
<RETURN>
The <RETURN> key signals the computer to look at the information that you typed and enters that information into memory.
<SHIFT>
The <SHIFT> key works like that on a standard typewriter. Many keys are capable of displaying two letters or symbols and two graphic characters. In the “upper/lower case” mode the <SHIFT> key gives you standard upper case characters. In the “upper case/graphic” mode the <SHIFT> key will display the graphic character on the right hand side of the front part of the key. In the case of special YELLOW function keys, the <SHIFT> key will give you the function marked on the front of the key.
EDITING
No one is perfect, and the Commodore 64 takes that into account. A number of editing keys let you correct typing mistakes and move information around on the screen.
<CRSR>
There are two keys marked <CRSR> (CuRSoR), one with up and down arrows, the other with left and right arrows. You can use these keys to move the cursor up and down or left and right. In the unshifted mode, the <CRSR> keys will let you move the cursor down and to the right. Using the <SHIFT> key and <CRSR> keys allows the cursor to be moved either up or to the left. The cursor keys have a special repeat feature that keeps the cursor moving until you release the key.
<INST/DEL>
If you hit the <INST/DEL> key, the cursor will move back a space, erasing (DELeting) the previous character you typed. If you’re in the middle of a line, the character to the left is deleted and the characters to the right automatically move together to close up the space. A <SHIFT>ed <INST/DEL> allows you to INSerT information on a line. For example, if you noticed a typing mistake in the beginning of a line — perhaps you left out part of the name — you could use the <CRSR> key to move back to the error and then hit <INST/DEL> to insert a space. Then just type in the missing later.
<CLR/HOME>
<CLR/HOME> positions the cursor at the “HOME” position of the screen, which is the upper left-hand corner. A shifted <CLR/HOME> will clear the screen and place the cursor in the home position.
<RESTORE>
<RESTORE> operates as the name implies. It stores the computer to the normal state it was in before you changed things with a program or some command. A lot more will be said on this in later chapters.
FUNCTION KEYS
The four function keys on the right side of the keyboard can be “programmed” to handle a variety of functions. They can be defined in many ways to handle repetitive tasks.
[ Picture omitted ]
<CTRL>
The <CTRL> key, which stands for ConTRoL, allows you to set colors, and perform other specialized functions. You hold the <CTRL> key down while depressing another designated key to get a control function. You had an opportunity to try the <CTRL> key when you changed text colors to create different color bars during the setup procedure.
<RUN/STOP>
Normally, depressing the <RUN/STOP> key will stop the execution of a BASIC program. It signals the computer to STOP doing something. Using the <RUN/STOP> key in the shifted mode will allow you to automatically load a program from tape.
<C=> COMMODORE KEY
The Commodore key <C=> performs a number of functions. First, it allows you to move between the text and graphic display modes.
When the computer is first turned on, it is in the upper case/graphic mode, that is, everything you type is in upper case letters. As was mentioned, using the <SHIFT> key in this mode will display the graphic on the right side of the keys.
If you hold down the <C=> key and <SHIFT> key, the display will change to upper and lower case. Now, if you hold down the <C=> key and any other key with a graphic symbol, the graphic shown on the left side of the key will be displayed.
To get back into the upper case/graphic mode hold down the <C=> key and <SHIFT> key again.
The second function of the <C=> key is to allow you access to a second set of eight text colors. By holding down the <C=> key and any of the number keys, any text now typed will be in the alternate color available from the key you depressed. Chapter 5 lists the text colors available from each key.
2.2. Back to Normal
Now that you’ve had a chance to look over the keyboard, let’s explore some of the Commodore 64’s many capabilities.
If you still have the color bars on the screen from adjusting your TV set, hold <SHIFT> and <CLR/HOME>. The screen should clear and the cursor will be positioned in the “home” spot (upper left-hand corner of the screen).
Now, simultaneously hold <C=> and the <7> key. This sets the text color back to light blue. There is one more step needed to get everything back to normal. Hold <CTRL> and <0> (Zero not Oh!). This sets the display mode back to normal. If you remember, we turned REVERSE type on with the <CTRL><9> to create the color bars (the color bars were actually reversed spaces). If we were in the normal text mode during the color test, the cursor would have moved, but just left blank spaces.
TIP:
Now that you’ve done things the hard way, there is a simple way to reset the machine to the normal display. First press the <RUN/STOP> key and then press the <RESTORE> key. <RUN/STOP> must always be held down in order to use the <RESTORE> key function.
This will clear the screen and return everything to normal. If there is a program in the computer, it will be left untouched. This is a good sequence to remember, especially if you do a lot of programming.
If you wish to reset the machine as if it were turned off and then switched on again, type, SYS 64759 and press <RETURN>. Be careful using this command! It will wipe out any program or information that is currently in the computer.
2.3. Loading and Saving Programs
One of the most important features of the Commodore 64 is the ability to save and load programs to and from cassette tape or disk.
This capability allows you to save the programs you write for use at a later time, or purchase prewritten programs to use with the Commodore 64. Make sure that either the disk drive or cassette unit is attached properly.
LOADING PREPACKAGED PROGRAMS
For those of you interested in using only prepackaged programs available on cartridges, cassette, or disk here’s all you have to do:
1. CARTRIDGES: The Commodore 64 computer has a line of programs and games on cartridge. The programs offer a wide variety of business and personal applications and the games are just like real arcade games — not imitations. To load these games, first turn on your TV set. Next turn OFF your Commodore 64. YOU MUST TURN OFF YOUR COMMODORE 64 BEFORE INSERTING OR REMOVING CARTRIDGES OR YOU MAY DAMAGE THE CARTRIDGE AND/OR YOUR COMMODORE 64! Third insert the cartridge. Now turn your Commodore 64 on. Finally type the appropriate START key as is listed on the instruction sheet that comes with each game.
2. CASSETTES: Use your DATASSETTE recorder and the ordinary audio cassettes that came as part of your prepackaged program. Make sure the tape is completely rewound to the beginning of the first side. Then just type LOAD. The computer will answer with PRESS PLAY ON TAPE, so you respond by pressing play on your datassette machine. At this point the computer screen will go blank until the program is found. The computer will say FOUND (PROGRAM NAME) on the screen. Now you press down on the <C=> key. This will actually load the program into the computer. If you want to stop the loading simply press <RUN/STOP> key.
3. DISK: Using your disk drive, carefully insert the preprogrammed disk so that the label on the disk is facing up and is closest to you. Look for a little notch on the disk (it might be covered with a little piece of tape). If you’re inserting the disk properly the notch will be on the left side. Once the disk is inside close the protective gate by pushing down on the lever. Now type LOAD “PROGRAM NAME”,8 and hit the <RETURN> key. The disk will make noise and your screen will say:
SEARCHING FOR PROGRAM NAME
LOADING
READY.
_
When the READY comes on and the _ is on, just type RUN, and your prepackaged software is ready to use.
LOADING PROGRAMS FROM TAPE
Loading a program back from tape or disk is just as simple. For tape, rewind the tape back to the beginning and type:
LOAD “PROGRAM NAME”
If you don’t remember the program name, just type LOAD and the first program on the tape will be loaded into memory. After you press <RETURN> the computer will respond with:
PRESS PLAY ON TAPE
After you depress the play key, the screen will blank, turning the border color of the screen as the computer searches for the program. When the program is found, the screen will display:
FOUND PROGRAM NAME
To actually load the program, depress the <C=> key. To abandon the loading procedure, hit <RUN/STOP>. If you hit the Commodore key, the screen will again turn the border color while the program is loaded. After the loading procedure is completed, the screen will return to the normal state and the READY prompt will reappear.
LOADING PROGRAMS FROM DISK
Loading a program from disk follows the same format. Type:
LOAD “PROGRAM NAME”,8
The 8 is the code for the disk, so you’re just letting the computer know that you want the program loaded from the disk. After you hit <RETURN> the disk will start whirring and the display shows:
SEARCHING FOR PROGRAM NAME
LOADING
READY.
_
NOTE:
When you load a new program into the computer’s memory, any instructions that were in the computer previously will be erased. Make sure you save a program you’re working on before loading a new one. Once a program has been loaded, you can RUN it, LIST, or make changes and re-save the new version.
SAVING PROGRAMS ON TAPE
After entering a program, if you wish to save it on tape, type:
SAVE “PROGRAM NAME”
“PROGRAM NAME” can be up to 16 characters long. After you hit <RETURN> the computer will respond with:
PRESS PLAY AND RECORD ON TAPE
Press both the record and play keys on the datassette. The screen will blank, turning the color of the border.
After the program is saved on tape, the READY prompt will reappear, indicating that you can start working on another program, or just turn off the computer for a while.
SAVING PROGRAMS ON DISK
Saving a program on disk is even simpler. Type:
SAVE “PROGRAM NAME”,8
The 8 is the code for the disk, so you’re just letting the computer know you want the program saved to disk.
After you press <RETURN> the disk will start to turn and the computer will respond with:
SAVING PROGRAM NAME
OK
READY.
_
2.4. PRINT and Calculations
Now that you’ve gotten through a couple of the more difficult operations you need in order to keep the programs you like, lets start making some programs for you to save.
Try typing the following exactly as shown:
PRINT “COMMODORE 64” <—– Type this line and hit <RETURN>
COMMODORE 64 <—— Computer typed
READY.
_
If you make a typing mistake, use the <INST/DEL> key to erase the character immediately to the left of the cursor. You can delete as many characters as necessary.
Let’s see what went on in the example above. First, you instructed (commanded) the computer to PRINT whatever was inside the quote marks. By hitting <RETURN> you told the computer to do what you instructed and COMMODORE 64 was printed on the screen. When you use the PRINT statement in this form, whatever is enclosed in quotes is printed exactly as you typed it. If the computer responded with:
?SYNTAX ERROR
ask yourself if you made a mistake in typing, or forgot the quote marks. The computer is precise and expects instructions to be given in a specific form.
But don’t get worried; just remember to enter things as we present them in the examples and you’ll get along great with the Commodore 64. Remember, you can’t hurt the computer by typing on it, and the best way to learn BASIC is to try different things and see what happens. PRINT is one of the most useful and powerful commands in the BASIC language. With it, you can display just about anything you wish, including graphics and results of computations.
For example, try the following. Clear the screen by holding down the <SHIFT> key and <CLR/HOME> key and type (be sure to use the ‘1’ key for one, not a letter ‘I’):
PRINT 12 + 12 <—– Type this line and hit <RETURN>
24 <—— Computer printed the answer
READY.
_
What you’ve discovered is that the Commodore 64 is a calculator in its basic form. The result of “24” was calculated and printed automatically. In fact, you can also perform subtraction, multiplication, division, exponentiation, and advanced math functions such as calculating square roots, etc. And you’re not limited to a single calculation on a line, but
more on that later.
Note that in the above form, PRINT behaved differently from the first example. In this case, a value or result of a calculation is printed, rather than the exact message you entered because the quote marks were omitted.
ADDITION
The plus sign (+) signals addition: we instructed the computer to print the result of 12 added to 12. Other arithmetic operations take a similar form to addition. Remember to always hit <RETURN> after typing PRINT and the calculation.
SUBTRACTION
To subtract, use the conventional minus (-) sign. Type:
PRINT 12 – 9 <—– Hit <RETURN>
3
MULTIPLICATION
If you wanted to multiply 12 times 12, use the asterisk (*) to represent multiplication. You would type:
PRINT 12 * 12 <—– Hit <RETURN>
144
DIVISION
Division uses the familiar “/”. For example, to divide 144 by 12, type:
PRINT 144 / 12 <—– Hit <RETURN>
12
EXPONENTIATION
In a like fashion, you can easily raise a number to a power (this is the same as multiplying a number by itself a specified number of times). The ‘^’ (up arrow) signifies exponentiation.
PRINT 12 ^ 5
248832
This is the same as typing:
PRINT 12 * 12 * 12 * 12 * 12
248832
TIP:
BASIC has number of shortcut ways of doing things. One such way is abbreviating BASIC commands (or keywords). A ‘?’ can be used in place of PRINT, for example. As we go on you’ll be presented with many commands; Appendix D shows the abbreviations for each and what will be displayed on the screen when you type the abbreviated form.
The last example brings up another important point: many calculations may be performed on the same line, and they can be of mixed types. You could calculate this problem:
? 3 + 5 – 7 + 2 (The ‘?’ replaces the word PRINT)
3
Up to this point we’ve just used small numbers and simple examples. However, the Commodore 64 is capable of more complex calculations. You could, for example, add a number of large figures together. Try this, but don’t use any commas, or you’ll get an error:
? 123.45 + 345.78 + 7895.687
8364.917
That looks fine, but now try this:
? 12123123.45 + 345.78 + 7895.687
12131364.9
If you took the time to add this up by hand, you would get a different result.
What’s going on here? Even though the computer has a lot of power, there’s a limit to the numbers it can handle. The Commodore 64 can work with numbers containing 10 digits. However when a number is printed, only nine digits are displayed.
So in our example, the result was “rounded” to fit in the proper range. The Commodore 64 rounds up when the next digit is five or more; it rounds down when the next digit is four or less. Numbers between 0.01 and 999,999,999 are printed using standard notation. Numbers outside this range are printed using scientific notation. Scientific notation is just a process of expressing a very large or small number as a power of 10.
If you type:
? 123000000000000000
1.23E+17
This is the same as 1.23 * 10^17 and is used just to keep things tidy. There is a limit to the numbers the computer can handle, even in scientific notation. The limits are:
Largest: +/- 1.70141183E+38
Smallest (different from zero): +/- 2.93873588-39
2.5. Precedence
If you tried to perform some mixed calculations different from the examples we showed earlier, you might not have gotten the results that you expected. The reason is that the computer performs calculations in a certain order. In this calculation:
20 + 8 / 2
you can’t tell whether the answer should be 24 or 14 until you know in which order to perform the calculations. If you add 20 to 8 divided by 2 (or 4), then the result is 24. But, if you add 20 plus 8 and then divide by 2 the answer is 14. Try the example and see what result you get. The reason you got 24 is because the Commodore 64 performs calculations
left to right according to the following:
First : – minus sign indicating negative numbers
Second: ^ exponentiation, left to right
Third : */ multiplication and divisions, left to right
Fourth: +- addition and subtraction, left to right
Follow along according to the order of precedence, and you will see that it the above example the division was performed first and then the addition to get a result of 24.
Make up some problems of your own and see if you can follow along and predict the results according to the rules set down above. There’s also an easy way to alter the precedence process by using parentheses to set off which operations you want performed first. For example, if you want to divide 35 by 5-plus-2 you type:
? 35 / 5 + 2
9
you will get 35 divided by 5 with 2 added to the answer, which is not what you intended at all. To get what you really wanted, try this:
? 35 / (5 + 2)
5
What happens now is that the computer evaluates what is contained in the parentheses first. If there are parentheses within parentheses, the innermost parentheses are evaluated first.
Where there are a number of parentheses on a line, such as:
? (12 + 9) * (6 + 1)
147
the computer evaluates them left to right. Here 21 would be multiplied by 7 for the result 147.
2.6. Combining Things
Even though we’ve spent a lot of time in areas that might not seem very important, the details presented here will make more sense once you start to program, and will prove invaluable.
To give you an idea how things fit in place, consider the following: how could you combine the two types of PRINT statements we’ve examined so far to print something more meaningful on the screen?
We know that by enclosing something within quote marks prints that information on the screen exactly as it was entered, and by using math operators, calculations can be performed. So why not combine the two types of PRINT statements like this:
? “5 * 9 = “; 5 * 9 (Semicolon means no space)
5 * 9 = 45
Even though this might seem a bit redundant, what we’ve done is simply use both types of print statements together. The first part prints “5 * 9 =” exactly as it was typed. The second part does the actual work and prints the result, with the semicolon separating the message part of the statement from the actual calculation.
You can separate the parts of a mixed PRINT statement with punctuation for various formats. Try a comma in place of the semicolon and see what happens.
For the curious, the semicolon causes the next part of the statement to be printed immediately after the previous part, without any spaces. The comma does something different. Even though it is an acceptable separator, it spaces things out more. If you type:
? 2,3,4,5,6 <——————————– Hit <RETURN>
2 3 4 5
6
the numbers will be printed across the screen and down on to the next line.
The Commodore 64’s display is organized into 4 areas of 10 columns each. The comma tabs each result into the next available area. Since we asked for more information to be printed than would fit on one line, (we tried to fit five 10-column areas on one line) the last item was moved down to the next line.
The basic difference between the comma and semicolon in formatting PRINT statements can be used our advantage when creating more complex displays: it allow us to create some sophisticated results very easily.
3. BEGINNING BASIC PROGRAMMING
3.1. The Next Step
Up to now we’ve performed some simple operations by entering a single line of instructions into the computer. Once <RETURN> was depressed, the operation that we specified was performed immediately. This is called the IMMEDIATE or CALCULATOR mode.
But to accomplish anything significant, we must be able to have the computer operate with more than a single line statement. A number of statements combined together is called a PROGRAM and allows you to use the full power of the Commodore 64.
To see how easy it is to write your first Commodore 64 program, try this:
Clear the screen by holding down the <SHIFT> key, and then depressing the <CLR/HOME> key.
Type NEW and press <RETURN>. (This just clears out any numbers that might have been left in the computer from your experimenting.)
Now type the following exactly as shown (remember to hit <RETURN> after each line)
10 ? “COMMODORE 64”
20 GOTO 10
Now, type RUN and hit <RETURN> — watch what happens. Your screen will come alive with COMMODORE 64. After you’ve finished watching the display, hit <RUN/STOP> to stop the program.
COMMODORE 64
COMMODORE 64
COMMODORE 64
COMMODORE 64
COMMODORE 64
COMMODORE 64
COMMODORE 64
COMMODORE 64
COMMODORE 64
COMMODORE 64
COMMODORE 64
COMMODORE 64
BREAK IN 10
READY
What we’ve done is introduce two new BASIC commands, and provided some control over our runaway little print program introduced at the start of this chapter.
IF … THEN adds some logic to the program. If says IF a condition holds true THEN do something. IF the condition no longer holds true, THEN do the next line in the program.
A number of conditions can be set up in using an IF … THEN statement:
SYMBOL MEANING
< Less Than
> Greater Than
= Equal To
<> Not Equal To
>= Greater Than or Equal To
<= Less Than or Equal To
The use of any one of these conditions is simple, yet surprisingly powerful.
10 CT = 0
+–> 20 ? “COMMODORE 64”
| 30 CT = CT + 1
+-<- 40 IF CT < 5 THEN 20
|
!
50 END
In the sample program, we’ve set up a “loop” that has some constrains placed on it by saying: IF a value is less than some number THEN do omething.
Line 10 sets CT (CounT) equal to 0. Line 20 prints our message. Line 30 adds one to the variable CT. This line counts how many times we do the loop. Each time the loop is executed, CT goes up by one.
Line 40 is our control line. If CT is less than 5, meaning we’ve executed the loop less than 5 times, the program goes back to line 20 and prints again. When CT becomes equal to 5 — indicating 5 COMMODORE 64’s were printed — the program goes to line 50, which signals to END the program.
Try program and see what we mean. By changing the CT limit in line 40 you can have any number of lines printed.
IF … THEN has a multitude of other uses, which we’ll see in future examples.
3.5 FOR … NEXT Loops
There is a simpler, and preferred way to accomplish what we did in the previous example by using a FOR … NEXT loop. Consider the following:
NEW
10 FOR CT = 1 TO 5
20 ? “COMMODORE 64”
30 NEXT CT
RUN
COMMODORE 64
COMMODORE 64
COMMODORE 64
COMMODORE 64
COMMODORE 64
As you can see, the program has become much smaller and more direct. CT starts at 1 in line 10. Then, line 20 does some printing. In line 30 CT is incremented by 1. The NEXT statement in line 30 automatically sends the program back to line 10 where the FOR part of the FOR … NEXT statement is located. This process will continue until CT reaches the limit you entered.
The variable used in a FOR … NEXT loop can be incremented by smaller amounts than 1, if needed. Try this:
NEW
10 FOR NB = 1 TO 10 STEP .5
20 PRINT NB,
30 NEXT NB
RUN
1 1.5 2 2.5
3 3.5 4 4.5
5 5.5 6 6.5
7 7.5 8 8.5
9 9.5 10
If you enter and run this program, you’ll see the numbers from 1 to 10, by .5, printed across the display.
All we’re doing here is printing the values that NB assumes as it goes through the loop.
You can even specify whether the variable is increasing or decreasing. Substitute the following for line 10:
10 FOR NB = 10 TO 1 STEP -.5
and watch the opposite occur, as NB goes from 10 to 1 in descending order.
4. ADVANCED BASIC
4.1. Introduction
The next few chapters have been writtenfor people who have become relatively familiar with the BASIC programming language and the concepts necessary to write more advanced programs.
For those of you who are just staring to learn how to program, you may find some of the information a bit too technical to understand completely. But take heart … because for these two fun chapters, SPRITE GRAPHICS and CREATING SOUND, we’ve set up some simple examples that are written for the new user. The examples will give you a good idea of how to use the sophisticated sound and graphics capabilities available on your COMMODORE 64.
If you decide that you want to learn more about writing programs in BASIC, we’ve put a bibliography (Appendix N) in the back of this manual. If you are already familiar with BASIC programming, these chapters will help you get started with advanced BASIC programming techniques. More detailed information can be found in the COMMODORE 64 PROGRAMMER’S REFERENCE MANUAL, available through your local Commodore dealer.
4.2. Simple Animation
Let’s exercise some of the Commodore 64’s graphic capabilities by putting together what we’ve seen so far, together with a few new concepts. If you’re ambitious, type in the following program and see what happens. You will notice that within the print statements we can also include cursor controls and screen commands. When you see something like
{CRSR LEFT} in a program listing, hold the <SHIFT> key and hit the <CRSR LEFT/RIGHT> key. The screen will show the graphic representation of a cursor left (two vertical reversed bars). In the same way, pressing <SHIFT> and <CLR/HOME> shows as a reversed heart.
NEW
10 REM BOUNCING BALL
20 PRINT “{CLR/HOME}”
25 FOR X=1 to 10 : PRINT “{CRSR DOWN}” : NEXT
30 FOR BL=1 to 40
40 PRINT” O{CRSR LEFT}”; : REM (O is a SHIFT-Q)
50 FOR TM=1 TO 5
60 NEXT TM
70 NEXT BL
75 REM MOVE BALL RIGHT TO LEFT
80 FOR BL=40 TO 1 STEP -1
90 PRINT” {CRSR LEFT}{CRSR LEFT}O{CRSR LEFT}”;
100 FOR TM=1 TO 5
110 NEXT TM
120 NEXT BL
130 GOTO 20
NOTES: The ‘:’ in lines 25 and 40 indicates new command. The spaces in lines 40 and 90 are intentional.
TIP: All words in this text will be completed on one line. However, as long as you don’t hit <RETURN> your 64 will automatically move to the next line even in the middle of a word.
The program will display a bouncing ball moving from left to right, and back again, across the screen. If we look at the program closely, you can see how this feat was
accomplished.
10 REM BOUNCING BALL
+—-> 20 PRINT “{CLR/HOME}”
| +–> 25 FOR X=1 to 10 : PRINT “{CRSR DOWN}” : NEXT
| | 30 FOR BL=1 to 40
| | 40 PRINT” O{CRSR LEFT}”; : REM (O is a SHIFT-Q)
| | +> 50 FOR TM=1 TO 5
| | +- 60 NEXT TM
| +— 70 NEXT BL
| 75 REM MOVE BALL RIGHT TO LEFT
| +–> 80 FOR BL=40 TO 1 STEP -1
| | 90 PRINT” {CRSR LEFT}{CRSR LEFT}O{CRSR LEFT}”;
| | +> 100 FOR TM=1 TO 5
| | +- 110 NEXT TM
| +— 120 NEXT BL
+—– 130 GOTO 20
Line 10 is a REMark that just tells what the program does; it has no effect on the program itself. Line 20 clears the screen of any information.
Line 25 PRINTs 10 cursor-down commands. This just positions the ball in the middle of the screen. If line 25 was eliminated the ball would move across the top line of the screen.
Line 30 sets up a loop for moving the ball the 40 columns from the left to right.
Line 40 does a lot of work. It first prints a space to erase the previous ball positions, then it prints the ball, and finally it performs a cursor-left to get everything ready to erase the current ball position again.
The loop set up in lines 50 and 60 slows the ball down a bit by delaying the program. Without it, the ball would move too fast to see. Line 70 completes the loop that prints balls on the screen, set up in line 30. Each time the loop is executed, the ball moves another space to the right. As you notice from the illustration, we have set up a loop within a loop.
This is perfectly acceptable. The only time you get in trouble is when the loops cross over each other. It’s helpful in writing programs to check yourself as illustrated here tomake sure the logic of a loop is correct.
To see what would happen if you cross a loop, reverse the statements in lines 60 and 70. You will get an error because the computer gets confused and cannot figure out what’s going on.
Lines 80 through 120 just reverse the steps in the first part of the program, and move the ball from right to left. Line 90 is slightly different from line 40 because the ball is moving in the opposite direction (we have to erase the ball to the right and move to the left). And when that’s all done the program goes back to line 20 to start the whole process over again. Pretty neat! To stop the program hold down <RESTORE> and hit <RUN/STOP>.
For a variation on the program, edit line 40 to read:
40 PRINT”O”; To make the O, hold SHIFT key down and hit the letter “Q”
Run the program and see what happens now. Because we left out the cursor control, each ball remains on the screen until erased by the ball moving right to left in the second part of the program.
4.3. INPUT
Up to now, everything within a program has been set before it is run. Once the program was started, nothing could be changed. INPUT allows us to pass new information to a program as it is running and have that new information acted upon.
To get an idea of how INPUT works, type NEW <RETURN> and enter this short program:
10 INPUT A$
20 PRINT “YOU TYPED: “;A$
30 PRINT
40 GOTO 10
RUN
? COMMODORE 64 <————— You typed
YOU TYPED: COMMODORE 64 <—– Computer responded
What happens when you run this simple program. A question mark will appear, indicating that the computer is waiting for you to type something. Enter any character, or group of characters, from the keyboard and hit <RETURN>. The computer will then respond with “YOU TYPED:” followed by the information you entered.
This may seem very elementary, but imagine what you can have the computer do with any information you enter.
You can INPUT either numeric or string variables, and even have the INPUT statement prompt the user with a message. The format of INPUT is:
INPUT “PROMPT MESSAGE”;VARIABLE
^
+—- Prompt must be 38 characters or less
Or, just:
INPUT VARIABLE
NOTE: To get out of this program hold down the <RUN/STOP> and <RESTORE> keys.
The following program is not only useful, but demonstrates a lot of what has been presented so far, including the new input statement.
NEW
1 REM TEMPERATURE CONVERSION PROGRAM
5 PRINT “{CLR/HOME}”
10 PRINT “CONVERT FROM FAHRENHEIT OR CELSIUS (F/C): “: INPUT A$
20 IF A$ = “” THEN 10 <———————– No space within quotes
30 IF A$ = “F” THEN 100
40 IF A$ <> “C” THEN 10
50 INPUT “ENTER DEGREES CELSIUS: “;C
60 F = (C*9)/5+32
70 PRINT C;” DEG. CELSIUS =”; F ;”DEG. FAHRENHEIT”
80 PRINT
90 GOTO 10
100 INPUT “ENTER DEGREES FAHRENHEIT: “;F <- Don’t forget to hit RETURN
110 C = (F-32)*/5/9
120 PRINT F;” DEG. FAHRENHEIT =”; C ;”DEG. CELSIUS”
130 PRINT
140 GOTO 10
If you entered and run this program, you’ll see INPUT in action. Line 10 uses the input statement to not only gather information, but also print our prompt. Also notice that we can ask for either a number or string (by using a numeric or string variable).
Lines 20, 30, and 40 do some checks on what is typed in. In line 20, if nothing is entered (just <RETURN> is hit), then the program goes back to line 10 and requests the input again. In line 30, if F is typed, you know the user wants to convert a temperature in degrees Fahrenheit to Celsius, so the program branches to the part that does that conversion.
Line 40 does one more check. We know there are only two valid choices the user can enter. To get to line 40, the user must have typed some character other than F. Now, a check is made to see if that character is a C; if not, the program requests input again. This may seem like a lot of detail, but it is good programming practice. A user not familiar with the program can become very frustrated if it does something strange because a mistake was made entering information.
Once we determine what type of conversion to perform, the program does the calculation and prints out the temperature entered and the converted temperature.
The calculation is just straight math, using the established formula for temperature conversion. After the calculation is finished and answer printed, the program loops back and starts over. After running, the screen might look like this:
CONVERT FROM FAHRENHEIT OR CELSIUS (F/C): ? F
ENTER DEGREES FAHRENHEIT: 32
32 DEG. FAHRENHEIT = 0 DEG. CELSIUS
CONVERT FROM FAHRENHEIT OR CELSIUS (F/C): ?
After running the program, make sure to save it on disk or tape. This program, as well as others presented throughout the manual, can form the base of your program library.
4.4. GET
GET allows you to input one character at a time from the keyboard without hitting <RETURN>. This really speeds entering data in many applications. Whatever key is hit is assigned variable to the variable you specify with GET.
The following routine illustrates how GET works:
NEW
1 PRINT “{CLR/HOME}”
10 GET A$: IF A$ = “” THEN 10
20 PRINT A$; ^
30 GOTO 10 |————– No SPACE here
If you RUN the program, the screen will clear and each time you hit a key, line 20 will print it on the display, and then GET another character. It is important to note that the character entered will not be displayed unless you specifically PRINT it to the screen, as we’ve done here.
The second statement on line 10 is also important. GET continually works, even if no key is pressed (unlike INPUT that waits for a response), so the second part of this line continually checks the keyboard until a key is hit.
See what happens if the second part of line 10 is eliminated. To stop this program you can hit the <RUN/STOP> and <RESTORE> keys. The first part of the temperature conversion program could easily be rewritten to use GET. LOAD the temperature conversion program, and modify lines 10,20 and 40 as shown:
10 PRINT “CONVERT FROM FAHRENHEIT OR CELSIUS (F/C) ?”
20 GET A$: IF A$ = “” THEN 20 <—————- No space within quotes
30 IF A$ <> “C” THEN 20
This modification will make the program operate smoother, as nothing will happen unless the user types in one of the desired responses to select the type of conversion.
Once this change is made, make sure you save the new version of the program.
4.5. Random Numbers and Other Functions
The Commodore 64 contains a number of functions that are used to perform special operations. Functions could be thought of as built-in programs included in BASIC. But rather than typing in a number of statements each time you need to perform a specialized calculation, you just type the command for the desired function and the computer does the rest.
Many times when designing a game or educational program, you need to generate a random number, to simulate the throw of dice, for example. You could certainly write a program that would generate these numbers, but an easier way to call upon the RaNDom number function. To see what RND actually does, try this short program:
NEW
10 FOR X = 1 TO 10
20 PRINT RND(1), <———— If you leave out the comma, your list
30 NEXT of numbers will appear as 1 column
After running the program, you will see a display like this:
.789280697 .664673958
.256373663 .0123442287
.682952381 3.90587279E-04
.402343724 .879300926
.158209063 .245596701
Your numbers don’t match? Well, if they did we would all be in trouble, as they should be completely random!
Try running the program a few more times to verify that the results are always different. Even if the numbers don’t follow any pattern, you should start to notice that some things remain the same every time the program is run.
First, the results are always between 0 and 1, but never equal to 0 or 1. This will certainly never do if we want to simulate the random toss of dice, since we’re looking for numbers between 1 and 6.
The other important feature to look for is that we are dealing with real numbers (with decimal places). This could also be a problem since whole (integer) numbers are often needed.
There are a number of simple ways to produce numbers from the RND function in the range desired.
Replace line 20 with following and run the program again:
20 PRINT 6*RND(1),
RUN
3.60563664 4.53660853
5.47238963 8.40850227
3.19265054 4.39547668
3.16331095 5.50620749
9.32527884 4.17090293
That cured the problem of not having results larger than 1, but we still have the decimal part of the result to deal with. Now, another function can be called upon.
The INTeger function converts real numbers into integer values.
Once more, replace line 20 with the following and run the program to see the effect of the change:
20 PRINT INT(6*RND(1)),
RUN
2 3 1 0
2 4 5 5
0 1
That took care of a lot, getting us closer to our original goal of generating random numbers between 1 and 6. If you examine closely what we generated this last time, you’ll find that the results range from 0 to 5, only.
As a last step, add a one to the statement, as follows:
20 PRINT INT(6*RND(1))+1,
Now, we have achieved the desired results.
In general, you can place a number, variable, or any BASIC expression within the parentheses of the INT function. Depending on the range desired, you just multiply the upper limit by the RND function. For example, to generate random numbers between 1 and 25, you could type:
20 PRINT INT(25*RND(1))+1,
The general formula for generating a set of random numbers in a certain range is:
NUMBER=INT(LOWER+(UPPER-LOWER+1)*RND(1))
4.6. Guessing Game
Since we’ve gone to some lengths to understand random numbers, why not put this information to use? The following game not only illustrates a good use of random numbers, but also introduces some additional programming theory.
In running this program, a random number, NM, will be generated.
NEW
1 REM NUMBER GUESSING GAME
2 PRINT “{CLR/HOME}”
5 INPUT “ENTER UPPER LIMIT FOR GUESS “;LI
10 NM = INT(LI*RND(1))+1
15 CN = 0
20 PRINT “I’VE GOT THE NUMBER.” : PRINT
30 INPUT “WHAT’S YOUR GUESS “; GU
35 CN = CN + 1
40 IF GU > NM THEN PRINT “MY NUMBER IS LOWER.” : PRINT : GOTO 30
50 IF GU < NM THEN PRINT “MY NUMBER IS HIGHER.”: PRINT : GOTO 30
60 PRINT “GREAT! YOU GOT MY NUMBER”
65 PRINT “IN ONLY”; CN ;”GUESSES.” : PRINT
70 PRINT “DO YOU WANT TO TRY ANOTHER (Y/N) ?”;
80 GET AN$ : IF AN$ = “” THEN 80
90 IF AN$ = “Y” THEN 2
100 IF AN$ <> “N” THEN 70
110 END
You can specify how large the number will be at the start of the program. Then, it’s up to you to guess what the number is.
A sample run follows along with an explanation.
ENTER UPPER LIMIT FOR GUESS ? 25
I’VE GOT THE NUMBER.
WHAT’S YOUR NUMBER GUESS ? 15
MY NUMBER IS HIGHER.
WHAT’S YOUR NUMBER GUESS ? 20
MY NUMBER IS LOWER.
WHAT’S YOUR NUMBER GUESS ? 19
GREAT! YOU GOT MY NUMBER
IN ONLY 3 GUESSES.
DO YOU WANT TO TRY ANOTHER (Y/N) ?
IF/THEN statements compare your guess to the number generated. Depending on your guess, the program tells you whether your guess was higher or lower than the random number generated.
From the formula given for determining random number range, see if you can add a few lines to the program that allow the user to also specify the lower range of numbers generated.
Each time you make a guess, CN is incremented by 1 to keep track of the number of guesses. In using the program, see if you can use good reasoning to guess a number in the least number of tries.
When you get the right answer, the program prints out the “GREAT! YOU GOT MY NUMBER” message, along with the number of tries it took. You can then start the process over again. Remember, the program generates a new random number each time.
PROGRAMMING TIPS:
In line 40 and 50, a colon is used to separate multiple statements on a single line. This not only saves typing, but in long programs will conserve memory space.
Also notice in the IF/THEN statements on the same two lines, we instructed the computer to PRINT something, rather than immediately branching to some other point in the program.
The last point illustrates the reason behind using line numbers in increments of 10. After the program was written, we decided to add the count part. By just adding those new lines at the end of the program, numbered to fall between the proper existing lines, the program was easily modified.
4.7. Your Roll
The following program simulates the throw of two dice. You can enjoy it as it stands, or use it as part of a larger game.
5 PRINT “CARE TO TRY YOUR LUCK?”
10 PRINT “RED DICE =”;INT(6*RND(1))+1
20 PRINT “WHITE DICE =”;INT(6*RND(1))+1
30 PRINT “HIT SPACE BAR FOR ANOTHER ROLL” : PRINT
40 GET A$ : IF A$ = “” THEN 40
50 IF A$ = CHR$(32) THEN 10
From what you’ve learned about random numbers and BASIC, see if you can follow what is going on.
4.8. Random Graphics
As a final note on random numbers, and as an introduction to designing graphics, take a moment to enter and run this neat little program:
10 REM MAZE
20 PRINT “{CLR/HOME}”
30 PRINT CHR$(205.5+RND(1));
40 GOTO 20
As you may have expected, line 20 is the key here. Another function, CHR$ (Character String), gives you a character, based on a standard code number from 0 to 255. Every character the Commodore 64 can print is encoded this way (see Appendix F).
To quickly find out the code for any character, just type:
PRINT ASC(“X”)
where X is the character you’re checking (this can be any printable character, including graphics). The response is the code for the character you typed. As you probably figured out, “ASC” is another function, which returns the standard “ASCII” code for the character you typed.
You can now print that character by typing:
PRINT CHR$(X)
If you try typing:
PRINT CHR$(205); CHR$(206)
you will see the two right side graphic characters on the M and N keys. These are two characters that the program is using for the maze.
By using the formula 205.5 + RND(1) the computer will pick a random number between 205.5 and 206.5. There is a fifty-fifty chance of the number being above or below 206. CHR$ ignores any fractional values, so half the time the character with code 205 is printed and the remaining time code 206 is displayed.
If you’d like to experiment with this program, try changing 205.5 by adding or subtracting a couple tenths from it. This will give either character a greater chance of being selected.
5. ADVANCED COLOR AND GRAPHIC COMMANDS
5.1. Color and Graphics
Up to now we’ve explored some of the sophisticated computing capabilities of the Commodore 64. But one of its most fascinating features is an outstanding ability to produce color and graphics.
You’ve seen a quick example of graphics in the “bouncing ball” and “maze” programs. But these only touched on the power you command. A number of new concepts will be introduced in this section to explain graphic and color programming and show how you can create your own games and advanced animation.
Because we’ve concentrated on the computing capabilities of the machine, all the displays we’ve generated so far were a single color (light blue text on a dark blue background, with a light blue border).
In this chapter we’ll see how to add color to programs and control all those strange graphic symbols on the keyboard.
5.2. PRINTing Colors
As you discovered if you tried the color alignment test in Chapter 1, you can change text colors by simply holding the <CTRL> key and one of the color keys. This works fine in the immediate mode, but what happens if you want to incorporate color changes in your programs?
When we showed the “bouncing ball” program, you saw how keyboard commands, like cursor movement, could be incorporated within PRINT statements. In a like way, you can also add text color changes to your programs.
You have a full range of 16 text colors to work with. Using <CTRL> key and a number key, the following colors are available:
1 2 3 4 5 6 7 8
Black White Red Cyan Purple Green Blue Yellow
If you hold down the <C=> key along with the appropriate number key, these additional eight colors can be used:
1 2 3 4 5 6 7 8
Orange Brown Lt.Red Gray 1 Gray 2 Lt.Green Lt.Blue Gray 3
Type NEW, and experiment with the following. Hold down the <CTRL> key and at the same time hit the <1> key. Next, hit the <R> key without holding down the <CTRL> key. Now, while again depressing the <CTRL> key at the same time hit the <2> key. Release the <CTRL> key and hit the <A> key. Move through the numbers, alternating with the letters, and type out the word RAINBOW as follows:
10 PRINT ” R A I N B O W”
^ ^ ^ ^ ^ ^ ^
<CTRL><1 2 3 4 5 6 7>
RUN
RAINBOW
Just as cursor controls show as graphic characters within the quote marks of print statements, color controls are also represented as graphic characters.
In the previous example, when you held down <CTRL> and typed <3> a “{Pound Sign}” was displayed. <CTRL> <7> displayed a “<-“. Each color control will display its unique graphic code when used in this way. The table shows the graphic representations of each printable color control.
KEYBOARD COLOR DISPLAY KEYBOARD COLOR DISPLAY
———————————————————————
<CTRL><1> BLACK <C=><1> ORANGE
<CTRL><2> WHITE <C=><2> BROWN
<CTRL><3> RED <C=><3> LT. RED
<CTRL><4> CYAN <C=><4> GRAY 1
<CTRL><5> PURPLE <C=><5> GRAY 2
<CTRL><6> GREEN <C=><6> LT. GREEN
<CTRL><7> BLUE <C=><7> LT. BLUE
<CTRL><8> YELLOW <C=><8> GRAY 3
Even though the PRINT statement may look a bit strange on the screen, when you RUN the program, only the text will be displayed. And it will automatically change colors according to the color controls you placed in the print statement.
Try a few examples of your own, mixing any number of colors within a single PRINT statement. Remember, too, you can use the second set of text colors by using the Commodore key and the number keys.
TIP: You will notice after running a program with color or mode (reverse) changes, that the “READY.” prompt and any additional text you type is the same as the last color or mode change. To get back to the normal display, remember to depress: <RUN/STOP> and <RESTORE>.
5.3. Color CHR$ Codes
Take a brief look at Appendix F, then turn back to this section.
You may have noticed in looking over the list of CHR$ codes in Appendix F that each color (as well as most other keyboard controls, such as cursor movement) has a unique code. These codes can be printed directly to obtain the same results as typing CTRL and the appropriate key within the PRINT statement.
For example, try this:
NEW
10 PRINT CHR$(147) : REM {CLR/HOME}
20 PRINT CHR$(30); “CHR$(30) CHANGES ME TO?”
RUN
CHR$(30) CHANGES ME TO?
The text should now be green. In many cases, using the CHR$ function will be much easier, especially if you want to experiment with changing colors. The following program is a different way to get a rainbow of colors. Since there are a number of lines that are similar (40-110) use editing keys to save a lot of typing. See the notes after the listing to refresh your memory on the editing procedures.
NEW
1 REM AUTOMATIC COLOR BARS
5 PRINT CHR$(147) : REM CHR$(147) = CLR/HOME
10 PRINT CHR$(18); ” “; : REM REVERSE BAR
20 CL = INT(8*RND(1))+1
30 ON CL GOTO 40,50,60,70,80,90,100,110
40 PRINT CHR$(5); : GOTO 10
50 PRINT CHR$(28); : GOTO 10
60 PRINT CHR$(30); : GOTO 10
70 PRINT CHR$(31); : GOTO 10
80 PRINT CHR$(144); : GOTO 10
90 PRINT CHR$(156); : GOTO 10
100 PRINT CHR$(158); : GOTO 10
110 PRINT CHR$(159); : GOTO 10
Type lines 1 through 40 normally. Your display should look like this:
1 REM AUTOMATIC COLOR BARS
5 PRINT CHR$(147) : REM CHR$(147) = CLR/HOME
10 PRINT CHR$(18); ” “; : REM REVERSE BAR
20 CL = INT(8*RND(1))+1
30 ON CL GOTO 40,50,60,70,80,90,100,110
40 PRINT CHR$(5); : GOTO 10
EDITING NOTES
Use the <CRSR UP> key to position the cursor on line 40. Then type 5 over the 4 of 40. Next, use the <CRSR RIGHT> key to move over to the 5 in the CHR$ parentheses. Hit <SHIFT> <INST/DEL> to open up a space and type ’28’. Now just hit <RETURN> with the cursor anywhere on the line.
The display should now look like this:
1 REM AUTOMATIC COLOR BARS
5 PRINT CHR$(147) : REM CHR$(147) = CLR/HOME
10 PRINT CHR$(18); ” “; : REM REVERSE BAR
20 CL = INT(8*RND(1))+1
30 ON CL GOTO 40,50,60,70,80,90,100,110
50 PRINT CHR$(28); : GOTO 10
Don’t worry. Line 40 is still there. LIST the program and see. Using the same procedure, continue to modify the last line with a new line number and CHR$ code until all the remaining lines have been entered. See, we told you the editing keys would come in handy. As a final check, list the entire program to make sure all the lines were entered properly
before you RUN it.
Here is a short explanation of what’s going on.
You’ve probably figured out most of the color bar program by now except for some strange new statement in line 30. But let’s quickly see what the whole program actually does. Line 5 prints the CHR$ code for CLR/HOME.
Line 10 turns reverse type on and prints 5 spaces, which turn out to be a bar, since they’re reversed. The first time through the program the bar will be light blue, the normal text color.
Line 20 uses our workhorse, the random function to select a random color between 1 and 8.
Line 30 contains a variation of the IF … THEN statement which is called ON … GOTO. ON … GOTO allows the program to choose from a list of line numbers to go to. If the variable (in this case CL) has a value of 1, the first line number is the one chosen (here 40). If the value is 2, the second number in the list is used, etc.
Lines 40-110 just convert our random key colors to the appropriate CHR$ code for that color and return the program to line 10 to PRINT a section of the bar in that color. Then the whole process starts over again.
See if you can figure out how to produce 16 random numbers, expand ON … GOTO to handle them, and add the remaining CHR$ codes to display the remaining 8 colors.
5.4. PEEKs and POKEs
No, we’re not talking about jobbing the computer, but we will be able to “look around” inside the machine and “stick” things in there.
Just as variables could be thought of as a representation of “boxes” within the machine where you placed your information, you can also think of some specially defined “boxes” within the computer that represent specific memory locations.
The Commodore 64 looks at these memory locations to see what the screen’s background and border color should be, what characters are to be displayed on the screen — and where — and a host of other tasks.
By placing, “POKEing”, a different value into the proper memory location, we can change colors, define and move objects, and even create music.
These memory locations could be represented like this:

Above we showed just four locations, two of which control the screen and background colors. Try typing this:
POKE 53281,7 <RETURN>
The background color of the screen will change to yellow because we placed the value ‘7’ — for yellow — in the location that controls the background color of the screen.
Try POKEing different values into the background color location, and see what results you get. You can POKE any value between 0 and 255, but only 0 through 15 will work.
The actual values to POKE for each color are:
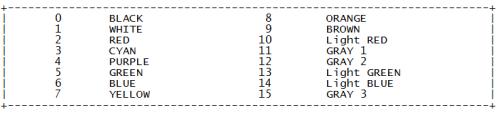
Can you think of a way to display the various background and border combinations? The following may be of some help:
NEW
10 FOR BA = 0 TO 15
20 FOR BO = 0 TO 15
30 POKE 53280, BO
40 POKE 53281, BA
50 FOR X = 1 TO 2000 : NEXT X
60 NEXT BO : NEXT BA
Two simple loops were set up to POKE various values to change the background and border colors. The DELAY loop in line 50 just slows things down a bit.
For the curious, try:
? PEEK(53280) AND 15
You should get a value of 15. This is the last value BORDER was given and makes sense because both the background and border colors are GRAY (value 15) after the program is run.
By entering AND 15 you eliminate all other values except 1-15, because of the way color codes are stored in the computer. Normally you would expect to find the same value that was last POKEd in the location. In general, PEEK lets us examine a specific location and see what value is presently there. Can you think of a one line addition to the program that
will display the value of BACK and BORDER as the program runs? How about this:
25 PRINT CHR$(147); “BORDER =”;PEEK(53280) AND 15,
“BACKGROUND =”; PEEK(53281) AND 15
5.5. Screen Graphics
In all the printing information that you’ve done so far, the computer normally handled information in a sequential fashion: one character is printed after the next, starting from the current cursor position (except where you asked for a new line, or used the ‘,’ in PRINT formatting).
To PRINT data in a particular spot you can start from a known place on the screen and PRINT the proper number of cursor controls to format the display. But this takes program steps and is time consuming.
But just as there are certain spots in the Commodore 64’s memory to control color, there are also locations that you can use to directly control each location on the screen.
SCREEN MEMORY MAP
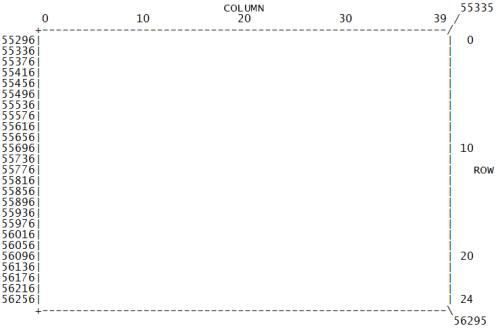
Since the computer’s screen is capable of holding 1000 characters (40 columns by 25 lines) there are 1000 memory locations set aside to handle what is placed on the screen. The layout of the screen could be thought of as a grid, with each square representing a memory location.
And since each location in memory can contain a number from 0 to 255, there are 256 possible values for each memory location. These values represent the different characters the Commodore 64 can display (see Appendix E). By POKEing the value for a character in the appropriate screen memory location, that character will be displayed in the proper
position.
Screen memory in the Commodore 64 normally begins at memory location 1024, and ends at location 2023. Location 1024 is the upper left corner of the screen. Location 1025 is the position of the next character to the right of that, and so on down the row. Location 1063 is the right-most position of the first row. The next location following the last character
on a row is the first character on the next row down.

Now, let’s say that you’re controlling a ball bouncing on the screen. The ball is in the middle of the screen, column 20, row 12. The formula for calculation of the memory location on the screen is:
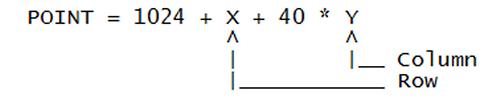
where X is the column and Y is the row.
Therefore, the memory location of the ball is:

Clear the screen with <SHIFT> and <CLR/HOME> and type:

COLOR MEMORY MAP
A ball appears in the middle of the screen! You have placed a character directly into screen memory without using the PRINT statement. The ball that appeared was white. However there is a way to change the color of an object on the screen by altering another range of memory. Type:

The ball’s color changes to red. For every spot on the Commodore 64’s screen there are two memory locations, one for the character code, and the other for the color code. The color memory map begins at location 55296 (top left-hand corner), and continues on for 1000 locations. The same color codes, from 0-15, that we used to change border and background colors can be used here to directly change character colors.
The formula we used for calculating screen memory locations can be modified to give the locations to POKE color codes. The new formula is:
COLOR PRINT = 55296 + X + 40 * Y
5.6. More Bouncing Balls
Here’s a revised bouncing ball program that prints directly on the screen with POKEs, rather than using controls within PRINT statements. As you will see after running the program, it is much more flexible than the earlier program, and will lead up to programming much more sophisticated animation.
NEW
10 PRINT “{CLR/HOME}”
20 POKE 53280,7 : POKE 53281,13
30 X = 1 : Y = 1
40 DX = 1 : DY = 1
50 POKE 1024 + X + 40 * Y, 81
60 FOR T = 1 TO 10 : NEXT
70 POKE 1024 + X + 40 * Y, 32
80 X = X + DX
90 IF X <= 0 OR X >= 39 THEN DX = -DX
100 Y = Y + DY
110 IF Y <= 0 OR Y >= 24 THEN DY = -DY
120 GOTO 50
Line 10 clears the screen, and line 20 sets the background to light green with a yellow border.
The X and Y variables in line 30 keep track of the current row and column position of the ball. The DX and DY variables in line 40 are the horizontal and vertical direction of the ball’s movement. When a +1 is added to the X value, the ball is moved to the right; when -1 is added, the ball moves to the left. A +1 added to Y moves the ball down a row;
a -1 added to Y moves the ball up a row.
Line 50 puts the ball on the screen at the current cursor position. Line 60 is the familiar delay loop, leaving the ball on the screen just long enough to see it.
Line 70 erases the ball by putting a space (code 32) where the ball was on the screen.
Line 80 adds the direction factor to X. Line 90 tests to see if the ball has reached one of the side walls, reversing the direction if there’s a bounce. Line 100 and 110 do the same thing for the top and bottom walls.
Line 120 sends the program back to display and moves the ball again.
By changing the code in line 50 from 81 to another character code, you can change the ball to any other character. If you change DX and DY to 0 the ball will bounce straight instead of diagonally.
We can also add a little more intelligence. So far the only thing you checked for is the X and Y values getting out of bounds for the screen. Add the following lines to the program:
21 FOR L = 1 TO 10
25 POKE 1024 + INT(RND(1)*1000), 166 <—————— Screen Code
27 NEXT L
85 IF PEEK(1024 + X + 40 * Y) = 166 THEN DX = -DX : GOTO 80
105 IF PEEK(1024 + X + 40 * Y) = 166 THEN DY = -DY : GOTO 100
Lines 21 to 27 put 10 blocks on the screen in random positions. Lines 85 and 105 check (PEEK) to see if the ball is about to bounce into a block, and changes the ball’s direction if so.
6. SPRITE GRAPHICS
6.1. Introduction to Sprites
In previous chapters dealing with graphics, we saw that graphic symbols could be used in PRINT statements to create animation and add chartlike appearances to our display.
A way was also shown to POKE character codes in specific screen memory locations. This would then place the appropriate characters directly on the screen in the right spot.
Creating animation in both these cases requires a lot of work because objects must be created from existing graphic symbols. Moving the object requires a number of program statements to keep track of the object and move it to new spot. And, because of the limitation of using graphic symbols, the shape and resolution of the object might not be as good as required.
Using sprites in animated sequences eliminates a lot of these problems. A sprite is a high-resolution programmable object that can be made into just about any shape — through BASIC commands. The object can be easily moved around the screen by simply telling the computer the position the sprite should be moved to. The computer takes care of the rest.
And sprites have much more power than just that. Their color can be changed; you can tell if one object collides with another; they can be made to go in front and behind another; and they can be easily expanded in size, just for starters.
The penalty for all this is minimal. However, using sprites requires knowing some more details about how the Commodore 64 operates and how numbers are handled within the computer. It’s not as difficult as it sounds, though. Just follow the examples and you’ll be making your own sprites do amazing things in no time.
6.2. Sprite Creation
Sprites are controlled by a separate picture-maker in the Commodore 64. This picture maker handles the video display. It does all the hard work of creating and keeping track of characters and graphics, creating colors, and moving around.
This display circuit has 46 different “ON/OFF” locations which act like internal memory locations. Each of these locations breaks down into a series of 8 blocks. And each block can either be “ON” or “OFF”. We’ll get into more detail about this later. By POKEing the appropriate decimal value in the proper memory location you can control the formation and
movement of your sprite creations.
In addition to accessing many of the picture making locations we will also be using some of the Commodore 64’s main memory to store information (data) that defines the sprites. Finally, eight memory locations directly after the screen memory will be used to tell the computer exactly which memory area each sprite will get its data from.
As we go through some examples, the process will be very straightforward, and you’ll get the hang of it.
So let’s get on with creating some sprite graphics. A sprite object is 24 dots wide by 21 dots long. Up to eight sprites can be controlled at a time. Sprites are displayed in a special independent 320 dot wide by 200 dot high area. However, you can use your sprite with any mode, high- resolution, low-resolution, text etc.
Say you want to create a balloon and have it float around the sky. The balloon could be designed as in the 24 by 21 grid:

The next step is to convert the graphic design into data the computer can use. Get a piece of notebook or graph paper and set up a sample grid that is 21 spaces down and 24 spaces across. Across the top write 128, 64, 32, 16, 8, 4, 2, 1, three times (as shown) for each of the 24 squares. Number down the left side of the grid 1-21 for each row. Write the word DATA at the end of each row. Now fill in the grid with any design or use the balloon that we have. It’s easiest to outline the shape first and then go back and fill in the grid. Now if you think of all the squares you filled in as “ON” then substitute a 1 for each filled square. For the one’s that aren’t filled in, they’re “OFF” so put a zero.
Starting on the first row, you need to convert the dots into three separate pieces of data the computer can read. Each set of 8 squares is equal to one piece of data called a byte in our balloon. Working from the left, the first 8 squares are blank, or 0, so the value for that series of numbers is 0.
The middle series looks like this (again a 1 indicates a dot, 0 is a space):
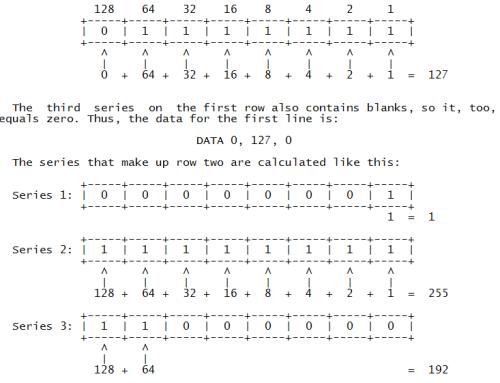
For row 2, the data would be:
DATA 1, 255, 192
In the same way, the three series that make up each remaining row would be converted into their decimal value. Take the time to do the remainder of the conversion in this example.
Now that you have the data for your object, how can it be put to use? Type in the following program and see what happens.
1 REM UP, UP, AND AWAY!
5 PRINT “{CLR/HOME}”
10 V = 53248 : REM START OF DISPLAY CHIP
11 POKE V+21, 4 : REM ENABLE SPRITE 2
12 POKE 2042, 13 : REM SPRITE 2 DATA FROM 13TH BLOCK
20 FOR N = 0 TO 62 : READ Q : POKE 832+N, Q : NEXT
30 FOR X = 0 TO 200 ^—— GETS ITS INFO. FROM DATA*
40 POKE V+4, X : REM UPDATE X COORDINATES
50 POKE V+5, X : REM UPDATE Y COORDINATES
60 NEXT X
70 GOTO 30
200 DATA 0,127,0,1,255,192,3,255,224,3,231,224 <- INFO. READ IN FROM “Q”
210 DATA 7,217,240,7,223,240,7,217,240,3,231,224
220 DATA 3,255,224,3,255,224,2,255,160,1,127,64
230 DATA 1,62,64,0,156,128,0,156,128,0,73,0,0,73,0
240 DATA 0,62,0,0,62,0,0,62,0,0,28,0
* FOR MORE DETAIL ON READ & DATA SEE CHAPTER 8.
If you typed everything correctly, your balloon is smoothly flying across the sky:
[ PICTURE OMITTED ]
In order to understand what happened, first you need to know what picture making locations control the functions you need. These locations, called registers, could be illustrated in this manner:
Register(s) Description
0 X coordinate of sprite 0
1 Y coordinate of sprite 0
2 – 15 Paired like 0 and 1 for sprites 1-7
16 Most Significant Bit — X coordinate
21 Sprite appear: 1 = appear, 0 = disappear
29 Expand sprite in “X” Direction
23 Expand sprite in “Y” Direction
39-46 Sprite 0-7 color
In addition to this information you need to know from which 64 byte section sprites will get their data (1 byte is used).
This data is handled by 8 locations directly after screen memory:

Now let’s outline the exact procedure to get things moving and finally write a program.
There are only a few things necessary to actually create and move an object.
1. Make the proper sprite(s) appear on the screen by POKEing into location 21 a 1 for the bit which turns on the sprite.
2. Set sprite pointer (locations 2040-2047) to where sprite data should be read from.
3. POKE actual data into memory.
4. Through a loop, update X and Y coordinates to move sprite around.
5. You can, optionally, expand the object, change colors, or perform a variety of special functions. Using location 29 to expand your sprite in the “X” direction and location 23 in the “Y” direction.
There are only a few items in the program that might not be familiar from the discussion so far.
In line 10,
V = 53248
sets V to the starting memory location of the video chip. In this way we just increase V by the memory number to get the actual memory location. The register numbers are the ones given on the sprite register map.
In line,
POKE V+21,4
makes sprite 2 appear by placing a 4 in what is called the sprite enable register (21) to turn on sprite 2. Think of it like this:
SPRITES

Each sprite level is represented in section 21 of the sprite memory and 4 happens to be sprite level 2. If you were using level 3 you would put a 1 in sprite 3 which has a value of 8. In fact, if you used both sprites 2 and 3 you would put a 1 in both 4 and 8. You would then add the numbers together just like you did with the DATA on your graph paper. So, turning on sprites 2 and 3 would be represented as V+21,12.
In line 12,
POKE 2042,13
instructs the computer to get the data for sprite 2 (location 2042) from the 13th area of memory. You know from making your sprite that it takes up 63 sections of memory. You may not have realized it, but those numbers you put across the top of your grid equal what is known as 3 bytes of the computer. In other words each collection of the following numbers, 128, 64, 32, 16, 8, 4, 2, equals 1 byte of computer memory. Therefore with the 21 rows of your grid times the 3 bytes of each row, each sprite takes up 63 bytes of memory.

This line handles the actual sprite collision. The 63 bytes of data that represent the sprite you created are READ in through the loop and POKEd into the 13th block of memory. This starts at location 832.
30 FOR X = 0 TO 200
40 POKE V+4, X <—- SPRITE 2’S X COORDINATE
50 POKE V+5, X <—- SPRITE 2’S Y COORDINATE
If you remember from school the X coordinate represents an objects horizontal movement across the screen and the Y coordinate represents the sprite’s vertical movement across the screen. Therefore as the values of X change in line 30 from 0 to 200 (one number at a time) the sprite moves across the screen DOWN and TO THE RIGHT one space for each number. The numbers are READ by the computer fast enough to make the movement appear to be continuous, instead of 1 step at a time. If you need more details take a look at the register map in Appendix O.
When you get into moving multiple objects, it would be impossible for one memory section to update the locations of all eight objects. Therefore each sprite has its own set of 2 memory sections to make it move on the screen.
Line 70 starts the cycle over again, after one pass on the screen. The remainder of the program is the data for the balloon. Sure looks different on the screen, doesn’t it?
Now, try adding the following line:
25 POKE V+23, 4 : POKE V+29, 4 : REM EXPAND
and RUN the program again. The balloon has expanded to twice the original size! What we did was simple. By POKEing 4 (again to indicate sprite 2) into memory sections 23 and 29, sprite 2 was expanded in the X and Y direction.
It’s important to note that the sprite will start in the upper left-hand corner of the object. When expanding an object in either direction, the starting point remains the same.
For some added excitement, make the following changes:
11 POKE V+21, 12
12 POKE 2042, 13 : POKE 2043, 13
30 FOR X = 1 TO 190
45 POKE V+6, X
55 POKE V+7, 190-X
A second sprite (number 3) has been turned on by POKEing 12 into the memory location that makes the sprite appear (V+21). The 12 turns sprites 3 and 2 on (00001100 = 12).
The added lines 45 and 55 move sprite 3 around by POKEing values into sprite 3’s X and Y coordinate locations (V+6 and V+7).
Want to fill the sky with even more action? Try making these additions:
11 POKE V+21, 28 <– 28 IS REALLY 4(SPRITE 2)+8(SPRITE 3)+16(SPRITE 4)
12 POKE 2042, 13 : POKE 2043, 13 : POKE 2044, 13
25 POKE V+23, 12 : POKE V+29, 12
48 POKE V+8, X
58 POKE V+9, 100
In line 11 this time, another sprite (4) was made to appear by POKEing 28 into the appropriate “ON” location of the sprite memory section. Now sprites 2-4 are on (00011100 = 28).
Line 12 indicates that sprite 4 will get its data from the same memory area (13th 63 section area) as the other sprites by POKEing 2044,13.
In line 25, sprites 2 and 3 are expanded by POKEing 12 (Sprites 2 and 3 on) into the X and Y direction expanded memory locations (V+23 and V+29).
Line 48 moves sprite 3 along the X axis. Line 58 positions sprite 3 halfway down the screen, at location 100. Because this value does not change, like it did before with X=0 to 200, sprite 3 just moves horizontally.
6.3. Additional Notes on Sprites
Now that you’ve experimented with sprites, a few more words are in order. First, you can change a sprite’s color to any of the standard 16 color codes (0-15) that were used to change character color. These can be found in Chapter 5 or in Appendix G.
For example, to change sprite 1 to light green, type: POKE V+40,13 (be sure to set V = 53248).
You may have noticed in using the example sprite programs that the object never moved to the right-hand edge of the screen. This was because the screen is 320 dots wide and the X direction register can only hold a value up to 255. How then can you get an object to move across the entire screen?
There is a location on the memory map that has not been mentioned yet. Location 16 (of the map) controls something called the Most Significant Bit (MSB) of the sprite’s X direction location. In effect, this allows you to move the sprite to a horizontal spot between 256 and 320.
The MSB of X register works like this: after the sprite has been moved to X location 255, place a value into memory location 16 representing the sprite you want to move. For example, to get sprite 2 to move to horizontal locations 256-320, POKE the value for sprite 2 (which is 4) into memory location 16:
POKE V+16, 4
Now start from 0 again in the usual X direction register for sprite 2 (which is in location 4 of the map). Since you are only moving another 64 spaces, X locations would only range between 0 and 63 this time.
This whole concept is best illustrated with a version of the original BALLOON SPRITE program:
10 V = 53248 : POKE V+21, 4 : POKE 2042, 13
20 FOR N = 0 TO 62 : READ Q : POKE 832+N, Q : NEXT
25 POKE V+5, 100
30 FOR X = 0 TO 255
40 POKE V+4, X
50 NEXT
60 POKE V+16, 4
70 FOR X = 0 TO 63
80 POKE V+4, X
90 NEXT
100 POKE V+16, 0
110 GOTO 30
200 DATA 0,127,0,1,255,192,3,255,224,3,231,224
210 DATA 7,217,240,7,223,240,7,217,240,3,231,224
220 DATA 3,255,224,3,255,224,2,255,160,1,127,64
230 DATA 1,62,64,0,156,128,0,156,128,0,73,0,0,73,0
240 DATA 0,62,0,0,62,0,0,62,0,0,28,0
Line 60 sets the most significant bit for sprite 2. Line 70 starts moving the standard X direction location, moving sprite 2 the rest of way across the screen.
Line 100 is important because it “TURNS OFF” the MSB so that the sprite can start moving from the left edge of the screen again.
To define multiple sprites, you may need additional blocks for the sprite data. You can use some of BASIC’s RAM by moving BASIC. Before typing or loading your program type:
POKE 44, 16 : POKE 16*256, 0 : NEW
Now, you can use blocks 32 through 41 (locations 2048 through 4095) to store sprite data.
6.4. Binary Arithmetic
It is beyond the scope of this introductory manual to go into details of how the computer handles numbers. We will, however, provide you with a good base for understanding the process and get you started on sophisticated animation.
But, before you get too involved we have to define a few terms:
BIT — This is the smallest amount of information a computer can store. Think of a BIT as a switch that is either “ON” or “OFF”. When a BIT is “ON” it has a value of 1; when a BIT is “OFF” it has a value of 0.
After a BIT, the next level is BYTE.
BYTE — This is defined as a series of BITs. Since a BYTE is made up of 8 BITs, you can actually have a total of 256 different combinations of BITs. In other words, you can have all BITs “OFF” so your BYTE will look like this:
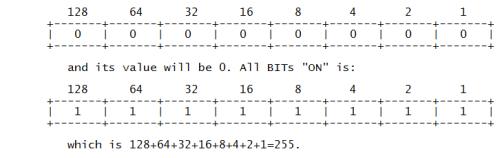
The next step up is called a REGISTER.
REGISTER — Defined as a block of BYTEs strung together. But, in this case each REGISTER is really only 1 BYTE long. A series of REGISTERs makes up a REGISTER MAP. REGISTER MAPS are charts like the one you looked at to make your BALLOON SPRITE. Each REGISTER controls a different function, like turning on the SPRITE is really called the SPRITE ENABLE REGISTER. Making the SPRITE longer is the SPRITE EXPAND X REGISTER, while making the SPRITE wider is the SPRITE EXPAND Y REGISTER. Keep in mind that a REGISTER is a BYTE that performs a specific task.
Now let’s move on to the rest of BINARY ARITHMETIC.
BINARY TO DECIMAL CONVERSION
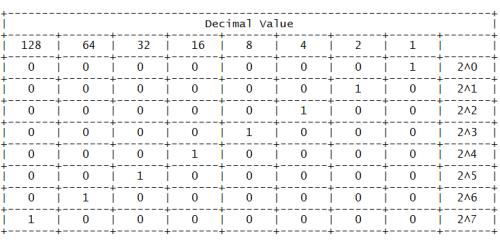
Using combinations of all eight bits, you can obtain any decimal value from 0 to 255. Do you start to see why when we POKEd character or color values into memory locations the values had to be in the 0-255 range? Each memory location can hold a byte of information.
Any possible combination of eight 0’s and 1’s will convert to a unique decimal value between 0-255. If all places contain a 1 then the value of the byte equals 255. All zeros equal a byte value zero; “00000011” equals 3, and so on. This will be the basis for creating data that represents sprites and manipulating them. As just one example, if this byte grouping
represented part of a sprite (0 is a space, 1 is a colored area):

Then we would POKE 255 into the appropriate memory location to represent that part of the object.
TIP: To save you the trouble of converting binary numbers into decimal values — we’ll need to do that a lot — the following program will do the work for you. It’s a good idea to enter and save the program for future use.
5 REM BINARY TO DECIMAL CONVERTER
10 INPUT “ENTER 8-BIT BINARY NUMBER :”;A$
12 IF LEN(A$) <> 8 THEN PRINT “8 BITS PLEASE…” : GOTO 10
15 TL = 0 : C = 0
20 FOR X = 8 TO 1 STEP -1 : C = C + 1
30 TL = TL + VAL(MID$(A$,C,1))*2^(X-1)
40 NEXT X
50 PRINT A$; ” BINARY = “; TL ;” DECIMAL”
60 GOTO 10
This program takes your binary number, which was entered as a string, and looks at each character of the string, from left to right (the MID$ function). The variable C indicates what character to work on as the program goes through the loop.
The VAL function, in line 30, returns the actual value of the character. Since we are dealing with numeric characters, the value is the same as the character. For example, if the first character of A$ is 1 then the value would also be 1.
The final part of line 30 multiplies the value of the current character by the proper power of 2. Since the first value is in the 2^7 place, in the example, TL would first equal 1 times 128 or 128. If the bit is 0 then the value for that place would also be zero.
This process is repeated for all eight characters as TL keeps track of the running total decimal value of the binary number.
7. CREATING SOUND
7.1. Using Sound if You’re Not a Computer Programmer
Most programmers use computer sound for two purposes: making music and generating sound effects. Before getting into the “intricacies” of programming sound, let’s take a quick look at how a typical sound program is structured … and give you a short sound program you can experiment with.
7.2. Structure of a Sound Program
To begin with, there are five settings which you should know in order to generate sound on your COMMODORE 64: VOLUME, ATTACK/DECAY, SUSTAIN/ RELEASE (ADSR), WAVEFORM CONTROL and HIGH FREQUENCY/LOW FREQUENCY. The first three settings are usually set ONCE at the beginning of your program. The high and low frequency settings must be set for EACH NOTE you play. The waveform control starts and stops each note.
7.3. Sample Sound Program
Before you start you have to choose a VOICE. There are 3 voices. Each voice requires different sound setting numbers for Waveform, etc. You can play 1, 2 or 3 voices together but our sample uses only VOICE NUMBER 1. Type in this program line by line … be sure to hit the <RETURN> key after each line:
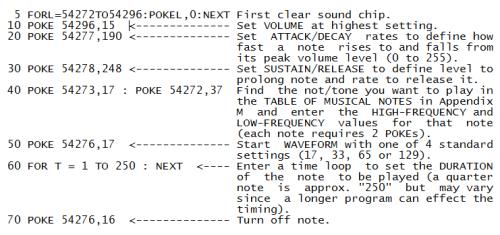
To hear the note you just created, type the word RUN and then hit the <RETURN> key. To view the program type the word LIST and hit <RETURN>. To change it, retype the lines you want to alter.
7.4. Making Music on Your Commodore 64
You don’t have to be a musician to make a music on your COMMODORE 64! All you need to know are a few simple numbers which tell your computer how loud to set the volume, which notes to play, how long to play them, etc. But first … here’s a program which gives you a quick demonstration of the COMMODORE 64’s incredible music capabilities, using only ONE of your computer’s 3 separate voices.
Type the word NEW and hit <RETURN> to erase your previous program, then enter this program, type the word RUN and hit the <RETURN> key.
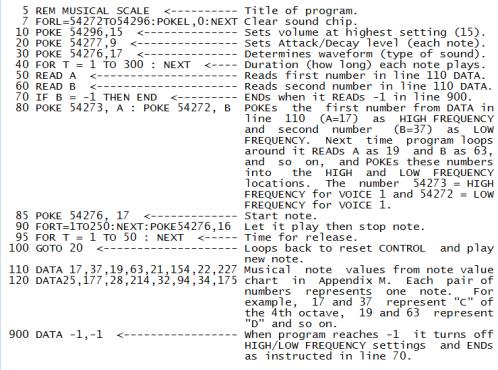
To change the sound to a “harpsichord”, change line 85 to read 54276,33 and line 90 to read FOR T=1 TO 250:NEXT:POKE 54276,32 and RUN the program again. (To change the line, hit the <RUN/STOP> key to stop the program, type word LIST and hit <RETURN>, then retype the program line you want to change; the new line will automatically replace the old one). What we did here is change the “waveform” from a “triangular” shaped sound wave to a “sawtooth” wave. Changing the WAVEFORM can drastically change the sound
produced by the COMMODORE 64 … but … waveform is only one of several settings you can change to make different musical tones and sound effects! You can also change the ATTACK/DECAY rate of each note … for example, to change from a “harpsichord” sound to a more “banjo” sound try changing lines 20 and 30 to read:
20 POKE 54277,3
30 POKE 54278,0 <————— Sets no sustain for banjo effect.
As you’ve just seen, you can make your COMMODORE 64 sound like different musical instruments. Let’s take a closer look at how each sound setting works.
7.5. Important Sound Settings
1. VOLUME. — To turn on the volume and set it to the highest level, type: POKE 54296,15. The volume setting ranges from 0 to 15 but you’ll use 15 most of the time. To turn “off” the volume, type:
POKE 54296,0
You only have to set the volume ONCE at the beginning of your program, since the same setting activates all three of the Commodore 64’s VOICES. (Changing the volume during a musical note or sound effect can produce interesting results but is beyond the scope of this introduction.)
2. ADSR and WAVEFORM CONTROL SETTINGS. — You’ve already seen how changing the waveform can change the sound effect from “xylophone” to “harpsichord”. Each VOICE has its own WAVEFORM CONTROL SETTING which lets you define four different types of waveforms: Triangle, Sawtooth, Pulse (Square) and Noise. The CONTROL also activates the COMMODORE 64’s ADSR feature, but we’ll come back to this in a moment. A sample waveform start setting looks like this:
POKE 54276,17
where the first number (54276) represents the control setting for VOICE 1 and the second number (17) represents the start for a triangular waveform. The settings for each VOICE and WAVEFORM combination are shown in the table below.
ADSR AND WAVEFORM CONTROL SETTINGS
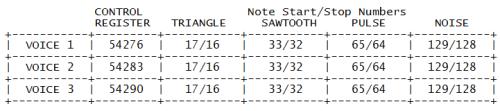
Although the control registers are different for each voice the waveform settings are the same for each type of waveform. To see how this works, look at lines 85 and 90 in the musical scale program. In this program, immediately after setting the frequency in line 80, we set the CONTROL SETTING for VOICE 1 in line 85 by POKEing 54276,17. This turned on the CONTROL for VOICE 1 and set it to a TRIANGLE WAVEFORM (17). In line 70 we POKE 54276,16, stopping the note. Later, we changed the waveform start setting from 17 to 33 to create a SAWTOOTH WAVEFORM and this gave the scale a “harpsichord” effect. See how the CONTROL SETTING and WAVEFORM interact? Setting the waveform is similar to setting the volume, except each voice has its own stetting and instead of POKEing volume levels we’re defining waveforms. Next, we’ll look at another
aspect of sound … the ADSR feature.
3. ATTACK/DECAY SETTING. — As we mentioned before, the ADSR CONTROL SETTING not only defines the waveform but it also activates the ADSR, or ATTACK/DECAY/SUSTAIN/RELEASE feature of the COMMODORE 64. We’ll begin by looking at the ATTACK/DECAY setting. The following chart shows the various ATTACK and DECAY levels for each voice. If you’re not familiar with the concepts of sound attack and decay, you might think of “attack” as the rate at which a note/sound arises to its MAXIMUM VOLUME. The DECAY is the rate at which the note/sound falls from its highest volume level back to the SUSTAIN level. The following chart shows the ATTACK/DECAY setting for each voice, and the numbers for each attack and decay setting. Note that YOU MUST COMBINE ATTACK AND DECAY SETTINGS BY ADDING THEN UP AND ENTERING THE TOTAL. For example, you can set a HIGH ATTACK rate and a LOW DECAY rate by adding the high attack number (64) to the low decay number (1). The total (65) will tell the computer to set the high attack rate and low decay rate. You can also increase the attack rates by adding them together (128+64+32+16=MAX. ATTACK RATE of 240).
ATTACK/DECAY RATE SETTINGS
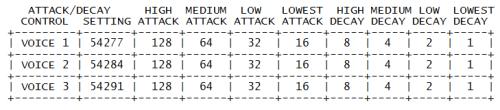
If you set an attack rate with no decay, the decay is automatically zero, and vice-versa. For example, if you POKE 54277,64 you set a medium attack rate with zero decay for VOICE 1. If you POKE 54277, 66 you set a medium attack rate and a low decay rate (because 66=64+2 and sets BOTH settings). You can also add up several attack values, or several decay
values. For example, you can add a low attack (32) and a medium attack (64) for a combined attack rate of 96, then add a medium decay of 4 and … presto … POKE 54277,100.
At this point, a sample program will better illustrate the effect. Type the word NEW, hit <RETURN> and type in this program and RUN it:
5 FOR L=54272 TO 54296:POKE L,0:NEXT Clear sound chip.
10 PRINT “HIT ANY KEY” <————- Screen message
20 POKE 54296,15 <——————- Set VOLUME at highest level.
30 POKE 54277,64 <——————- Set Attack/Decay.
50 POKE 54273,17 : POKE 54272,37 <— POKE one note into VOICE 1.
60 GET K$ : IF K$ = “” THEN 60 <—– Check the keyboard.
70 POKE 54276,17: FOR T=1 TO 200: NEXT Set waveform control (triangle).
80 POKE 54276,16: FOR T=1 TO 50: NEXT Turn off settings.
90 GOTO 20 <————————- Loop back and do it again.
Here, we’re using VOICE 1 to create one note at a time … with a MEDIUM ATTACK RATE and ZERO DECAY. The key is line 30. POKEing the ATTACK/DECAY setting with the number 64 activates a MEDIUM attack rate. The result sounds like someone bouncing a ball in an oil drum. Now for the fun part. Hit the <RUN/STOP> key to stop the program, then type the word LIST and hit <RETURN>. Now type this line and hit <RETURN> (the new line 30 automatically replaces the old line 30):
30 POKE 54277,190
Type word RUN and hit <RETURN> to see how it sounds. What we’ve done here is combine several attack and decay settings. The settings are: HIGH ATTACK (128) + LOW ATTACK (32) + LOWEST ATTACK (16) + HIGH DECAY (8) + MEDIUM DECAY (4) + LOW DECAY (2) = 190. This effect sounds like a sound an oboe or other “reedy” instrument might make. If you’d like to experiment, try changing the waveform and attack/decay numbers in the musical scale example to see how an “oboe” sounds. Thus … you can see
that changing the attack/decay rates can be used to create different types of sound effects.
4. SUSTAIN/RELEASE SETTING. — Like Attack/Decay, the SUSTAIN/RELEASE setting is activated by the ADSR/WAVEFORM CONTROL. SUSTAIN/RELEASE lets you “extend” (SUSTAIN) a portion of a particular sound, like the “sustain pedal” on a piano or organ which lets you prolong a note. Any note or sound can be sustained at any one of 16 levels. The SUSTAIN/RELEASE setting may be used with a FOR … NEXT loop to determine how long the note will be held at SUSTAIN volume before being released. The following
chart shows the numbers you have to POKE to reach different SUSTAIN/ RELEASE rates.
SUSTAIN/RELEASE RATE SETTINGS
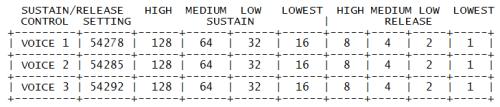
As an example, if you’re using VOICE 1, you can set a HIGH SUSTAIN level by typing: POKE 54278,128 or you could combine a HIGH SUSTAIN level with a LOW RELEASE rate by adding 128 + 2 and then POKE 54278,130. Here’s the same sample program we used in the ATTACK/DECAY section above … with a SUSTAIN/RELEASE feature added. Notice the difference in sounds.
5 FOR L=54272 TO 54296:POKE L,0:NEXT Clear sound chip.
10 PRINT “HIT ANY KEY” <————- Screen message
20 POKE 54296,15 <——————- Set VOLUME at highest level.
30 POKE 54277,64 <——————- Set Attack/Decay.
40 POKE 54278,128 <——————- Set Sustain/Release.
50 POKE 54273,17 : POKE 54272,37 <— POKE one note into VOICE 1.
60 GET K$ : IF K$ = “” THEN 60 <—– Check the keyboard.
70 POKE 54276,17: FOR T=1 TO 200: NEXT Set waveform control (triangle).
80 POKE 54276,16: FOR T=1 TO 50: NEXT Turn off settings.
90 GOTO 20 <————————- Loop back and do it again.
In line 30, we tell the computer to SUSTAIN the note at a HIGH SUSTAIN level (128 from chart above) … after which the tone is released in line 80. You can vary the duration of a note by changing the “count” in line 70. To see the effect of using the release function try changing line 30 to POKE 54278,89 (SUSTAIN = 80, RELEASE = 9).
5. CHOOSING VOICES AND SETTING HIGH/LOW FREQUENCY SOUND VALUES. — Each individual note on the Commodore 64 requires TWO SEPARATE POKE COMMANDS
… one for HIGH FREQUENCY and one for LOW FREQUENCY. The MUSICAL NOTE VALUE table in Appendix M shows you the corresponding POKEs you need to play any note in the Commodore 64’s eight octave range. The HIGH and LOW FREQUENCY POKE COMMANDS are different for each VOICE you use — this allows you to program all 3 voices independently to create 3-voice music or exotic sound effects.
The HIGH and LOW FREQUENCY POKE COMMANDS for each voice are shown in the chart below, which also contains the NOTE VALUES for the middle (fifth) octave.
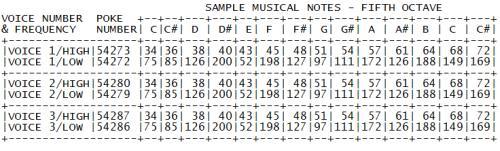
As you can see, there are 2 settings for each voice, a HIGH FREQUENCY setting and a LOW FREQUENCY setting. To play a musical note, you must POKE a value into the HIGH FREQUENCY location and POKE another values into the LOW FREQUENCY location. Using the settings in our VOICE/ FREQUENCY/NOTE VALUE table, here’s the setting that plays a C note from the 5th octave (VOICE 1):
POKE 54273,34 : POKE 54272,75
The same note on VOICE 2 would be:
POKE 54280,34 : POKE 54279,75
Used in a program, it looks like this:
5 FORL=54272TO54296:POKEL,0:NEXT Clear sound chip.
10 V=54296:W=54276:A=54277: <—- Set numbers equal to letters.
S=54278:H=54273:L=54272
20 POKE V,15:POKE A,190:POKE S,89 POKE volume, waveform, attack/decay.
30 POKE H,34:POKE L,75 <——— POKE hi/lo freq. notes.
40 POKE W,33:FOR T=1 TO 200:NEXT Start note, let it play.
50 POKE W,32 <——————- Stop note.
7.6. Playing a Song on the Commodore 64
The following program can be used to compose or play a song (using VOICE 1). There are two important lessons in this program: first, note how we abbreviate all the long control numbers in the first line of the program … after that, we can use the letter W for “Waveform” instead of the number 54276.
The second lesson concerns the way we use the DATA. This program is set up to let you enter 3 numbers for each note: the HIGH FREQUENCY NOTE VALUE, the LOW FREQUENCY NOTE VALUE, and the DURATION THE NOTE will be played. For this song, we used a duration “count” of 125 for an eighth note, 250 for a quarter note, 375 for a dotted quarter note, 500 for a half note and 1000 for a whole note. These number values can be increased or decreased to match a particular tempo, or your own musical taste.
To see how a song gets entered, look at line 100. We entered 34 and 75 as our HIGH and LOW FREQUENCY settings to play a “C” note (from the sample scale shown previously) and then the number 250 for a quarter note. So the first note in our song is a quarter note C. The second note is also a quarter note, this time the note is “E” … and so on to the
end of our tune. You can enter almost any song this way, adding as many DATA statement lines as you need. You can continue the note and duration numbers from one line to the next but each line must begin with the word DATA. DATA -1,-1,-1 should be the last line in your program. This line “ends” the song.
Type the word NEW to erase your previous program and type in the following program, then type RUN to hear the song.
MICHAEL ROW THE BOAT ASHORE-1 MEASURE
2 FOR L = 54272 TO 54296 : POKE L,0 : NEXT
5 V=54296:W=54276:A=54277:HF=54273:LF=54272:S=54278:PH=54275:PL=54274
10 POKE V,15 : POKE A,88 : POKE PH,15 : POKE PL,15 : POKE S,89
20 READ H : IF H = -1 THEN END
30 READ L
40 READ D
60 POKE HF,H : POKE LF,L : POKE W,65
80 FOR T = 1 TO D : NEXT : POKE W,64
85 FOR T = 1 TO 50 : NEXT
90 GOTO 10
100 DATA 34,75,250,43,52,250,51,97,375,43,52,125,51,97
105 DATA 250,57,172,250
110 DATA 51,97,500,0,0,125,43,52,250,51,97,250,57,172
115 DATA 1000,51,97,500
120 DATA -1,-1,-1
7.7. Creating Sound Effects
Unlike music, sound effects are more often tied to a specific programming “action” such as the explosion made by an astro-fighter as it crashes through a barrier in a space game … or the warning buzzer in a business program that tells the user he’s about to erase his disk by mistake.
You have a wide range of options available if you want to create different sound effects. Here are 10 programming ideas which might help you get started experimenting with sound effects:
1. Change the volume while a note is playing, for example to create an “echo” effect.
2. Vary between two notes rapidly to create a sound “tremor.”
3. Waveform … try different settings for each voice.
4. Attack/Decay … to alter the rate a sound rises toward its “peak” volume and rate it diminishes from that peak.
5. Sustain/Release … to change sustain to volume of a sound effect, and rate it diminishes from that volume.
6. Multivoice effects … playing more than one voice at the same time, each voice independently controlled, or one voice playing longer or shorter then another, or serving as an “echo” or response to a first note.
7. Changing notes on the scale, or changing octaves, using the values in the MUSICAL NOTE VALUE table.
8. Use the Square Waveform and different Pulse Settings to create different effects.
9. Use the Noise Waveform to generate “white noise” for accenting tonal sound effects or creating explosions, gunshots or footsteps. The same musical notes that create music can also be used with the Noise Waveform to create different types of white noise.
10. Combine several HIGH/LOW frequencies in rapid succession across different octaves.
11. Filter … try the extra POKE setting in Appendix M.
7.8. Sample Sound Effects To Try
The following programs may be added to almost any BASIC program. They are included to give you some programming ideas and demonstrate the Commodore 64’s sound effect range.
Notice the programming shortcut we’re using in line 10. We can abbreviate those long cumbersome sound setting numbers by defining them as easy-to-use letters (numeric variables). Line 10 simply means that these easy to remember LETTERS can be used instead of those long numbers. Here, V=Volume, W=Waveform, A=Attack/Decay, H=High Frequency (VOICE 1), and L=Low Frequency (VOICE 1). We then use these letters instead of numbers in our program … making our program shorter, typing faster, and the sound settings easier to remember and spot.
DOLL CRYING
10 V=54296 : W=54276 : A=54277 : H=54273 : L=54272
20 POKE V,15 : POKE W,65 : POKE A,15
30 FOR X = 200 TO 5 STEP -2 : POKE H,40 : POKE L,X : NEXT
40 FOR X = 150 TO 5 STEP -2 : POKE H,40 : POKE L,X : NEXT
50 POKE W,0
SHOOTING SOUND … USING VOICE 1, NOISE WAVEFORM, FADING VOLUME
10 V=54296 : W=54276 : A=54277 : H=54273 : L=54272
20 FOR X = 15 TO 0 STEP -1 : POKE V,X : POKE W,129:
POKE A,15 : POKE H,40 : POKE L,200 : NEXT
30 POKE W,0 : POKE A,0
8. ADVANCED DATA HANDLING
8.1. READ and DATA
You’ve seen how to assign values to variables directly within the program (A = 2), and how to assign different values while the program is running — through the INPUT statement.
There are many times, though, when neither one of these ways will quite fit the job you’re trying to do, especially if it involves a lot of information.
Try this short program:
10 READ X
20 PRINT “X IS NOW :”; X
30 GOTO 10
40 DATA 1, 34, 10.5, 16, 234.56
RUN
X IS NOW : 1
X IS NOW : 34
X IS NOW : 10.5
X IS NOW : 16
X IS NOW : 234.56
?OUT OF DATA ERROR IN 10
READY.
_
In line 10, the computer READs one value from the DATA statement and assigns that value to X. Each time through the loop the next value in the DATA statement is read and that value assigned to X, and PRINTed. A pointer in the computer itself keeps track of which value is to be used next:
![]()
When all the values have been used, and the computer executed the loop again, looking for another value, the OUT OF DATA ERROR was displayed because there were no more values to READ. It is important to follow the format of the DATA statement precisely:

Data statements can contain integer numbers, real numbers (234.5), or numbers expressed in scientific notation. But you can’t READ other variables, or have arithmetic operations in DATA lines. This would be incorrect:
40 DATA A, 23/56, 2*5
You can, however, use a string variable in a READ statement and then place string information in the DATA line. The following is acceptable:
NEW
10 FOR X = 1 TO 3
15 READ A$
20 PRINT “A$ IS NOW : “; A$
30 NEXT
40 DATA THIS, IS, FUN
RUN
A$ IS NOW : THIS
A$ IS NOW : IS
A$ IS NOW : FUN
READY.
Notice that this time, the READ statement was placed inside a FOR … NEXT loop. This loop was then executed to match the number of values in the data statement.
In many cases you will change the number of values in the DATA statement each time the program is run. A way to avoid counting the number of values and still avoid an OUT OF DATA ERROR is to place a “FLAG” as the last value in the DATA line. This would be a value that your data would never equal, such as a negative number or a very large or
small number. When that value is READ the program will branch to the next part.
There is a way to reuse the same DATA later in the program by RESTOREing the data pointer to the beginning of the data list. Add line 50 to the previous program:
50 GOTO 10
You will still get the OUT OF DATA ERROR because as the program branches back to line 10 to reread the data, the data pointer indicates all the data has been used. Now, add:
45 RESTORE
and RUN the program again. The data pointer has been RESTOREd and the data can be READ continuously.
8.2. Averages
The following program illustrates a practical use of READ and DATA, by reading in a set of numbers and calculating their average:
NEW
5 T = 0 : CT = 0
10 READ X
20 IF X = -1 THEN 50 : REM CHECK FOR FLAG
25 CT = CT + 1
30 T= T + X : REM UPDATE TOTAL
40 GOTO 10
50 PRINT “THERE WERE”; CT ;”VALUES READ”
60 PRINT “TOTAL =”; T
70 PRINT “AVERAGE =”; T/CT
80 DATA 75, 80, 62, 91, 87, 93, 78, -1
RUN
THERE WERE 7 VALUES READ
TOTAL = 566
AVERAGE = 80.8571429
Line 5 sets CT, the CounTer, and T, Total, equal to zero. Line 10 READs a value and assigns the value to X. Line 20 checks to see if the value is our flag (here a -1). If the value READ is part of the valid DATA, CT is incremented by 1 and X is added to the total.
When the flag is READ, the program branches to line 50 which PRINTs the number of values read. Line 60 PRINTs the total, and line 70 divides the total by the number of values to get the average.
By using a flag at the end of the DATA, you can place any number of values in DATA statements — which may stretch over several lines — without worrying about counting the number of values entered.
Another variation of the READ statement involves assigning information from the same DATA line to different variables. This information can even be a mixture of string data and numeric values. You can do all this in the following program that will READ a name, some scores — say bowling — and print the name, scores, and the average score:
NEW
10 READ N$, A, B, C
20 PRINT N$;”‘S SCORES WERE :”; A ;” “; B ;” “; C
30 PRINT “AND THE AVERAGE IS :”;(A+B+C)/3
40 PRINT : GOTO 10
50 DATA MIKE, 190, 185, 165, DICK, 225, 245, 190
60 DATA JOHN, 155, 185, 205, PAUL, 160, 179, 187
RUN
MIKE’S SCORES WERE : 190 185 165
AND THE AVERAGE IS : 180
DICK’S SCORES WERE : 225 245 190
AND THE AVERAGE IS : 220
In running the program, the DATA statements were set up in the same order that READ statement expected the information: a name (a string), then three values. In other words N$ the first time through gets the data “MIKE”, A in the READ corresponds to 190 in the DATA statement, “B” to 185 and “C” to 165. The process is then repeated in that order for the remainder of the information. (DICK and his scores, JOHN and his scores, and PAUL and his scores.)
8.3. Subscribed Variables
In the past we’ve used only simple BASIC variables, such as A, A$, and NU to present values. These were a single letter followed by a letter or single digit. In any of the programs that you would write, it is doubtful that we would have a need for more variable names than possible with all the combinations of letters or numbers available. But you are limited in
the way variables are used with programs.
Now let’s introduce the concept of subscripted variables.

This would be said: A sub 1. A subscribed variable consists of a letter followed by a subscript enclosed within parentheses. Please note the difference between A, A1, and A(1). Each is unique. Only A(1) is a subscripted variable.
Subscripted variables, like simple variables, name a memory location within the computer. Think of subscripted variables as boxes to store information, just like simple variables:
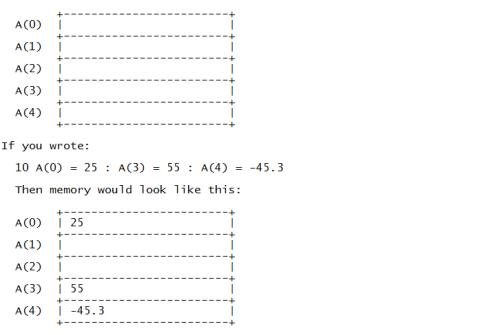
This group of subscripted variables is also called an array. In this case, a one-dimensional array. Later on, we’ll introduce multidimensional arrays.
Subscripts can also be more complex to include other variables, or computations. The following are valid subscripted variables:
A(X) A(X+1) A(2+1) A(1*3)
The expressions within the parentheses are evaluated according to the same rules for arithmetic operations in Chapter 2.
Now that the ground rules are in place, how can subscripted variables be put to use? One way is to store a list of numbers entered with INPUT or READ statements.
Let’s use subscripted variables to do the averages a different way.
5 PRINT CHR$(147)
10 INPUT “HOW MANY NUMBERS :”; X
20 FOR A = 1 TO X
30 PRINT “ENTER VALUE #”; A ;: INPUT B(A)
40 NEXT
50 SU = 0
60 FOR A = 1 TO X
70 SU = SU + B(A)
80 NEXT
90 PRINT : PRINT “AVERAGE =”; SU/X
RUN
HOW MANY NUMBERS :? 5
ENTER VALUE # 1 ? 125
ENTER VALUE # 2 ? 167
ENTER VALUE # 3 ? 189
ENTER VALUE # 4 ? 167
ENTER VALUE # 5 ? 158
AVERAGE = 161.2
There might have been an easier way to accomplish what we did in this program, but it illustrates how subscripted variables work. Line 10 asks for how many numbers will be entered. This variable, X, acts as the counter for the loop within which values are entered and assigned to the subscripted variable, B.
Each time through the INPUT loop, A is increased by 1 and so the next value entered is assigned to the next element in the array A. For example, the first time through the loop A = 1, so the first value entered is assigned to B(1). The next time through, A = 2; the next value is assigned to B(2), and so on until all the values have been entered.
But now a big difference comes into play. Once all the values have been entered, they are stored in the array, ready to be put to work in a variety of ways. Before, you kept a running total each time through the INPUT or READ loop, but never could get back the individual pieces of data without re-reading the information.
In line 50 through 80, another loop has been designed to add up the various elements of the array and then display the average. This separate part of the program shows that all of the values are stored and can be accessed as needed.
To prove that all of the individual values are actually stored separately in an array, type the following immediately after running the previous program:
FOR A=1 TO 5 : ? B(A), : NEXT
125 167 189 167
158
The display will show your actual values as the contents of the array are PRINTed.
8.4. Dimension
If you tried to enter more than 10 numbers in the previous example, you got a BAD SUBSCRIPT ERROR. Arrays of up to eleven elements (subscripts 0 to 10 for a one-dimensional array) may used where needed, just as simple variables can be used anywhere within a program. Arrays of more than eleven elements need to be “declared” in the dimension statement.
Add this line to the program:
5 DIM B(100)
This lets the computer know that you will have a maximum of 100 elements in the array.
The dimension statement may also be used with a variable, so the following line could replace line 5 (don’t forget to eliminate line 5):
15 DIM B(X)
This would dimension the array with the exact number of values that will be entered.
Be careful, though. Once dimensioned, an array cannot be redimensioned in another part of the program. You can, however, have multiple arrays within the program and dimension them all on the same line, like this:
10 DIM C(20), D(50), E(40)
8.5. Simulated Dice Roll With Arrays
As programs become more complex, using subscripted variables will cut down on the number of statements needed, and make the program simpler to write.
A single subscribed variable can be used, for example, to keep track of the number of times a particular face turns up:
10 INPUT “HOW MANY ROLLS: “; X
20 FOR L = 1 TO X
30 R = INT(6*RND(1))+1
40 F(R) = F(R) + 1
50 NEXT L
60 PRINT “FACE”, “NUMBER OF TIMES”
70 FOR C=1 TO 6 : PRINT C, F(C) : NEXT
The array F, for FACE, will be used to keep track of how many times a particular face turns up. For example, every time a 2 is thrown, F(2) is increased by one. By using the same element of the array to hold the actual number on the face that is thrown, we’ve eliminated the need for five other variables (one for each face) and numerous statements to check
and see what number is thrown.
Line 10 asks for how many rolls you want to simulate.
Line 20 establishes the loop to perform the random roll and increment the proper element of the array by one for each toss.
After all of the required tosses are completed, line 60 PRINTs the heading and line 70 PRINTs the number of times each face shows up.
A sample run might look like this:
HOW MANY ROLLS: ? 1000
FACE NUMBER OF TIMES
1 148
2 176
3 178
4 166
5 163
6 169
Well, at least it wasn’t loaded!
Just as a comparison, the following is one way of re-writing the same program, but without using subscripted variables. Don’t bother to type it in, but do notice the additional statements necessary.
10 INPUT “HOW MANY ROLLS: “; X
20 FOR L = 1 TO X
30 R = INT(6*RND(1))+1
40 IF R = 1 THEN F1 = F1 + 1 : NEXT
41 IF R = 2 THEN F2 = F2 + 1 : NEXT
42 IF R = 3 THEN F3 = F3 + 1 : NEXT
43 IF R = 4 THEN F4 = F4 + 1 : NEXT
44 IF R = 5 THEN F5 = F5 + 1 : NEXT
45 IF R = 6 THEN F6 = F6 + 1 : NEXT
60 PRINT “FACE”, “NUMBER OF TIMES”
70 PRINT 1, F1
71 PRINT 2, F2
72 PRINT 3, F3
73 PRINT 4, F4
74 PRINT 5, F5
75 PRINT 6, F6
The program has doubled in size from 7 to 16 lines. In larger programs the space savings from using subscripted variables will be even more dramatic.
8.6. Two-Dimensional Arrays
Earlier in this chapter you experimented with one-dimensional arrays. This type of array was visualized as a group of consecutive boxes within memory each holding an element of the array. What would you expect a two- dimensional array to look like?
First, a two-dimensional array would be written like this:
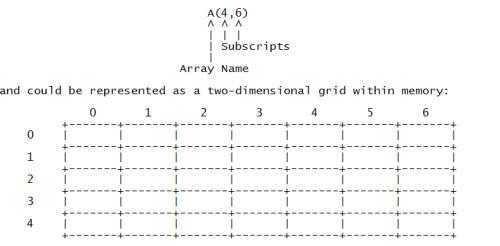
The subscripts could be thought of as representing the row and column within the table where the particular element of the array is stored.
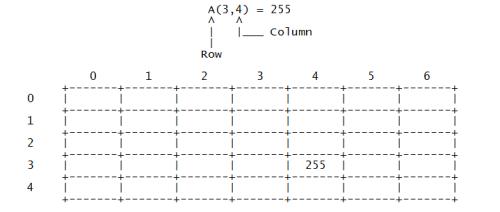
If we assigned the value 255 to A(3,4), then 255 could be thought of as being placed in the 4th column of the 3rd row within the table.
Two-dimensional arrays behave according to the same rules that were established for one-dimensional arrays:
They must be dimensioned: DIM A(20,20)
Assignment of data: A(1,1) = 255
Assign values to other variables: AB = A(1,1)
PRINT values: PRINT A(1,1)
If two-dimensional arrays work like their smaller counterparts, what additional capabilities will the expanded arrays handle?
Try this: can you think of a way using a two-dimensional array to tabulate the results of a questionnaire for your club that involved four questions and had up to three responses for each question? The problem could be represented like this:
CLUB QUESTIONNAIRE
Q1: ARE YOU IN FAVOR OF RESOLUTION #1?
_1-YES _2-NO _3-UNDECIDED
… and so on.
The array table for this problem could be represented like this:
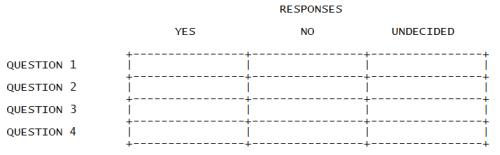
The program to do the actual tabulation for the questionnaire mightlook like that:
20 PRINT “{CLR/HOME}”
30 FOR R = 1 TO 4
40 PRINT “QUESTION # :”; R
50 PRINT “1-YES 2-NO 3-UNDECIDED”
60 PRINT “WHAT WAS THE RESPONSE : “;
61 GET C : IF C<1 OR C>3 THEN 61
65 PRINT C: PRINT
70 A(R,C) = A(R,C) + 1 : REM UPDATE ELEMENT
80 NEXT R
85 PRINT
90 PRINT “DO YOU WANT TO ENTER ANOTHER” : PRINT “RESPONSE (Y/N) ?”;
100 GET A$ : IF A$ = “” THEN 100
110 IF A$ = “Y” THEN 20
120 IF A$ <> “N” THEN 100
130 PRINT “{CLR/HOME}” ; “THE TOTAL RESPONSES WERE:” : PRINT
140 PRINT SPC(18); “RESPONSE”
141 PRINT “QUESTION”, “YES”, “NO”, “UNDECIDED”
142 PRINT “——– —————————–“
150 FOR R = 1 TO 4
160 PRINT R, A(R,1), A(R,2), A(R,3)
170 NEXT R
RUN
QUESTION # : 1
1-YES 2-NO 3-UNDECIDED
WHAT WAS THE RESPONSE : 1
DO YOU WANT TO ENTER ANOTHER
RESPONSE (Y/N) ?
QUESTION # : 2
1-YES 2-NO 3-UNDECIDED
WHAT WAS THE RESPONSE : 1
And so on…
THE TOTAL RESPONSES WERE:

APPENDICES
INTRODUCTION
Now that you’ve become more intimately involved with your Commodore 64, we want you to know that our customer support does not stop here. You may not know it, but Commodore has been in business for over 23 years. In the 1970’s we introduced the first self-contained personal computer (the PET). We have since become the leading computer company in many countries of the world. Our ability to design and manufacture our own computer chips allows us to bring you new and better personal computers at prices way below what you’d expect for this level of technical excellence.
Commodore is committed to supporting not only you, the end user, but also the dealer you bought your computer from, magazines which publish how-to articles showing you new applications or techniques, and … importantly … software developers who produce programs on cartridge, disk ond tape for use with your computer. We encourage you to establish or join a Commodore “user club” where you can learn new techniques, exchange ideas and share discoveries. We publish two separate magazines which contain programming tips, information on new products and ideas for computer applications. (See Appendix N).
In North America, Commodore provides a “Commodore Information Network” on the CompuServe Information Service … to access this network, all you need is your Commodore 64 computer and our low cost VICMODEM telephone interface cartridge (or other compatible modem).
The following APPENDICES contain charts, tables, and other information which help you program your Commodore 64 faster and more efficiently. They also include important information on the wide variety of Commodore products you may be interested in, and a bibliography listing of over 20 books and magazines which can help you develop your programming skills and keep you current on the latest information concerning your computer and peripherals.
APPENDIX A
COMMODORE 64 ACCESSORIES AND SOFTWARE
ACCESSORIES
The Commodore 64 will support Commodore VIC 20 storage devices and accessories — DATASSETTE recorder, disk drive, modem, printer — so your system can expand to keep pace with changing needs.
o Datassette Recorder — This low cost tape unit enables programs and data to be stored on cassette tape, and played back at a later time.
The datassette can also be used to play pre-written programs.
o Disk — The single disk unit uses standard 5.25-inch floppy diskettes, about the size of a 45 RPM record, to store programs and data. Disks allow faster access to data and hold up to 170,000 characters of information each. Disk units are “intelligent”, meaning they have their own microprocessor and memory. Disks require no resources from the Commodore 64, such as using part of main memory.
o Modem — A low-cost communication device, the VICMODEM allows access to other computers over ordinary telephone lines. Users will have access to the full resources of large data bases such as The Source, CompuServe, and Dow Jones News Retrieval Service (North America only).
o Printer — The VIC printer produces printed copies of programs, data, or graphics. This 30 character per second dot-matrix printer uses plain tractor feed paper and other inexpensive supplies. The printer attaches directly to the Commodore 64 without any additional interfaces.
o Interface Cartridges — A number of specialized cartridges will be available for the Commodore 64 to allow various standard devices such as modems, printers, controllers, and instruments to be attached to the system.
With a special IEEE-488 Cartridge, the Commodore 64 will support the full range of CBM peripherals including disk units and printers. Additionally, a Z80 cartridge will allow you to run CP/M on the Commodore 64, giving you access to the largest base of microcomputer applications available.
SOFTWARE
Several categories of software will be offered for the Commodore 64, providing you with a wide variety of personal, entertainment, and educational applications to choose from.
Business Aids
o An Electronic Spreadsheet package will allow you to plan budgets, and perform “what if?” analysis. And with the optional graphic program, meaningful graphs may be created from the spreadsheet data.
o Financial planning, such as loan amortization, will be easily handled with the Financial Planning Package.
o A number of Professional Time Management programs will help manage appointments and work load.
o Easy-to-use Data Base programs will allow you to keep track of information … mailing lists … phone lists … inventories … and organize information in a useful form.
o Professional Word Processing programs will turn the Commodore 64 into a full-featured word processor. Typing and revising memos, letters, and other text material become a breeze.
Entertainment
o The highest quality games will be available on plug-in cartridges for the Commodore 64, providing hours of enjoyment. These programs make use of the high resolution graphics and full sound range possible with the Commodore 64.
o Your Commodore 64 allows you all the fun and excitement available on MAX games because these two machines have completely compatible cartridges.
Education
o The Commodore 64 is a tutor that never tires and always gives personal attention. Besides access to much of the vast PET educational programs, additional educational languages that will be available for the Commodore 64 include PILOT, LOGO and other key advanced packages.
APPENDIX B
ADVANCED CASSETTE OPERATION
Besides saving copies of your programs on tape, the Commodore 64 can also store the values of variables and other items of data, in a group called a FILE. This allows you to store even more information than could be held in the computer’s main memory at one time.
Statements used with data files are OPEN, CLOSE, PRINT#, INPUT# and GET#. The system variable ST (status) is used to check for tape markers.
In writing data to tape, the same concepts are used as when displaying information on the computer’s screen. But instead of PRINTing information on the screen, the information is PRINTed on tape using a variation of the PRINT command — PRINT#. The following program illustrates how this works:
10 PRINT “WRITE-TO-TAPE-PROGRAM”
20 OPEN 1,1,1, “DATA FILE”
30 PRINT “TYPE DATA TO BE STORED OR TYPE STOP”
40 PRINT
50 INPUT “DATA”; A$
60 PRINT#1, A$
70 IF A$ <> “STOP” THEN 40
80 PRINT
90 PRINT “CLOSING FILE”
100 CLOSE 1
The first thing that you must do is OPEN a file (in this case DATA FILE). Line 10 handles that.
The program prompts for the data you want to save on tape in line 50. Line 60 writes what you typed — held in A$ — onto the tape. And the process continues.
If you type STOP, line 100 CLOSEs the file.
To retrieve the information, rewind the tape, and try this:
10 PRINT “READ-TAPE-PROGRAM”
20 OPEN 1,1,0, “DATA FILE”
30 PRINT “FILE OPEN”
40 PRINT
50 INPUT#1, A$
60 PRINT A$
70 IF A$ <> “STOP” THEN 40
80 PRINT
90 PRINT “CLOSING FILE”
100 CLOSE 1
Again, this file “DATA FILE” first must be OPENed. In line 50 the program INPUTs A$ from tape and also PRINTs A$ on the screen. Then the whole process is repeated until “STOP” is found, which ENDs the program.
A variation of GET-GET# can also be used to read the data back from tape. Replace lines 50-70 in the program above with:
50 GET#1, A$
60 IF A$ <> “” THEN 50
70 PRINT A$, ASC(A$)
APPENDIX C
COMMODORE 64 BASIC
This manual has given you an introduction to the BASIC language — enough for you to get a feel for computer programming and some of the vocabulary involved. This appendix gives a complete list of the rules (SYNTAX) of Commodore 64 BASIC, along with concise descriptions. Please experiment with these commands. Remember, you can’t do any permanent damage to the computer by just typing in programs, and the best way to learn computing is by doing.
This appendix is divided into sections according to the different types of operations in BASIC. These include:
1. Variables and Operators: describes the different type of variables, legal variable names, and arithmetic and logical operators.
2. Commands: describes the commands used to work with programs, edit, store and erase them.
3. Statements: describes the BASIC program statements used in numbered lines of programs.
4. Functions: describes the string, numeric, and print functions.
VARIABLES
The Commodore 64 uses three types of variables in BASIC. These are real numeric, integer numeric, and string (alphanumeric) variables.
Variable names may consist of a single letter, a letter followed by a number, or two letters.
An integer variable is specified by using the percent (%) sign after the variable name. String variable have the dollar sign ($) after their name.
Examples
Real Variable Names: A, A5, BZ
Integer Variable Names: A%, A5%, BZ%
String Variable Names: A$, A5$, BZ$
Arrays are lists of variables with the same name, using extra numbers to specify the element of the array. Arrays are defined using the DIM statement, and may contain floating point, integer, or string variables. The array variable name is followed by a set of parentheses ( ) enclosing the number of variables in the list.
A(7), BZ%(11), A$(50), PT(20,20)
NOTE: There are three variable names which are reserved for use by the Commodore 64, and may not be defined by you. These variables are: ST, TI and TI$. ST is a status variable which relates to input/output operations. The value of ST will change if there is a problem loading a program from disk or tape.
TI and TI$ are variables which relate to the real-time clock built into the Commodore 64. The variable TI is updated every 1/60th of a second. It starts at 0 when the computer is turned on, and is reset only by changing the value of TI$. TI$ is a string which is constantly updated by the system. The first two characters contain the number of hours , the 3rd and 4th characters the number of minutes, and the 5th and 6th characters are the number of seconds. This variable can be given any numeric value, and will be updated from that point.
TI$ = “101530” sets the clock to 10:15 and 30 seconds AM.
This clock is erased when the computer is turned off, and starts at zero when the system is turned back on.
OPERATORS
The arithmetic operators include the following signs:
+ Addition
– Subtraction
* Multiplication
/ Division
^ Raising to a power (exponentiation)
On a line containing more than one operator, there is a set order in which operations always occur. If several operations are used together on the same line, the computer assigns priorities as follows: First, exponentiation. Next, multiplication and division, and last, addition and subtraction.
You can change the order of operations by enclosing within parentheses the calculation to be performed first. Operations enclosed in parentheses will take place before other operations.
There are also operations for equalities and inequalities:
= Equal To
< Less Than
> Greater Than
<= Less Than or Equal To
>= Greater Than or Equal To
<> Not Equal To
Finally, there are three logical operators:
AND
OR
NOT
These are used most often to join multiple formulas in IF…THEN statements. For example:
IF A=B AND C=D THEN 100 (Requires both parts to be true)
IF A=B OR C=D THEN 100 (Allows either part to be true)
COMMANDS
CONT (Continue)
This command is used to restart the execution of a program which has been stopped by either using the <STOP> key, a STOP statement, or an END statement within the program. The program will restart at the exact place from where it left off.
CONT will not work if you have changed or added lines to the program (or even just moved the cursor), or if the program halted due to an error, or if you caused an error before trying to restart the program. In these cases you will get a CAN’T CONTINUE ERROR.
LIST
The LIST command allows you to look at lines of a BASIC program in memory. You can ask for the entire program to be displayed, or only certain line numbers.
LIST Shows entire program
LIST 10- Shows only from line 10 until end
LIST 10 Shows only line 10
LIST -10 Shows lines from beginning until 10
LIST 10-20 Shows line from 10 to 20, inclusive
LOAD
This command is used to transfer a program from tape or disk into memory so the program can be used. If you just type LOAD and hit RETURN, the first program found on the cassette unit will be placed in memory. The command may be followed by a program name enclosed within quotes. The name may then be followed by a comma and a number or numeric variable, which acts as a device number to indicate where the program is coming from.
If no device number is given, the Commodore 64 assumes device #1, which is the cassette unit. The other device commonly used with the LOAD command is the disk device, which is device #8.
LOAD Reads in the next program on tape
LOAD “HELLO” Searches tape for program called HELLO,
and loads program, if found
LOAD A$ Looks for program whose name is in the variable A$
LOAD “HELLO”,8 Looks for program called HELLO on the disk drive
LOAD “*”,8 Looks for first program on disk
NEW
This command erases the entire program in memory, and also clears out any variables that may have been used. Unless the program was SAVEd, it is lost. BE CAREFUL WHEN YOU USE THIS COMMAND.
The NEW command can also be used as a BASIC program statement. When the program reaches this line, the program is erased. This is useful if you want to leave everything neat when the program is done.
RUN
This command causes execution of a program, once the program is loaded into memory. If there is no line number following RUN, the computer will start with the lowest line number. If a line number is designated, the program will start executing from the specified line.
RUN Starts program at lowest line number
RUN 100 Starts execution at line 100
RUN X UNDEFINED STATEMENT ERROR. You must always specify an
actual line number, not a variable representation
SAVE
This command will store the program currently in memory on cassette or disk. If you just type SAVE and RETURN, the program will be SAVEd on cassette. The computer has no way of knowing if there is a program already on that tape, so be careful with your tapes or you may erase a valuable program.
If you type SAVE followed by a name in quotes or a string variable, the computer will give the program that name, so it can be more easily located and retrieved in the future. The name may also be followed by a device number.
After the device number, there can be a comma and a second number, either 0 or 1. If the second number is 1, the Commodore 64 will put an END-OF-TAPE marker after your program. This signals the computer not to look any further on the tape if you were to give an additional LOAD command. If you try to LOAD a program and the computer finds one of these markers, you will get a FILE NOT FOUND ERROR.
SAVE Stores program to tape without name
SAVE “HELLO” Stores on tape with name HELLO
SAVE A$ Stores on tape with name A$
SAVE “HELLO”,8 Stores on disk with name HELLO
SAVE “HELLO”,1,1 Stores on tape with name HELLO and follows
program with END-OF-TAPE marker
VERIFY
This command causes the computer to check the program on disk or tape against the one in memory. This is proof that the program is actually SAVEd, in case the tape or disk is bad, or something went wrong during the SAVE. VERIFY without anything after the command causes the Commodore 64 to check the next program on tape, regardless of name, against the program in memory.
VERIFY followed by a program name, or a string variable, will search for that program and then check. Device numbers can also be included with the verify command.
VERIFY Checks the next program on tape
VERIFY “HELLO” Searches for HELLO, checks against memory
VERIFY “HELLO”,8 Searches for HELLO on disk, then checks
STATEMENTS
CLOSE
This command completes and closes any files used by OPEN statements. The number following CLOSE is the file number to be closed.
CLOSE 2 Only file #2 is closed
CLR
This command will erase any variables in memory, but leaves the program itself intact. This command is automatically executed when a RUN command is given.
CMD
CMD sends the output which normally would go to the screen (i.e., PRINT statements, LISTs, but not POKEs onto the screen) to another device instead. This could be a printer, or a data file on tape or disk. This device or file must be OPENed first. The CMD command must be followed by a number or numeric variable referring to the file.
OPEN 1,4 OPENs device #4, which is the printer
CMD 1 All normal output now goes to printer
LIST The program listing now goes to
the printer, not the screen
To send output back to the screen, CLOSE the file with CLOSE 1.
DATA
This statement is followed by a list of items to be used by READ statements. Items may be numeric values or text strings, and items are separated by commas. String items need not be inside quote marks unless they contain space, colon, or comma. If two commas have nothing between them, the value will be READ as a zero for a number, or an empty string.
DATA 12, 14.5, “HELLO, MOM”, 3.14, PART1
DEF FN
This command allows you to define a complex calculation as a function with a short name. In the case of a long formula that is used many times within the program, this can save time and space.
This function name will be FN and any legal variable name (1 or 2 characters long). First you must define the function using the statement DEF followed by the function name. Following the name is a set of parentheses enclosing a numeric variable. Then follows the actual formula that you want to define, with the variable in the proper spot. You can
then “call” the formula, substituting any number for the variable.

DIM
When you use more than 11 elements of an array, you must execute a DIM statement for the array. Keep in mind that the whole array takes up room in memory, so don’t create an array much larger than you’ll need. To figure the number of variables created with DIM, multiply the total number of elements in each dimension of the array.

You can dimension more than one array in a DIM statement. However, be careful not to dimension an array more than once.
END
When a program encounters an END statement, the program halts, as if it ran out of lines. You may use CONT to restart the program.
FOR … TO … STEP
This statement works with the NEXT statement to repeat a section of the program a set number of times. The format is:
FOR (Var. Name)=(Start of Count) TO (End of Count) STEP (Count By)
The loop variable will be added to or subtracted from during the program. Without any STEP specified, STEP is assumed to be 1. The start count and end count are the limits to the value of the loop variable.
10 FOR L = 1 to 10 STEP .1
20 PRINT L
30 NEXT L
The end of the loop value may be followed by the word STEP and another number or variable. In this case, the value following STEP is added each time instead of 1. This allows you to count backwards, or by fractions.
GET
The GET statement allows you to get data from the keyboard, one character at a time. When GET is executed, the character that is typed is assigned to the variable. If no character is typed, then a null (empty) character is assigned.
GET is followed by a variable name, usually a string variable. If a numeric variable was used and a nonnumeric key depressed, the program would halt with an error message. The GET statement may be placed into a loop, checking for any result. This loop will continue until a key is hit.
10 GET A$: IF A$ = “” THEN 10
GET#
The GET# statement is used with a previously OPENed device or file, to input one character at a time from that device or file.
GET #1,A$
This would input one character from a data file.
GOSUB
This statement is similar to GOTO, except the computer remembers which program line it last executed before the GOSUB. When a line with a RETURN statement is encountered, the program jumps back to the statement immediately following the GOSUB. This is useful if there is a routine in your program that occurs in several parts of the program.
Instead of typing the routine over and over, execute GOSUBs each time the routine is needed.
20 GOSUB 800
GOTO or GO TO
When a statement with the GOTO command is reached, the next line to be executed will be the one with the line number following the word GOTO.
IF … THEN
IF … THEN lets the computer analyze a situation and take two possible courses of action, depending on the outcome. If the expression is true, the statement following THEN is executed. This may be any BASIC statement.
If the expression is false, the program goes directly to the next line.
The expression being evaluated may be a variable or formula, in which case it is considered true if nonzero, and false if zero. In most cases, there is an expression involving relational operators (=, <, >, <=, >=, <>, AND, OR, NOT).
10 IF X > 10 THEN END
INPUT
The INPUT statement allows the program to get data from the user, assigning that data to a variable. The program will stop, print a question mark (?) on the screen, and wait for the user to type in the answer and hit RETURN. INPUT is followed by a variable name, or a list of variable names, separated by commas. A message may be placed within quote marks, before the list of variable names to be INPUT. If more than one variable is to be INPUT, they must be separated by commas when typed.
10 INPUT “PLEASE ENTER YOUR FIRST NAME”;A$
20 PRINT “ENTER YOUR CODE NUMBER”;: INPUT B
INPUT#
INPUT# is similar to INPUT, but takes data from a previously OPENed file or device.
10 INPUT#1, A
LET
LET is hardly ever used in programs, since it is optional, but the statement is the heart of all BASIC programs. The variable name which is to be assigned the result of a calculation is on the left side of the equal sign, and the formula in the right.
10 LET A = 5
20 LET D$ = “HELLO”
NEXT
NEXT is always used in conjunction with the FOR statement. When the program reaches a NEXT statement, it checks the FOR statement to see if the limit of the loop has been reached. If the loop is not finished, the loop variable is increased by the specified STEP value. If the loop is finished, execution proceeds with the statement following NEXT.
NEXT may be followed by a variable name, or list of variable names, separated by commas. If there are no names listed, the last loop started is the one being completed. If variables are given, they are completed in order from left to right.
10 FOR X = 1 TO 100: NEXT
ON
This command turns the GOTO and GOSUB commands into special versions of the IF statement. ON is followed by a formula, which is evaluated. If the result of the calculation is one, the first line on the list is executed; if the result is 2, the second line is executed, and so on. If the result is 0, negative, or larger than the list of numbers, the next line executed will be the statement following the ON statement.
10 INPUT X
20 ON X GOTO 10,20,30,40,50
OPEN
Then OPEN statement allows the Commodore 64 to access devices such as the cassette recorder and disk for data, a printer, or even the screen. OPEN is followed by a number (0-255), to which all following statements will refer. There is usually a second number after the first, which is the device number.
The device numbers are:
0 Screen
1 Cassette
4 Printer
8 Disk
Following the device number may be a third number, separated again by a third number, separated again by a comma, which is the secondary address. In the case of the cassette, this is 0 for read, 1 for write, and 2 for write with end-of-tape marker.
In the case of the disk, the number refers to the buffer, or channel, number. In the printer, the secondary address controls features like expanded printing. See the Commodore 64 Programmer’s Reference Manual for more details.
10 OPEN 1,0 OPENs the SCREEN as a device
20 OPEN 2,1,0,”D” OPENs the cassette for reading,
file to be searched for is D
30 OPEN 3,4 OPENs the printer
40 OPEN 4,8,15 OPENs the data channel on the disk
Also see: CLOSE, CMD, GET#, INPUT#, and PRINT#, system variable ST, and Appendix B.
POKE
POKE is always followed by two numbers, or formulas. The first location is a memory location; the second number is a decimal value from 0 to 255, which will be placed in the memory location, replacing any previously stored value.
10 POKE 53281,0
20 S = 4096 * 13
30 POKE S + 29, 8
The PRINT statement is the first one most people learn to use, but there are a number of variations to be aware of. PRINT can be followed by:
Text String with quotes
Variable names
Functions
Punctuation marks
Punctuation marks are used to help format the data on the screen. The comma divides the screen into four columns, while the semicolon suppresses all spacing. Either mark can be last symbol on a line. This results in the next thing PRINTed acting as if it were a continuation of the same PRINT statement.
10 PRINT “HELLO”
20 PRINT “HELLO”, A$
30 PRINT A + B
40 PRINT J;
50 PRINT A, B, C, D
Also see: POS, SPC and TAB functions.
PRINT#
There are a few differences between this statement and PRINT. PRINT# is followed by a number, which refers to the device or data file previously OPENed. This number is followed by a comma and a list to be printed. The comma and semicolon have the same effect as they do in PRINT. Please note that some devices may not work with TAB and SPC.
100 PRINT#1, “DATA VALUES”; A%, B1, C$
READ
READ is used to assign information from DATA statements to variables, so the information may be put to use. Care must be taken to avoid READing strings where READ is expecting a number, which will give a TYPE MISMATCH ERROR.
REM (Remark)
REMark is a note to whomever is reading a LIST of the program. It may explain a section of the program, or give additional instructions. REM statements in no way affect the operation of the program, except to add to its length. REM may be followed by any text.
RESTORE
When executed in a program, the pointer to which an item in a DATA statement will be READ next is reset to the first item in the list. This gives you ability to re-READ the information. RESTORE stands by itself on a line.
RETURN
This statement is always used in conjunction with GOSUB. When the program encounters a RETURN, it will go to the statement immediately following the GOSUB command. If no GOSUB was previously issued, a RETURN WITHOUT GOSUB ERROR will occur.
STOP
This statement will halt program execution. The message, BREAK IN xxx will be displayed, where xxx is the line number containing STOP. The program may be restarted by using the CONT command. STOP is normally used in debugging a program.
SYS
SYS is followed by a decimal number or numeric value in the range 0-65535. The program will then begin executing the machine language program starting at that memory location. This is similar to the USR function, but does not allow parameter passing.
WAIT
WAIT is used to halt the program until the contents of a memory location changes in a specific way. WAIT is followed by a memory location (X) and up to two variables. The format is:
WAIT X,Y,Z
The contents of the memory location are first exclusive-ORed with the third number, if present, and then logically ANDed with the second number. If the result is zero, the program goes back to that memory location and checks again. When the result is nonzero, the program continues with the next statement.
NUMERIC FUNCTIONS
ABS(X) (absolute value)
ABS returns the absolute value of the number, without its sign (+ or -). The answer is always positive.
ATN(X) (arctangent)
Returns the angle, measured in radians, whose tangent is X.
COS(X) (cosine)
Returns the value of the cosine of X, where X is an angle measured in radians.
EXP(X)
Returns the value of the mathematical constant e (2.71827183) raised to the power of X.
FN xx(X)
Returns the value of the user-defined function xx created in a DEF FN xx(X) statement.
INT(X)
Returns the truncated value of X, that is, with all the decimal places to the right of the decimal point removed. The result will always be less than, or equal to, X. Thus, any negative numbers with decimal places will become the integer less than their current value.
LOG(X) (logarithm)
Will return the natural log of X. The natural log to the base e (see EXP(X)). To convert to log base 10, simply divide by LOG(10).
PEEK(X)
Used to find out contents of memory location X, in the range 0-65535, giving a result from 0-255. PEEK is often used in conjunction with the POKE statement.
RND(X) (random number)
RND(X) returns a random number in the range 0-1. The first random number should be generated by the formula RND(-TI) to start things off differently every time. After this, X should be a 1 or any positive number. If X is zero, the result will be the same random number as the last one.
A negative value for X will reseed the generator. The use of the same negative number for X will result in the same sequence of “random” numbers.
The formula for generating a number between X and Y is:
N = RND(1) * (Y-X) + X
where,
Y is the upper limit,
X is the lower range of numbers desired.
SGN(X) (sign)
This function returns the sign (positive, negative, or zero) of X. The result will be +1 if positive, 0 if zero, and -1 if negative.
SIN(X) (sine)
SIN(X) is the trigonometric sine function. The result will be the sine of X, where X is an angle in radians.
SQR(X) (square root)
This function will return the square root of X, where X is a positive number or 0. If X is negative, an ILLEGAL QUANTITY ERROR results.
TAN(X) (tangent)
The result will be the tangent of X, where X is an angle in radians.
USR(X)
When this function is used, the program jumps to a machine language program whose starting point is contained in memory locations. The parameter X is passed to the machine language program, which will return another value back to the BASIC program. Refer to the Commodore 64 Programmer’s Reference Manual for more details on this function and machine language programming.
STRING FUNCTIONS
ASC(X$)
This function will return the ASCII code of the first character of X$.
CHR$(X)
This is the opposite of ASC, and returns a string character whose ASCII code is X.
LEFT$(X$,X)
Returns a string containing the leftmost X characters of X$.
LEN(X$)
Returned will be the number of characters (including spaces and other symbols) in the string X$.
MID$(X$,S,X)
This will return a string containing X characters starting from the Sth character in X$.
RIGHT$(X$,X)
Returns the rightmost X characters in X$.
STR$(X)
This will return a string which is identical to the PRINTed version of X.
VAL(X$)
This function converts X$ into a number, and is essentially the inverse operation from STR$. The string is examined from the leftmost character to the right, for as many characters as are in recognizable number format.
10 X = VAL(“123.456”) X = 123.456
10 X = VAL(“12A13B”) X = 12
10 X = VAL(“RIU017”) X = 0
10 X = VAL(“-1.23.45.67”) X = -1.23
OTHER FUNCTIONS
FRE(X)
This function returns the number of unused bytes available in memory, regardless of the value of X. Note that FRE(X) will read out n negative numbers if the number of unused bytes is over 32K.
POS(X)
This function returns the number of the column (0-39) at which the next PRINT statement will begin on the screen. X may have any value and is not used.
SPC(X)
This is used in a PRINT statement to skip X spaces forward.
TAB(X)
TAB is also used in a PRINT statement; the next item to be PRINTed will be in column X.
APPENDIX D
ABBREVIATIONS FOR BASIC KEYWORDS
As a time-saver when typing in programs and commands, Commodore 64 BASIC allows the user to abbreviate most keywords. The abbreviation for PRINT is a question mark. The abbreviations for other words are made by typing the first one or two letters of the word, followed by the SHIFTed next letter of the word. If the abbreviations are used in a program line, the keyword will LIST in the full form.
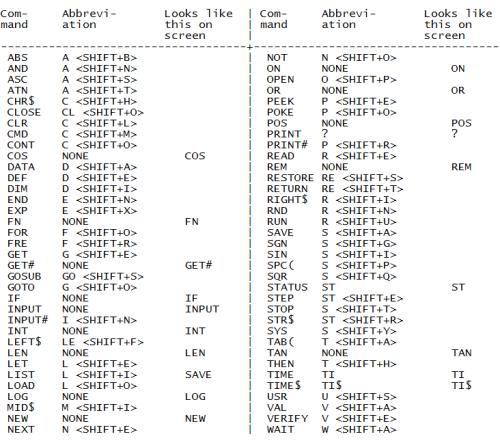
APPENDIX E
SCREEN DISPLAY CODES
The following chart lists all of the characters built into the Commodore 64 character sets. It shows which numbers should be POKED into screen memory (locations 1024-2023) to get a desired character. Also shown is which character corresponds to a number PEEKed from the screen.
Two character sets are available, but only one set at a time. This means that you cannot have characters from one set on the screen at the same time you have characters from the other set displayed. The sets are switched by holding down the <SHIFT> and <C=> keys simultaneously.
From BASIC, POKE 53272,21 will switch to upper case mode and POKE 53272,23 switches to lower case.
Any number on the chart may also be displayed in REVERSE. The reverse character code may be obtained by adding 128 to the values shown.
If you want to display a solid circle at location 1504, POKE the code for the circle (81) into location 1504: POKE 1504,81.
There is a corresponding memory location to control the color of each character displayed on the screen (locations 55296-56295). To change the color of the circle to yellow (color code 7) you would POKE the corresponding memory location (55776) with the character color: POKE 55776,7.
Refer to Appendix G for the complete screen and color memory maps, along with color codes.
SCREEN CODES
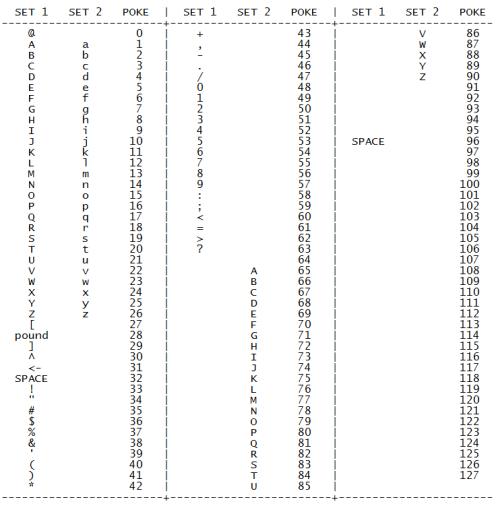
Codes from 128-255 are reversed images of codes 0-127.
APPENDIX F
ASCII AND CHR$ CODES
This appendix shows you what characters will appear if you PRINT CHR$(X), for all possible values of X. It will also show the values obtained by typing PRINT ASC(“x”), where x is any character you can type. This is useful in evaluating the character received in a GET statement, converting upper/lower case, and printing character based commands (like
switch to upper/lower case) that could not be enclosed in quotes.
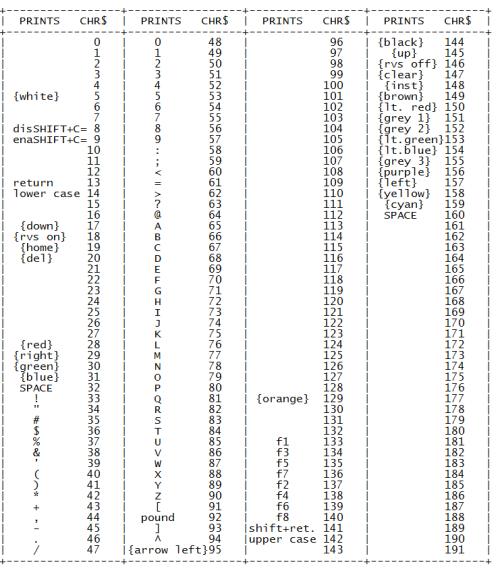
CODES 192-223 SAME AS 96-127
CODES 224-254 SAME AS 160-190
CODE 255 SAME AS 126
APPENDIX D
SCREEN AND COLOR MEMORY MAPS
The following charts list which memory locations control placing characters on the screen, and the locations used to change individual character colors, as well as showing character color codes.
SCREEN MEMORY MAP
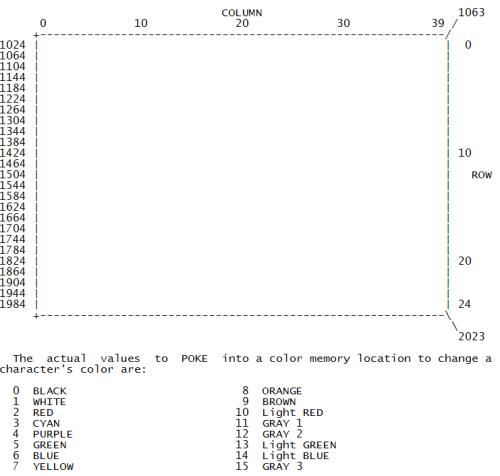
For example, to change the color of a character located at the upper left-hand corner of the screen to red, type: POKE 55296,2.
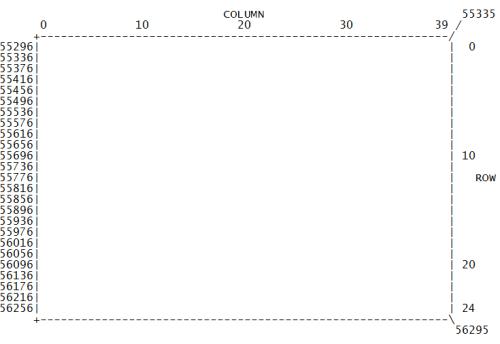
APPENDIX H
DERIVING MATHEMATICAL FUNCTIONS
Functions that are not intrinsic to Commodore 64 BASIC may be calculated as follows:
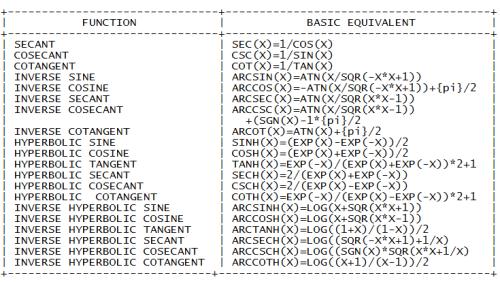
APPENDIX I
PINOUTS FOR INPUT/OUTPUT DEVICES
This appendix is designed to show you what connections may be made to the Commodore 64.
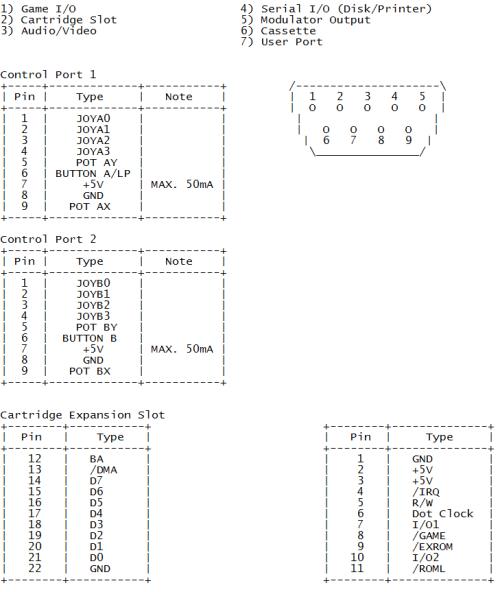
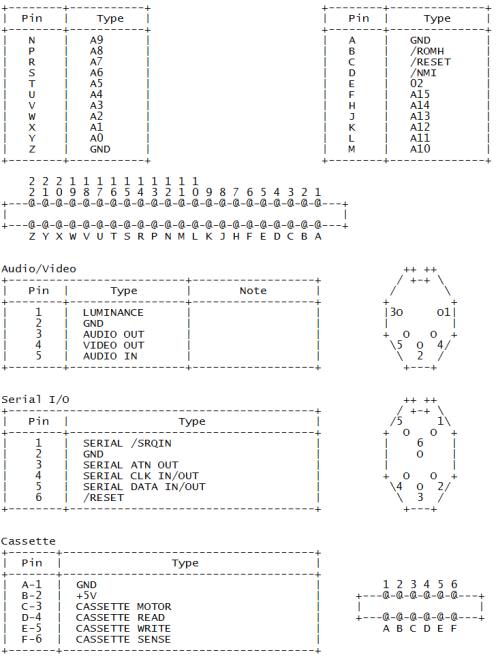
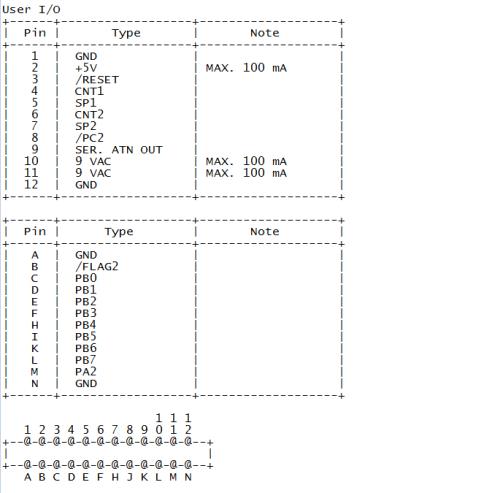
APPENDIX J
PROGRAMS TO TRY
We’ve included a number of useful programs for you to try with your Commodore 64. These programs will prove both entertaining and useful.
start tok64 jotto.prg
100 print “{down}jotto{space*7}jim butterfield”
120 input “{down}want instructions”;z$:if asc(z$)=78 goto 250
130 print “{down}try to guess the mystery 5-letter word”
140 print “{down}you must guess only legal 5-letter”
150 print “words, too…”
160 print “you will be told the number of matches”
170 print “(or ‘jots’) of your guess.”
180 print “{down}hint: the trick is to vary slightly”
190 print ” from one guess to the next; so that”
200 print ” if you guess ‘batch’ and get 2 jots”
210 print ” you might try ‘botch’ or ‘chart'”
220 print ” for the next guess…”
250 data bxbsf,ipccz,dbdif,esfbe,pggbm
260 data hpshf,ibudi,djwjm,kpmmz,lbzbl
270 data sbkbi,mfwfm,njnjd,boofy,qjqfs
280 data rvftu,sjwfs,qsftt,puufs,fwfou
290 data xfbwf,fyupm,nvtiz,afcsb,gjaaz
300 data uijdl,esvol,gmppe,ujhfs,gblfs
310 data cppui,mzjoh,trvbu,hbvaf,pxjoh
320 data uisff,tjhiu,bymft,hsvnq,bsfob
330 data rvbsu,dsffq,cfmdi,qsftt,tqbsl
340 data sbebs,svsbm,tnfmm,gspxo,esjgu
400 n=50
410 dim n$(n),z(5),y(5)
420 for j=1 to n: read n$(j): next j
430 t=ti
440 t=t/1000:if t>=1 then goto 440
450 z=rnd(-t)
500 g=0: n$=n$(rnd(1)*n+1)
510 print “{down}i have a five letter word:”: if r>0 then 560
520 print “guess (with legal words)”
530 print “and i’ll tell you how many”
540 print “‘jots’, or matching letters,”
550 print “you have….”
560 g=g+1: input “your word”;z$
570 if len(z$)<>5 then print “you must guess a 5-letter word!”: goto 560
580 v=0: h=0: m=0
590 for j=1 to 5
600 z=asc(mid$(z$,j,1)): y=asc(mid$(n$,j,1))-1: if y=64 then y=90
610 if z<65 or z>90 then print “that’s not a word!”: goto 560
620 if z=65 or z=69 or z=73 or z=79 or z=85 or z=89 then v=v+1
630 if z=y then m=m+1
640 z(j)=z: y(j)=y: next j
650 if m=5 goto 800
660 if v=0 or v=5 then print “come on..what kind of a word is that?”:\
goto 560
670 for j=1 to 5: y=y(j)
680 for k=1 to 5: if y=z(k) then h=h+1:z(k)=0:goto 700
690 next k
700 next j
710 print”{up}{right*19}”;h;”jots”
720 if g<30 goto 560
730 print “i’d better tell you.. word was ‘”;
740 for j=1 to 5: print chr$(y(j));: next j
750 print”‘”: goto 810
800 print “you got it in only”;g;”guesses.”
810 input “{down}another word”;z$
820 r=1: if asc(z$)<>78 goto 500
stop tok64
begin 644 jotto.prg
M`0@F”&0`F2`B$4I/5%1/(“`@(“`@($I)32!”551415)&245,1″(`50AX`(4@
M(A%704Y4($E.4U1254-424].4R([6B0ZBR#&*%HD*;(W.””)(#(U,`”%”((`
MF2`B$51262!43R!’54534R!42$4@35E35$5262`U+4Q%5%1%4B!73U)$(@”Q
M”(P`F2`B$5E/52!-55-4($=515-3($].3%D@3$5’04P@-2U,151415(B`,<(
ME@”9(“)73U)$4RP@5$]/+BXN(@#V”*“F2`B64]5(%=)3$P@0D4@5$],1”!4
M2$4@3E5-0D52($]&($U!5$-(15,B`!D)J@”9(“(H3U(@)TI/5%,G*2!/1B!9
M3U52($=515-3+B(`1@FT`)D@(A%(24Y4.B!42$4@5%))0TL@25,@5$\@5D%2
M62!33$E’2%1,62(`=`F^`)D@(B`@1E)/32!/3D4@1U5%4U,@5$\@5$A%($Y%
M6%0[(%-/(%1(050B`*()R`”9(“(@($E&(%E/52!’54534R`G0D%40T@G($%.
M1″!’150@,B!*3U13(@#-“=(`F2`B(“!93U4@34E’2%0@5%)9(“=”3U1#2″<@
M3U(@)T-(05)4)R(`[0G<`)D@(B`@1D]2(%1(12!.15A4($=515-3+BXN(@`1
M”OH`@R!”6$)31BQ)4$-#6BQ$0D1)1BQ%4T9″12Q01T=”30`U”@0!@R!(4%-(
M1BQ)0E5$22Q$2E=*32Q+4$U-6BQ,0EI”3`!9″@X!@R!30DM”22Q-1E=&32Q.
M2DY*1″Q”3T]&62Q12E%&4P!]”A@!@R!25D9452Q32E=&4RQ14T945″Q0555&
M4RQ&5T9/50″A”B(!@R!81D)71BQ&655032Q.5E1)6BQ!1D-30BQ’2D%!6@#%
M”BP!@R!524I$3″Q%4U9/3″Q’35!012Q52DA&4RQ’0DQ&4P#I”C8!@R!#4%!5
M22Q-6DI/2″Q44E9″52Q(0E9!1BQ06$I/2“-“T`!@R!525-&1BQ42DA)52Q”
M64U&5″Q(4U9.42Q”4T9/0@`Q”TH!@R!25D)352Q$4T9&42Q#1DU$22Q14T94
M5″Q444)33`!5″U0!@R!30D5″4RQ35E-“32Q43D9-32Q’4U!83RQ%4TI’50!>
M”Y`!3K(U,`!T”YH!AB!.)”A.*2Q:*#4I+%DH-2D`D`ND`8$@2K(Q(*0@3CH@
MAR!.)”A**3H@@B!*`)D+K@%4LE1)`+4+N`%4LE2M,3`P,#J+(%2QLC$@IR”)
M(#0T,`#!”\(!6K*[**M4*0#:”_0!1[(P.B!.)+).)”B[*#$IK$ZJ,2D`”PS^
M`9D@(A%)($A!5D4@02!&259%($Q%5%1%4B!73U)$.B(Z((L@4K$P(*<@-38P
M`”P,”`*9(“)’54534R`H5TE42″!,14=!3”!73U)$4RDB`$\,$@*9(“)!3D0@
M22=,3″!414Q,(%E/52!(3U<@34%.62(`=`P<`ID@(B=*3U13)RP@3U(@34%4
M0TA)3D<@3$545$524RPB`(D,)@*9(“)93U4@2$%612XN+BXB`*4,,`)’LD>J
M,3H@A2`B64]54B!73U)$(CM:)`#A##H”BR##*%HD*;.Q-2″G()D@(EE/52!-
M55-4($=515-3($$@-2U,151415(@5T]21″$B.B”)(#4V,`#S#$0″5K(P.B!(
MLC`Z($VR,“!#4X”@2!*LC$@I”`U`#4-6`):LL8HRBA:)”Q*+#$I*3H@6;+&
M*,HH3B0L2BPQ*2FK,3H@BR!9LC8T(*<@6;(Y,`!G#6(“BR!:LS8U(+`@6K$Y
M,””G()D@(E1(050G4R!.3U0@02!73U)$(2(Z((D@-38P`)T-;`*+(%JR-C4@
ML”!:LC8Y(+`@6K(W,R”P(%JR-SD@L”!:LC@U(+`@6K(X.2″G(%:R5JHQ`*\-
M=@*+(%JR62″G($VR3:HQ`,<-@`):*$HILEHZ(%DH2BFR63H@@B!*`-<-B@*+
M($VR-2″)(#@P,“:#I0″BR!6LC`@L”!6LC4@IR”9(“)#3TU%($].+BY72$%4
M($M)3D0@3T8@02!73U)$($E3(%1(050_(CH@B2`U-C“,`Z>`H$@2K(Q(*0@
M-3H@6;)9*$HI`%T.J`*!($NR,2″D(#4Z((L@6;):*$LI(*<@2+)(JC$Z6BA+
M*;(P.HD@-S`P`&4.L@*”($L`;0Z\`H(@2@”2#L8″F2*1’1T=’1T=’1T=’1T=
M’1T=’1T=’2([2#LB2D]44R(`HP[0`HL@1[,S,””)(#4V,`#-#MH”F2`B22=$
M($)%5%1%4B!414Q,(%E/52XN(%=/4D0@5T%3(“<B.P#L#N0″@2!*LC$@I”`U
M.B”9(,<H62A**2D[.B””($H`_`[N`IDB)R(Z((D@.#$P`”0/(`.9(“)93U4@
M1T]4($E4($E.($].3%DB.T<[(D=515-315,N(@`]#RH#A2`B$4%.3U1(15(@
F5T]21″([6B0`6`\T`U*R,3H@BR#&*%HD*;.Q-S@@B2`U,#“““
`
end
start tok64 sequence.prg
1 rem *** sequence
2 rem
3 rem *** from pet user group
4 rem *** software exchange
5 rem *** po box 371
6 rem *** montgomeryville, pa 18936
7 rem ***
50 dim a$(26)
100 z$=”abcdefghijklmnopqrstuvwxyz”
110 z1$=”12345678901234567890123456″
200 print “{clear}{down*2}enter length of string to be sequenced{down}”
220 input “maximum length is 26 “;s%
230 if s%<1 or s%>26 then 200
240 s=s%
300 for i=1 to s
310 a$(i)=mid$(z$,i,1)
320 next i
400 rem randomize string
420 for i=1 to s
430 k=int(rnd(1)*s+1)
440 t$=a$(i)
450 a$(i)=a$(k)
460 a$(k)=t$
470 next i
480 gosub 950
595 t=0
600 rem rverse substring
605 t=t+1
610 input “how many to reverse “;r%
620 if r%=0 goto 900
630 if r%>0 and r%<=s goto 650
640 print “must be between 1 and “;s: goto 610
650 r=int(r%/2)
660 for i=1 to r
670 t$=a$(i)
680 a$(i)=a$(r%-i+1)
690 a$(r%-i+1)=t$
700 next i
750 gosub 950
800 c=1: for i=2 to s
810 if a$(i)>a$(i+1) goto 830
820 c=0
830 next i
840 if c=0 goto 600
850 print “{down}you did it in “;t;” tries”
900 rem check for another game
910 input “{down}want to play again “;y$
920 if left$(y$,1)=”y” or y$=”ok” or y$=”1″ goto 200
930 end
950 print
960 print left$(z1$,s)
970 for i=1 to s: print a$(i);: next i
980 print “{down}”
990 return
stop tok64
begin 644 sequence.prg
M`0@4″`$`CR`J*BH@4T51545.0T4`&@@”`(\`.`@#`(\@*BHJ($923TT@4$54
M(%5315(@1U)/55“5`@$`(\@*BHJ(%-/1E1705)%($580TA!3D=%`&D(!0″/
M(“HJ*B!03R!”3U@@,S<Q`(T(!@”/(“HJ*B!-3TY41T]-15)95DE,3$4L(%!!
M(#$X.3,V`)<(!P”/(“HJ*@”D”#(`AB!!)”@R-BD`R`AD`%HDLB)!0D-$149′
M2$E*2TQ-3D]045)35%565UA96B(`[0AN`%HQ)+(B,3(S-#4V-S@Y,#$R,S0U
M-C<X.3`Q,C,T-38B`”`)R`”9(“*3$1%%3E1%4B!,14Y’5$@@3T8@4U1224Y’
M(%1/($)%(%-%455%3D-%1!$B`$$)W`”%(“)-05A)355-($Q%3D=42”!)4R`R
M-B`B.U,E`%H)Y@”+(%,ELS$@L”!3);$R-B”G(#(P,`!C”?“4[)3)0!Q”2P!
M@2!)LC$@I”!3`(4)-@%!)”A)*;+**%HD+$DL,2D`C0E“8(@20″D”9`!CR!2
M04Y$3TU)6D4@4U1224Y’`+()I`&!($FR,2″D(%,`Q`FN`4NRM2B[*#$IK%.J
M,2D`T0FX`50DLD$D*$DI`.$)P@%!)”A)*;)!)”A+*0#N”<P!020H2RFR5″0`
M]@G6`8(@20“”N`!C2`Y-3“”`I3`E2R,“?”E@”CR!25D524T4@4U5″4U12
M24Y’`”D*70)4LE2J,0!)”F(“A2`B2$]7($U!3ED@5$\@4D5615)312`B.U(E
M`%H*;`*+(%(ELC`@B2`Y,#“<PIV`HL@4B6Q,””O(%(EL[)3((D@-C4P`)L*
M@`*9(“)-55-4($)%($)%5%=%14X@,2!!3D0@(CM3.B”)(#8Q,`”I”HH”4K*U
M*%(EK3(I`+<*E`*!($FR,2″D(%(`Q`J>`E0DLD$D*$DI`-D*J`)!)”A)*;)!
M)”A2):M)JC$I`.L*L@)!)”A2):M)JC$ILE0D`/,*O`*”($D`_0KN`HT@.34P
M`!`+(`-#LC$Z(($@2;(R(*0@4P`J”RH#BR!!)”A)*;%!)”A)JC$I((D@.#,P
M`#(+-`-#LC“.@L^`X(@20!*”T@#BR!#LC`@B2`V,#“;0M2`YD@(A%93U4@
M1$E$($E4($E.(“([5#LB(%122453(@”*”X0#CR!#2$5#2R!&3U(@04Y/5$A%
M4B!’04U%`*H+C@.%(“(15T%.5”!43R!03$%9($%’04E.(“([620`U0N8`XL@
MR”A9)”PQ*;(B62(@L”!9)+(B3TLB(+`@622R(C$B((D@,C`P`-L+H@.“.$+
MM@.9`/`+P`.9(,@H6C$D+%,I“T,R@.!($FR,2″D(%,Z()D@020H22D[.B””
5($D`%PS4`YD@(A$B`!T,W@..““
`
end
start tok64 pianokey.prg
90 REM piano keyboard
100 PRINT”{CLEAR} {REVERSE ON} {RIGHT} {RIGHT} {194} {RIGHT} {RIGHT} \
{RIGHT} {194} {RIGHT} {RIGHT} {194} {RIGHT} {RIGHT} “
110 PRINT” {REVERSE ON} {RIGHT} {RIGHT} {194} {RIGHT} {RIGHT} {RIGHT} \
{194} {RIGHT} {RIGHT} {194} {RIGHT} {RIGHT} “
120 PRINT” {REVERSE ON} {RIGHT} {RIGHT} {194} {RIGHT} {RIGHT} {RIGHT} \
{194} {RIGHT} {RIGHT} {194} {RIGHT} {RIGHT} “
130 PRINT” {REVERSE ON} {194} {194} {194} {194} {194} {194} {194} \
{194} {194} {194} {194} {194} “
140 PRINT” {REVERSE ON}q{194}w{194}e{194}r{194}t{194}y{194}u{194} \
i{194}o{194}p{194}@{194}*{194}^”
150 PRINT”{DOWN}’space’ for solo or polyphonic”
160 PRINT”{DOWN}’f1,f3,f5,f7′ octave selection”
170 PRINT”{DOWN}’f2,f4,f6,f8′ waveform{DOWN}”
180 PRINT”hang on, setting up frequency table…”
190 S=13*4096+1024: DIM F(26): DIM K(255)
200 FOR I=0 TO 28: POKE S+I,0: NEXT
210 F1=7040: FOR I=1 TO 26: F(27-I)=F1*5.8+30: F1=F1/2^(1/12): NEXT
220 K$=”q2w3er5t6y7ui9o0p@-*\^”
230 FOR I=1 TO LEN(K$): K(ASC(MID$(K$,I)))=I: NEXT
240 PRINT “{UP}{SPACE*38}”
250 AT=0:DE=0:SU=15:RE=9:SV=SU*16+RE:AV=AT*16+DE:WV=16:W=0:M=1:OC=4:\
HB=256:Z=0
260 FOR I=0 TO 2: POKE S+5+I*7,AT*16+DE: POKES+6+I*7,SU*16+RE
270 POKE S+2+I*7,4000 AND 255: POKE S+3+I*7,4000/256: NEXT
280 POKE S+24,15: REM+16+64:poke s+23,7
300 GET A$:IF A$=”” THEN 300
310 FR=F(K(ASC(A$)))/M: T=V*7: CR=S+T+4: IF FR=Z THEN 500
320 POKE S+6+T,Z: REM finish dec/sus
325 POKE S+5+T,Z: REM finish att/rel
330 POKE CR,8: POKE CR,0: REM fix off
340 POKE S+T,FR-HB*INT(FR/HB): REM set lo
350 POKE S+1+T,FR/HB: REM set hi
360 POKE S+6+T,SV: REM set dec/sus
365 POKE S+5+T,AV: REM set att/rel
370 POKE CR,WV+1: FOR I=1 TO 50*AT: NEXT
375 POKE CR,WV: REM pulse
380 IF P=1 THEN V=V+1: IF V=3 THEN V=0
400 GOTO 300
500 IF A$=”{F1}” THEN M=1: OC=4: GOTO 300
510 IF A$=”{F3}” THEN M=2: OC=3: GOTO 300
520 IF A$=”{F5}” THEN M=4: OC=2: GOTO 300
530 IF A$=”{F7}” THEN M=8: OC=1: GOTO 300
540 IF A$=”{F2}” THEN W=0: WV=16: GOTO 300
550 IF A$=”{F4}” THEN W=1: WV=32: GOTO 300
560 IF A$=”{F6}” THEN W=2: WV=64: GOTO300
570 IF A$=”{F8}” THEN W=3: WV=128: GOTO300
580 IF A$=” ” THEN P=1-P: GOTO 300
590 IF A$=”{CLEAR}” THEN 200
600 GOTO 300
800 PRINT”hit a key”
810 GET A$: IF A$=”” THEN 810: WAIT FOR A KEY
820 PRINT A$: RETURN
stop tok64
begin 644 pianokey.prg
M`0@6″%H`CR!024%.3R!+15E”3T%21“Z”&0`F2*3(!(@’2`=(,(@’2`=(!T@
MPB`=(!T@PB`=(!T@(@!=”&X`F2(@$B`=(!T@PB`=(!T@’2#”(!T@’2#”(!T@
M’2`B`(`(>`”9(B`2(!T@’2#”(!T@’2`=(,(@’2`=(,(@’2`=(“(`HPB”`)DB
M(!(@PB#”(,(@PB#”(,(@PB#”(,(@PB#”(,(@(@#&”(P`F2(@$E'”5\)%PE+”
M5,)9PE7″2<)/PE#”0,(JPEXB`.T(E@”9(A$G4U!!0T4G($9/4B!33TQ/($]2
M(%!/3%E02$].24,B`!0)H`”9(A$G1C$L1C,L1C4L1C<G($]#5$%612!314Q%
M0U1)3TXB`#0)J@”9(A$G1C(L1C0L1C8L1C@G(%=!5D5&3U)-$2(`8@FT`)DB
M2$%.1R!/3BP@4T545$E.1R!54″!&4D51545.0UD@5$%”3$4N+BXB`(@)O@!3
MLC$SK#0P.3:J,3`R-#H@AB!&*#(V*3H@AB!+*#(U-2D`HPG(`($@2;(P(*0@
M,C@Z()<@4ZI)+#`Z(((`X0G2`$8QLC<P-#`Z(($@2;(Q(*0@,C8Z($8H,C>K
M22FR1C&L-2XXJC,P.B!&,;)&,:TRKB@QK3$R*3H@@@`!”MP`2R2R(E$R5S-%
M4C54-EDW54DY3S!00″TJ7%XB`”<*Y@”!($FR,2″D(,,H2R0I.B!+*,8HRBA+
M)”Q)*2DILDDZ(((`5PKP`)D@(I$@(“`@(“`@(“`@(“`@(“`@(“`@(“`@(“`@
M(“`@(“`@(“`@(“`@(“(`I@KZ`$%4LC`Z1$6R,#I35;(Q-3I21;(Y.E-6LE-5
MK#$VJE)%.D%6LD%4K#$VJD1%.E=6LC$V.E>R,#I-LC$Z3T.R-#I(0K(R-38Z
M6K(P`-L*!`&!($FR,””D(#(Z()<@4ZHUJDFL-RQ!5*PQ-JI$13H@EU.J-JI)
MK#<L4U6L,3:J4D4`”PL.`9<@4ZHRJDFL-RPT,#`P(*\@,C4U.B”7(%.J,ZI)
MK#<L-#`P,*TR-38Z(((`+@L8`9<@4ZHR-“PQ-3H@CRLQ-BLV-#I03TM%(%,K
M,C,L-P!%”RP!H2!!)#J+($$DLB(B(*<@,S`P`’D+-@%&4K)&*$LHQBA!)”DI
M*:U-.B!4LE:L-SH@0U*R4ZI4JC0Z((L@1E*R6B”G(#4P,`”9″T`!ER!3JC:J
M5″Q:.B”/($9)3DE32″!$14,O4U53`+D+10&7(%.J-:I4+%HZ((\@1DE.25-(
M($%45″]214P`UPM*`9<@0U(L.#H@ER!#4BPP.B”/($9)6″!/1D8`^@M4`9<@
M4ZI4+$92JTA”K+4H1E*M2$(I.B”/(%-%5″!,3P`6#%X!ER!3JC&J5″Q&4JU(
M0CH@CR!3150@2$D`-`QH`9<@4ZHVJE0L4U8Z((\@4T54($1%0R]355,`4@QM
M`9<@4ZHUJE0L058Z((\@4T54($%45″]214P`<@QR`9<@0U(L5U:J,3H@@2!)
MLC$@I”`U,*Q!5#H@@@”‘#'<!ER!#4BQ75CH@CR!054Q310″F#’P!BR!0LC$@
MIR!6LE:J,3H@BR!6LC,@IR!6LC“L`R0`8D@,S`P`-`,]`&+($$DLB*%(B”G
M($VR,3H@3T.R-#H@B2`S,#“\`S^`8L@022R(H8B(*<@3;(R.B!/0[(S.B”)
M(#,P,“0#0@”BR!!)+(BAR(@IR!-LC0Z($]#LC(Z((D@,S`P`#`-$@*+($$D
MLB*((B”G($VR.#H@3T.R,3H@B2`S,#“40T<`HL@022R(HDB(*<@5[(P.B!7
M5K(Q-CH@B2`S,#“<@TF`HL@022R(HHB(*<@5[(Q.B!75K(S,CH@B2`S,#“
MD@TP`HL@022R(HLB(*<@5[(R.B!75K(V-#H@B3,P,`”S#3H”BR!!)+(BC”(@
MIR!7LC,Z(%=6LC$R.#H@B3,P,`#/#40″BR!!)+(B(“(@IR!0LC&K4#H@B2`S
M,#“X@U.`HL@022R(I,B(*<@,C`P`.P-6`*)(#,P,`#]#2`#F2)(250@02!+
M15DB`”`.*@.A($$D.B”+($$DLB(B(*<@.#$P.B”2(($@02!+15D`+`XT`YD@
(020Z((X““`
`
end
APPENDIX K
CONVERTING STANDARD BASIC PROGRAMS TO COMMODORE 64 BASIC
If you have programs written in a BASIC other than Commodore BASIC, some minor adjustments may be necessary before running them on the Commodore-64. We’ve included some hints to make the conversion easier.
String Dimensions
Delete all statements that are used to declare the length of strings. A statement such as DIM A$(I,J), which dimensions a string array for J elements of length I, should be converted to the Commodore BASIC statement DIM A$(J).
Some BASICs use a comma or an ampersand for string concatenation. Each of these must be changed to a plus sign, which is the Commodore BASIC operator for string concatenation.
In Commodore-64 BASIC, the MID$, RIGHT$, and LEFT$ functions are used to take substrings of strings. Forms such as A$(I) to access the Ith character in A$, or A$(I,J) to take a substring of A$ from position I to J, must be changed as follows:
Other BASIC Commodore 64 BASIC
A$(I)=X$ A$=LEFT$(A$,I-1)+X$+MID$(A$,I+1)
A$(I,J)=X$ A$=LEFT$(A$,I-1)+X$+MID$(A$,J+1)
Multiple Assignments
To set B and C equal to zero, some BASICs allow statements of the form:
10 LET B=C=0
Commodore 64 BASIC would interpret the second equal sign as a logical operator and set B = -1 if C = 0. Instead, convert this statement to:
10 C=0:B=0
Multiple Statements
Some BASICs use a backslash to separate multiple statements on a line. With Commodore 64 BASIC, separate all statements by a colon (:).
MAT Functions
Programs using the MAT functions available on some BASICs must be rewritten using FOR…NEXT loops to execute properly.
APPENDIX L
ERROR MESSAGES
This appendix contains a complete list of the error messages generated by the Commodore-64, with a description of causes.
BAD DATA String data was received from an open file, but the program was expecting numeric data.
BAD SUBSCRIPT The program was trying to reference an element of an array whose number is outside of the range specified in the DIM statement.
BREAK Program execution was stopped because you hit the <STOP> key.
CAN’T CONTINUE The CONT command will not work, either because the program was never RUN, there has been an error, or a line has been edited.
DEVICE NOT PRESENT The required I/O device was not available for an OPEN, CLOSE, CMD, PRINT#, INPUT#, or GET#.
DIVISION BY ZERO Division by zero is a mathematical oddity and not allowed.
EXTRA IGNORED Too many items of data were typed in response to an INPUT statement. Only the first few items were accepted.
FILE NOT FOUND If you were looking for a file on tape, and END-OF-TAPE marker was found. If you were looking on disk, no file with that name exists.
FILE NOT OPEN The file specified in a CLOSE, CMD, PRINT#, INPUT#, or GET#, must first be OPENed.
FILE OPEN An attempt was made to open a file using the number of an already open file.
FORMULA TOO COMPLEX The string expression being evaluated should be split into at least two parts for the system to work with, or a formula has too many parentheses.
ILLEGAL DIRECT The INPUT statement can only be used within a program, and not in direct mode.
ILLEGAL QUANTITY A number used as the argument of a function or statement is out of the allowable range.
LOAD There is a problem with the program on tape.
NEXT WITHOUT FOR This is caused by either incorrectly nesting loops or having a variable name in a NEXT statement that doesn’t correspond with one in a FOR statement.
NOT INPUT FILE An attempt was made to INPUT or GET data from a file which was specified to be for output only.
NOT OUTPUT FILE An attempt was mode to PRINT data to a file which was specified as input only.
OUT OF DATA A READ statement was executed but there is no data left unREAD in a DATA statement.
OUT OF MEMORY There is no more RAM available for program or variables. This may also occur when too many FOR loops have been nested, or when there are too many
GOSUBs in effect.
OVERFLOW The result of a computation is larger than the largest number allowed, which is 1.70141884E+38.
REDIM’D ARRAY An array may only be DIMensioned once. If an array variable is used before that array is DIM’d, an automatic DIM operation is performed on that array
setting the number of elements to ten, and any subsequent DIMs will cause this error.
REDO FROM START Character data was typed in during an INPUT statement when numeric data was expected. Just re-type the entry so that it is correct, and the
program will continue by itself.
RETURN WITHOUT GOSUB A RETURN statement was encountered, and no GOSUB command has been issued.
STRING TOO LONG A string can contain up to 255 characters.
SYNTAX ERROR A statement is unrecognizable by the Commodore 64. A missing or extra parenthesis, misspelled keywords, etc.
TYPE MISMATCH This error occurs when a number is used in place of a string, or vice-versa.
UNDEF’D FUNCTION A user defined function was referenced, but it has never been defined using the DEF FN statement.
UNDEF’D STATEMENT An attempt was made to GOTO or GOSUB or RUN a line number that doesn’t exist.
VERIFY The program on tape or disk does not match the program currently in memory.
APPENDIX M
MUSIC NOTE VALUES
This appendix contains a complete list of Note#, actual note, and the values to be POKED into the HI FREQ and LOW FREQ registers of the sound chip to produce the indicated note.
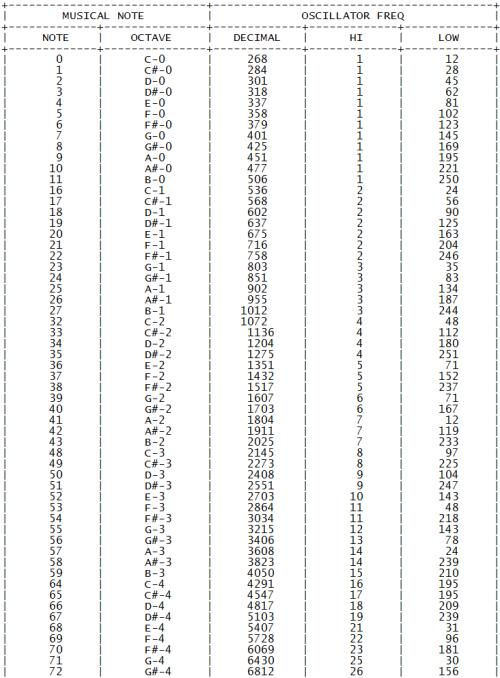
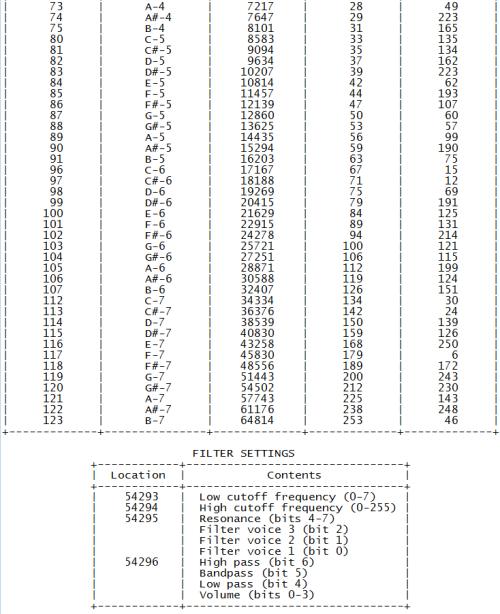
APPENDIX N
BIBLIOGRAPHY
Addison-Wesley
“BASIC and the Personal Computer”, Dwyer and Critchfield
Compute
“Compute’s First Book of PET/CBM”
Cowbay Computing
“Feed Me, I’m Your PET Computer”, Carol Alexander
“Looking Good with Your PET”, Carol Alexander
“Teacher’s PET-Plans, Quizzes, and Answers”
Creative Computing
“Getting Acquainted With Your VIC 20”, T. Hartnell
Dilithium Press
“BASIC Basic-English Dictionary for the PET”, Lorry Noonan
“PET BASIC”, Tom Rugg and Phil Feldman
Faulk Baker Associates
“MOS Programming Manual”, MOS Technology
Hoyden Book Co.
“BASIC From the Ground Up”, David E. Simon
“I Speak BASIC to My PET”, Aubrey Jones, Jr.
“Library of PET Subroutines’,’, Nick Hampshire
“PET Graphics”, Nick Hampshire
“BASIC Conversions Handbook, Apple, TRS-80, and PET”, David A. Brain, Phillip R. Oviatt, Paul J. Paquin, and Chandler P. Stone
Howard W. Sams
“The Howard W. Sams Crash Course in Microcomputers”, Louis E. Frenzel, Jr.
“Mostly BASIC: Applications for Your PET”,
Howard Berenbon
“PET Interfacing”, James M. Downey and Steven M. Rogers
“VIC 20 Programmer’s Reference Guide”, A. Finkel, P. Higginbottom, N. Harris, and M. Tomczyk
Little, Brown & Co.
“Computer Games for Businesses, Schools, and Homes”, J. Victor Nagigian, and William S. Hodges
“The Computer Tutor: Learning Activities for Homes and Schools”, Gary W. Orwig, University of Central Florida, and William S. Hodges
McGraw-Hill
“Hands-On BASIC With a PET”, Herbert D. Peckman
“Home and Office Use of VisiCalc”, D. Castlewitz, and L. Chisauki
Osborne/McGraw-Hill
“PET/CBM Personal Computer Guide”, Carroll S. Donahue
“PET Fun and Games”, R. Jeffries and G. Fisher
“PET and the IEEE”, A. Osborne and C. Donahue
“Some Common BASIC Programs for the PET”, L. Poole, M. Borchers, and C. Donahue
“Osborne CP/M User Guide”, Thorn Hogan
“CBM Professional Computer Guide”
“The PET Personal Guide”
“The 8086 Book”, Russell Rector and George Alexy
P. C. Publications
“Beginning Self-Teaching Computer Lessons”
Prentice-Hall
“The PET Personal Computer for Beginners”, S. Dunn and V. Morgan
Reston Publishing Co.
“PET and the IEEE 488 Bus (GPIB)”, Eugene Fisher and C. W. Jensen
“PET BASIC-Training Your PET Computer”, Roman Zamora, Wm. F. Carrie, and B. Allbrecht
“PET Games and Recreation”, M. Ogelsby, L. Lindsey, and D. Kunkin
“PET BASIC”, Richard Huskell
“VIC Games and Recreation”
Telmas Courseware Ratings
“BASIC and the Personal Computer”, T. A. Dwyer, and M. Critchfield
Total Information Services
“Understanding Your PET/CBM, Vol. 1, BASIC Programming”
“Understanding Your VIC”, David Schultz
Commodore Magazines provide you with the most up-to-date information for your Commodore 64. Two of the most popular publications that you should seriously consider subscribing to are:
COMMODORE — The Microcomputer Magazine is published bimonthly and is available by subscription ($15.00 per year, U.S., and $25.00 per year, worldwide).
POWER/PLAY — The Home Computer Magazine is, published quarterly and is available by subscription ($10.00 per year, U.S., and $15.00 per year worldwide).
APPENDIX O
SPRITE REGISTER MAP
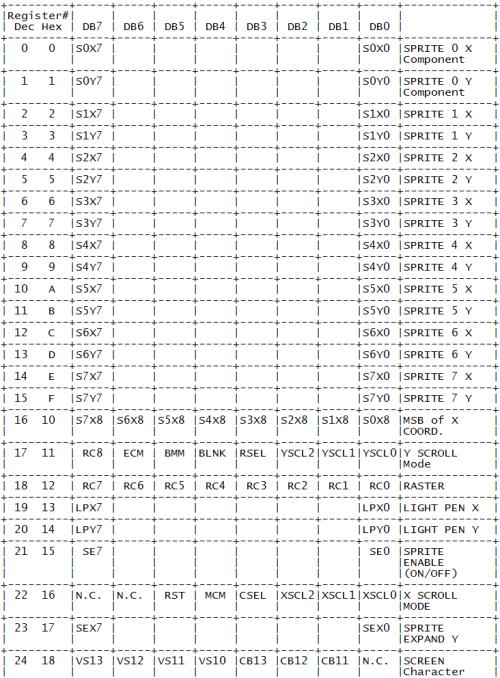
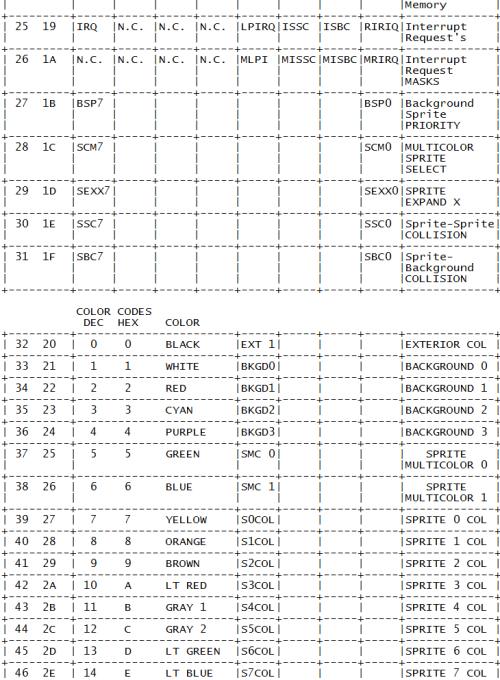
![]()
LEGEND:
ONLY COLORS 0-7 MAY BE USED IN MULTICOLOR CHARACTER MODE.
APPENDIX P
COMMODORE 64 SOUND CONTROL SETTINGS
This handy table gives you the key numbers you need to use in your sound programs, according to which of the Commodore 64’s 3 voices you want to use. To set or adjust a sound control in your BASIC program, just POKE the number from the second column, followed by a comma (,) and a number from the chart … like this: POKE 54276,17 (Selects a Triangle Waveform for VOICE 1).
Remember that you must set the VOLUME before you can generate sound. POKE 54296 followed by a number from 0 to 15 sets the volume for all 3 voices.
It takes 2 separate POKEs to generate each musical note … for example POKE 54273,34: POKE 54272,75 designates low C in the sample scale bellow.
Also … you aren’t limited to the numbers shown in the tables. If 34 doesn’t sound “right” for a low C, try 35. To provide a higher SUSTAIN or ATTACK rate than those shown, add two or more SUSTAIN numbers together. (Examples: POKE 54277,96 combines two attack rates (32 and 64) for a combined higher attack rate … but … POKE 54277,20 provides a low attack rate (16) and a medium decay rate (4).
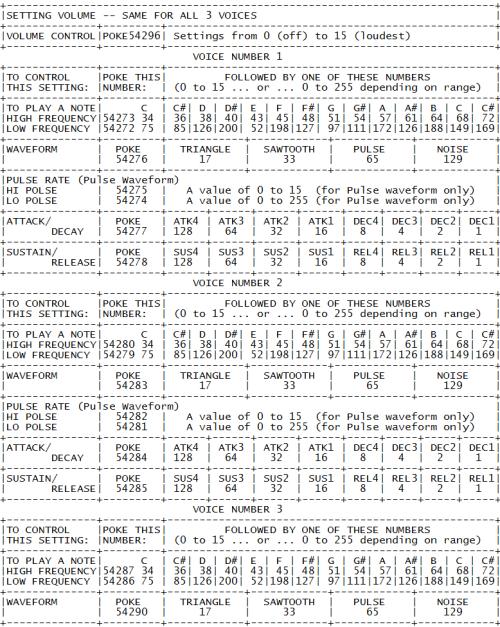
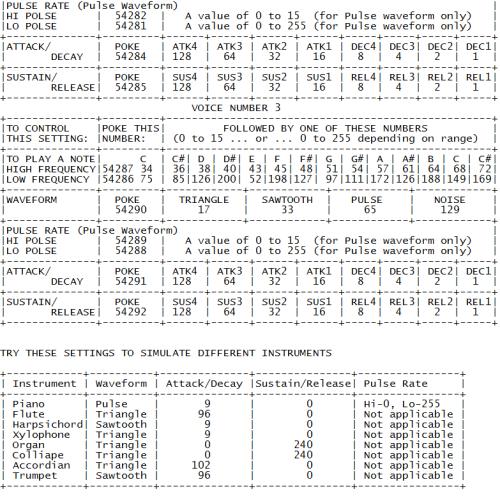
MEANINGS OF SOUND TERMS
ADSR — Attack/Decay/Sustain/Release
Attack — Rate sound rises to peak volume
Decay — Rate sound falls from peak volume to Sustain level
Sustain — Prolong note at certain volume
Release — Rate at which volume falls from Sustain level
Waveform — “Shape” of sound wave
Pulse — Tone quality of Pulse Waveform
NOTE: Attack/Decay and Sustain/Release settings should always be POKEd in your program BEFORE the Waveform is POKEd.
INDEX
A
Abbreviations, BASIC commands, D
Accesories, INTRODUCTION, A
Addition, 2.4-2.5, C
AND operator, 5.4, C
Animation, 4.1, 5.6, 6.2, E, G
Arithmetic, Operators, 2.4-2.5, C
Arithmetic, Formulas, 2.4-2.5, C, H
Arrays, 8.3-8.6
ASC function, 4.8, C, F
ASCII character codes, F
B
BASIC
abbreviations, D
commands, C
numeric functions, C
operators, 2.4, C
other functions, C
statements, C
string functions, C
variables, 3.3, C
Bibliography, N
Binary arithmetic, 6.3-6.4
Bit, 6.3-6.4
Business aids, A
Byte, 6.4
C
Calculations, 2.4-2.6
Cassette tape recorder (audio), 1.1, 2.3
Cassette tape recorder (video), 1.3
Cassette port, 1.1
CHR$ function, 3.3, 4.3, 4.8, 5.3, C, F, K
CLR statement, C
CLR/HOME key, 2.1, 3.1, 4.2
Clock, C
CLOSE statement, B, C
Color
adjustment, 1.5
CHR$ codes, 5.3
keys, 5.1-5.2
memory map, 5.5, G
PEEKS and POKES, 5.4
screen and border, 5.4-5.5, G
Commands, BASIC, C
Commodore key, (see graphic keys)
Connections
optional, 1.3
rear, 1.1
side panel, 1.1
TV/Monitor, 1.2
CONT command, C
ConTRoL key, 1.5, 2.1
COSine function, C
CuRSoR keys, 1.4, 2.1, 3.2
Correcting errors, 3.2
Cursor, 1.4
D
DATASSETTE recorder, (see cassette tape recorder, audio)
Data, loading and saving (disk), 2.3, C
Data, loading and saving (tape), 2.3, C
DATA statement, 6.2, 6.3, 7.4, 7.6, 8.1, C
DEFine statement, C
Delay loop, 5.4, 5.8
DELete key, 2.1
DIMension statement, 8.4, C
Division, 2.4-2.5, C
Duration, (see FOR … NEXT)
E
Editing program, 2.1, 3.2
END statement, 3.4, C
Equal, not-equal-to, signs, 2.4-2.5, 3.4, C
Equations, 3.4, C
Error messages, 2.4, L
Expansion port, I
EXPonent function, C
Exponentiation, 2.4-2.5, C
F
Files, (tape), 2.3, B, C
Files, (disk), 2.3, C
FOR statement, 3.5, C
FRE function, C
Functions, C
G
Game controls and ports, 1.1, I
GET statement, 4.4, C
GET# statement, C
Getting started, 2.1-2.6
GOSUB statement, C
GOTO (GO TO) statement, 3.1, C
Graphic keys, 2.1, 5.1-5.2, 5.4, E
Graphic symbols, (see graphic keys)
Greater than, 3.4, C
H
Hyperbolic functions, H
I
IEEE-488 Interface, A
IF … THEN statement, 3.4, C
INPUT statement, 4.3, C
INPUT# statement, C
INSerT key, 2.1, 3.2
INTeger function, 4.5, C
I/O pinouts, I
I/O ports, 1.1-1.3
J
Joysticks, 1.1, I
K
Keyboard, 2.1-2.2
L
LEFT$ function, C
LENgth function, 6.4, C
Less than, 3.4, C
LET statement, C
LIST command, 3.1-3.2, C
LOAD command, 2.3, C
LOADing programs from tape, 2.3, C
LOADing programs from disk, 2.3, C
LOGarithm, C
Loops, 3.5, 4.2-4.3
Lower Case characters, 2.1
M
Mathematics
formulas, 2.4-2.5
function table, H
symbols, 2.4-2.5, 3.4
Memory maps, 5.5, G, O, P
MID$ function, 6.4, C
Modulator, RF, 1.2-1.3
Multiplication, 2.4-2.5, C
Music, 7.1-7.8
N
Names
program, 2.3, C
variable, 3.3, C
NEW command, 3.1, C
NEXT statement, 3.5, C
NOT operator, C
Numeric variables, 3.3
O
ON statement, C
OPEN statement, C
Operators
arithmetic, 2.4, C
logical, C
relational, 3.4, C
P
Parentheses, 2.5
PEEK function, 5.4, 5.6
Peripherals, 1.1-1.3
POKE statement, 5.4
Ports, I/O, 1.1, I
POS function, C
PRINT statement, 2.4, C
PRINT# statement, C
Precedence, 2.5
Programs
editing, 2.1, 3.2
line numbering, 3.1
loading/saving (tape), 2.3, C
loading/saving (disk), 2.3, C
Prompt, 4.3
Q
Quotation marks, 2.4
R
RaNDom function, 4.5-4.8, C
Random numbers, 4.5-4.8
READ statement, 8.1-8.2, C
Reading from tape, B
REMark statement, 4.2, C
Reserved words, (see Commands, BASIC)
RESTORE key, 2.1-2.2
RESTORE statement, 8.1, C
RETURN key, 2.1-2.2
RETURN statement, C
RIGHT$ function, C
RUN command, C
RUN/STOP key, 2.1, 3.1
S
SAVE command, 2.3, C
Saving programs (tape), 2.3, C
Saving programs (disk), 2.3, C
Screen memory maps, 5.5, G
SGN function, C
SHIFT key, 2.1-2.2
SINe function, C
Sound effects, 7.7-7.8
SPC function, 8.6, C
SPRITE EDITOR, INTRODUCTION
SPRITE graphics, 6.1-6.3
SQuaRe function, C
STOP command, C
STOP key, 2.1
String variables, 3.3
STR$ function, C
Subscripted variables, 8.3
Subtraction, 2.4-2.5, C
SYNTAX ERROR, 2.4
SYS statement, C
T
TAB function, C
TAN function, C
TI variable, C
TI$ variable, C
Time clock, C
TV connections, 1.2-1.3
U
Upper/Lower Case mode, 2.1, E
USR function, C
User defined function, (see DEF)
V
VALue function, 6.4, C
Variables
array, 8.3-8.6, C
dimensions, 8.4-8.6, C
floating point, 3.3, C
integer, 3.3, C
numeric, 3.3, 4.3, C
string ($), 3.3, 4.3, C
VERIFY command, C
Voice, 7.1-7.8, P
W
WAIT command, C
Writing to tape, B
Z,
Z-80, INTRODUCTION, A
Commodore hopes you’ve enjoyed the COMMODORE 64 USER’S GUIDE. Although this manual contains some programming information and tips, it is NOT intended to be a Programmer’s Reference Manual. For those of you who are advanced programmers and computer hobbyists Commodore suggests that you consider purchasing COMMODORE 64 PROGRAMMER’S REFERENCE GUIDE available through your local Commodore dealer.
In addition updates and corrections as well as programming hints and tips are available in the COMMODORE and POWER PLAY magazines, on the COMMODORE database of the COMPUSERVE INFORMATION NETWORK, accessed through a VICMODEM.
COMMODORE 64 QUICK REFERENCE CARD
SIMPLE VARIABLES
TYPE NAME RANGE
Real XY +/-1.70141183E+38
+/-2.93873588E-39
Integer XY% +32767…-32768
String XY$ 0 to 255 characters
X is a letter (A-Z). Y is a letter or number (0-9). Variable names can be more than 2 characters, but only the first two are recognized.
ARRAY VARIABLES
TYPE NAME
Single Dimension XY(5)
Two-Dimension XY(5,5)
Three-Dimension XY(5,5,5)
Arrays of up to eleven elements (subscripts 0-10) can be used where needed. Arrays with more than eleven elements need to be DIMensioned.
ALGEBRAIC OPERATIONS
= Assigns value to variable
– Negation
^ Exponentiation
* Multiplication
/ Division
+ Addition
– Subtraction
RELATION AND LOGICAL OPERATORS
= Equal
<> Not Equal
< Less Than
> Greater Than
<= Less Than or Equal To
>= Greater Than or Equal To
NOT Logical “Not”
AND Logical “And”
OR Logical “Or”
Expressions equals 1 if true, 0 if false.
SYSTEM COMMANDS
LOAD “NAME” Loads a program from tape
SAVE “NAME” Saves a program on tape
LOAD “NAME”,8 Loads a program from disk
SAVE “NAME”,8 Saves a program to disk
VERIFY “NAME” Verifies that program was SAVEd without errors
RUN Executes a program
RUN xxx Executes program starting at line xxx
STOP Halts execution
END Ends execution
CONT Continues program execution from line where program was halted
PEEK(X) Returns contents of memory location X
POKE X,Y Changes contents of location X to value Y
SYS xxxxx Jumps to execute a machine language program, starting at xxxxx
WAIT X,Y,Z Program waits until contents of location X, when EORed with Z and ANDed with Y, is nonzero.
USR(X) Passes value of X to a machine language subroutine
EDITING AND FORMATTING COMMANDS
LIST Lists entire program
LIST A-B Lists from line A to line B
REM Message Comment message can be listed but is ignored during program execution
TAB(X) Used in PRINT statements. Spaces X positions on screen
SPC(X) PRINTs X blanks on line
POS(X) Returns current cursor position
CLR/HOME Positions cursor to left-up corner of screen
SHIFT CLR/HOME Clears screen and places cursor in “Home” position
SHIFT INS/DEL Inserts space current cursor position
INST/DEL Deletes character at current cursor position
CTRL When used with numeric color key, selects text color. May be used in PRINT statement.
CRSR Keys Moves cursor up, down, left right on screen
Commodore Key When used with SHIFT selects between upper/lower case and graphic display mode. When used with numeric key, selects optional text color
ARRAYS AND STRINGS
DIM A(X,Y,Z) Sets maximum subscripts for A; reserves space for (X+1)*(Y+1)*(Z+1) elements starting at A(0,0,0)
LEN(X$) Returns number of characters in X$
STR$(X) Returns numeric value of X, converted to a string
VAL(X$) Returns numeric value of X$, up to first nonnumeric character
CHR$(X) Returns ASCII character whose code is X
ASC(X$) Returns ASCII code for first character of X$
LEFT$(A$,X) Returns leftmost X characters of A$
RIGHT$(A$,X) Returns rightmost X characters of A$
MID$(A$,X,Y) Returns Y characters of A$ starting at character X
INPUT/OUTPUT COMMANDS
INPUT A$ or A PRINTs ‘?’ on screen and waits for user to enter a string or value
INPUT “ABC”;A PRINTs message and waits for user to enter value. Can also INPUT A$
GET A$ or A Waits for user type one-character value; no RETURN needed
DATA A,”B”,C Initializes a set of values that can be used by READ statement
READ A$ or A Assigns next DATA value to A$ or A
RESTORE Resets data pointer to start READing the DATA list again
PRINT “A=”;A PRINTs string ‘A=’ and value of A; ‘;’ suppresses spaces; ‘,’ tabs data to next field
PROGRAM FLOW
GOTO X Branches to line X
IF A=3 THEN 10 IF assertion is true THEN execute following part of statement. IF false, execute next line number
FOR A=1 to 10 Executes all statements between FOR and corresponding
STEP 2: NEXT NEXT, with A, going from 1 to 10 by 2. Step size is 1 unless specified
NEXT A Defines end of loop. A is optional
GOSUB 2000 Branches to subroutine starting at line 2000
RETURN Marks end of subroutine. Returns to statement following most recent GOSUB
ON X GOTO A,B Branches to Xth line number on list. If X=1 branches to A, etc.
ON X GOSUB A,B Branches to subroutine at Xth line number in list
ABOUT THE COMMODORE 64 USERS GUIDE…
Outstanding color … sound synthesis … graphics … computing capabilities … the synergistic marriage of state-of-the-art technologies. These features make the Commodore 64 the most advanced personal computer in its class.
The Commodore 64 User’s Guide helps you get started in computing, even if you’re never used a computer before. Through clear, step-by-step instructions, you are given an insight into the BASIC language and how the Commodore 64 can be put to a myriad of uses.
For those already familiar with microcomputers, the advanced programming sections and appendices explain the enhanced features of the Commodore 64 and how to get the most of these expanded capabilities.

Commodore Business Machines, Inc. — Computer Systems Division, 487 Devon Park Drive, Wayne, PA 19087.
DISTRIBUTED BY
Howard W. Sams & Co., Inc.
4300 W. 62nd Street, Indianapolis, Indiana 46268 USA
$12.95/22010
ISBN:0-672-22010-5